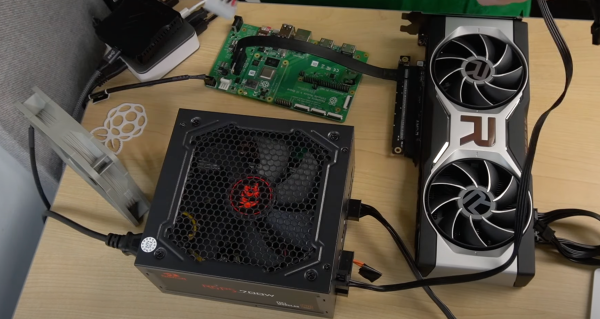
magicBlueSmoke-piStick-featured

How Do You Make A Raspberry Pi On A Stick?

We agree with [magic-blue-smoke] that one of the only things more fun than a standard Raspberry Pi 4 is the Compute Module form factor. If they are not destined to be embedded in a system, these need a breakout board to be useful. Each can be customized with a myriad board shapes and ports, and that’s where the real fun starts. We’ve already seen projects that include custom carrier boards in everything from a 3D Printer to a NAS and one that shows we can build a single-sided board at home complete with high-speed ports.

[magic blue smoke] used this ability to customize the breakout board as an opportunity to create a hackable media player “stick” with the Raspberry Pi built-in. We love that this Raspberry Pi CM4 TV Stick eliminates all the adapters and cables usually required to connect a Pi’s fiddly micro HDMI ports to a display and has heat sinks and an IR receiver to boot. Like a consumer media player HDMI stick, all you need to add is power. Continue reading “How Do You Make A Raspberry Pi On A Stick?”

3D Printer Control Board Packs A Raspberry Pi Compute Module 4

Traditionally, 3D printer control boards have used simplistic 8-bit microcontrollers to command the stepper drivers and ultimately move the machine where it needs to go. Newer boards have switched over to 32-bit microcontrollers, but they’re still relatively limited computationally. Because of this, a Raspberry Pi running OctoPrint is usually used to provide more complex features such as remote management and live video.

Looking to combine these different devices into a single all-in-one board, [pkElectronics] developed the Sigmoid S7P. With an STM32 microcontroller, TMC2209 stepper drivers, a Raspberry Pi Compute Module 4, and plenty of room for expansion, it promises to be a drop-in upgrade for essentially any 3D printer running on an open source firmware that could be ported over.

An earlier concept for the Sigmoid

According to [pkElectronics], the idea for the Sigmoid had been floating around for several years, but never got off the ground due to the difficulties in dealing with the SO-DIMM interface used by previous iterations of the Compute Module. But with the switch to smaller and denser connector for the CM4, the board finally started to take shape.

Whether you just used it as a convenient way to integrate OctoPrint into your printer, or want to get into something more advanced like Klipper, the Sigmoid S7P looks like a very exciting project. [pkElectronics] says they are considering producing the board commercially if there’s interest, so if you want one of these for your own custom 3D printer build, let them know.

NVMe Boot Finally Comes To The Pi Compute Module 4

Since the introduction of the Raspberry Pi Compute Module 4, power users have wanted to use NVMe drives with the diminutive ARM board. While it was always possible to get one plugged in through an adapter on the IO Board, it was a bit too awkward for serious use. But as [Jeff Geerling] recently discussed on his blog, we’re not only starting to see CM4 carrier boards with full-size M.2 slots onboard, but the Raspberry Pi Foundation has unveiled beta support for booting from these speedy storage devices.

The MirkoPC board that [Jeff] looks at is certainly impressive on its own. Even if you don’t feel like jumping through the hoops necessary to actually boot to NVMe, the fact that you can simply plug in a standard drive and use it for mass storage is a big advantage. But the board also breaks out pretty much any I/O you could possibly want from the CM4, and even includes some of its own niceties like an RTC module and I2S DAC with a high-quality headphone amplifier.

Once the NVMe drive is safely nestled into position and you’ve updated to the beta bootloader, you can say goodbye to SD cards. But don’t get too excited just yet. Somewhat surprisingly, [Jeff] finds that booting from the NVMe drive is no faster than the SD card. That said, actually loading programs and other day-to-day tasks are far snappier once the system gets up and running. Perhaps the boot time can be improved with future tweaks, but honestly, the ~7 seconds it currently takes to start up the CM4 hardly seems excessive.

NVMe drives are exciting pieces of tech, and it’s good to see more single-board computers support it. While it might not help your CM4 boot any faster, it definitely offers a nice kick in performance across the board and expands what the system is capable of. Continue reading “NVMe Boot Finally Comes To The Pi Compute Module 4”

Easy Carrier Board For The Compute Module 4 Shows You Can Do It, Too

The Raspberry Pi Compute Module 4 has got many excited, with a raft of new features bringing exciting possibilities. However, for those used to the standard Raspberry Pi line, switching over to the Compute Module form factor can be daunting. To show just how easy it is to get started, [timonsku] set about producing a quick and dirty carrier board for the module at home.

The Twitter thread goes into further detail on the design of the board. The carrier features HDMI, USB-A and USB-C ports, as well as a microSD slot. It’s all put together on a single-sided copper PCB that [timonsku] routed at home. The board was built as an exercise to show that high-speed signals and many-pin connectors can be dealt with by the home gamer, with [timonsku] sharing tips on how to get the job done with cheap, accessible tools.

The board may look rough around the edges, but that’s the point. [timonsku] doesn’t recommend producing PCBs at home when multi-layer designs can be had cheaply from overseas. Instead, it serves to show how little is really required to design a carrier board that works. Even four-layer boards can be had for under $10 apiece now, so there’s never been a better time to up your game and get designing.

For those eager to learn more about the CM4, we’ve got a full breakdown to get you up to speed!

New Raspberry Pi 4 Compute Module: So Long SO-DIMM, Hello PCIe!

The brand new Raspberry Pi Compute Module 4 (CM4) was just released! Surprised? Nope, and we’re not either — the Raspberry Pi Foundation had hinted that it was going to release a compute module for the 4-series for a long while.

The form factor got a total overhaul, but there’s bigger changes in this little beastie than are visible at first glance, and we’re going to walk you through most of them. The foremost bonuses are the easy implementation of PCIe and NVMe, making it possible to get data in and out of SSDs ridiculously fast. Combined with optional WiFi/Bluetooth and easily designed Gigabit Ethernet, the CM4 is a connectivity monster.

One of the classic want-to-build-it-with-a-Pi projects is the ultra-fast home NAS. The CM4 makes this finally possible.

If you don’t know the compute modules, they are stripped-down versions of what you probably think of as a Raspberry Pi, which is officially known as the “Model B” form-factor. Aimed at commercial applications, the compute modules lack many of the creature comforts of their bigger siblings, but they trade those for flexibility in design and allow for some extra functionality.

The compute modules aren’t exactly beginner friendly, but we’re positively impressed by how far Team Raspberry has been able to make this module accessible to the intermediate hacker. Most of this is down to the open design of the IO Breakout board that also got released today. With completely open KiCAD design files, if you can edit and order a PCB, and then reflow-solder what arrives in the mail, you can design for the CM4. The benefit is a lighter, cheaper, and yet significantly more customizable platform that packs the power of the Raspberry Pi 4 into a low-profile 40 mm x 55 mm package.

So let’s see what’s new, and then look a little bit into what is necessary to incorporate a compute module into your own design.

Continue reading “New Raspberry Pi 4 Compute Module: So Long SO-DIMM, Hello PCIe!”