Expanding On The Creation Of Collapsible Containers

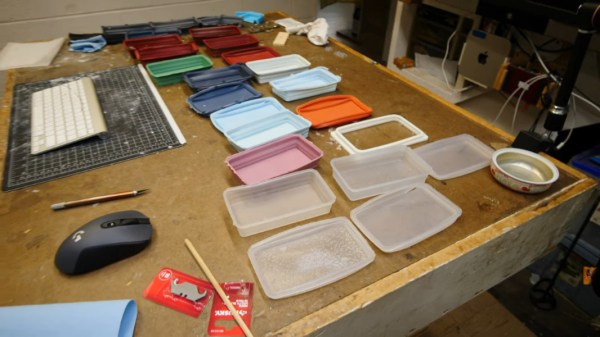
You might remember that industrial designer [Eric Strebel] tried to make a collapsible silicone container with 3D printed molds a few weeks ago, and was finally successful after dozens of attempts. Someone commented that commercial containers are molded in the collapsed position instead of the expanded position, so naturally, [Eric] had to try it once he saw the photographic proof of these molds.

Adding sand to a partially-cured silicone piece so it will take the shape of the expanded mold.This time around, [Eric] made things easier on himself by adding some handles to the mold and using both wax and spray mold release before pouring in the degassed silicone. The first one was a failure —  he had let it cure the whole time in the collapsed mold, and it just didn’t want to stay expanded. On the second attempt, [Eric] decided to pull the piece while it was curing, about 5 1/2 hours into the process.

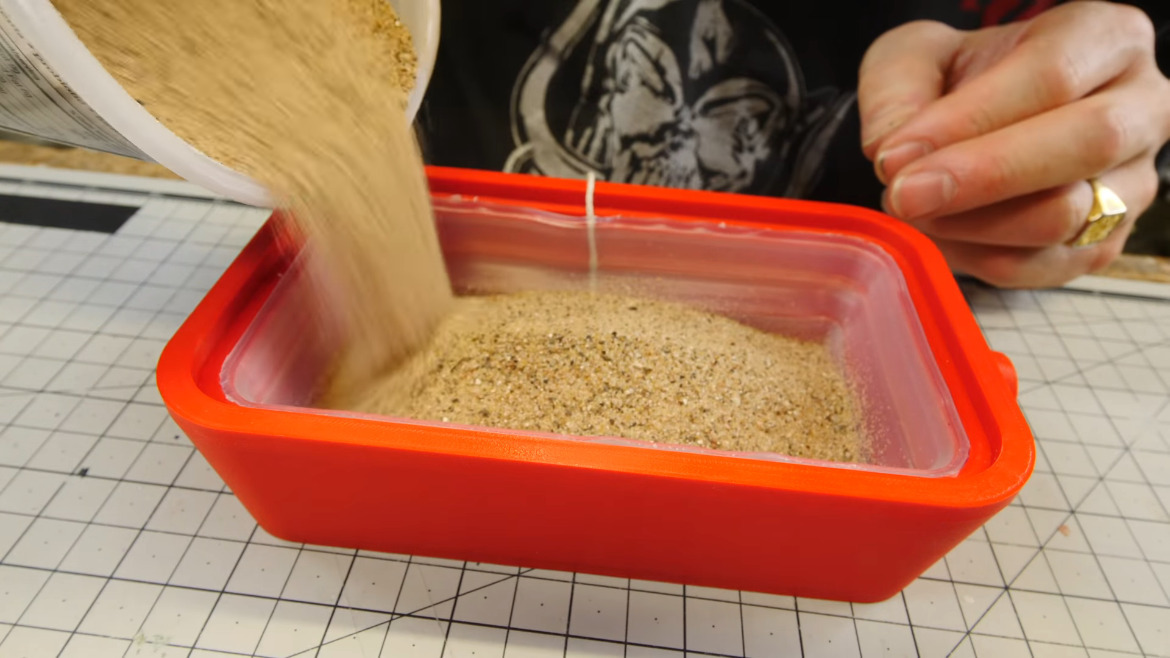
After carefully de-molding the piece, he pressed it into the grooves of one of the older molds from the days of molding containers in the expanded state. Then he filled it with sand and let it cure the rest of the way. That worked out quite well, but even so, [Eric] made a third attempt that he pulled after 3.5 hours or so when the silicone was still sticky.  He did the sand trick again, but this time, he ran a piece of string up the wall and over the edge so that the air that gets trapped under the sand can escape. The final result looks great, albeit a little bit floppy, but [Eric] fits the final product into a frame that makes them much sturdier. Check out the process in the video after the break.

Did you miss the first installment? It’s worth a look into the science of creating collapsible walls.

Continue reading “Expanding On The Creation Of Collapsible Containers”

How To Make A Collapsible Container Without Breaking Down

How hard could it be to make a collapsible silicone container? Turns out, it’s really, really hard — collapsible containers have rigid guidelines. Just ask [Eric Strebel], who failed dozens of times before finally getting it right (video, embedded below).

[Eric] started with an SLA-printed two-part mold and a silicone formulation with a Shore durometer of A 40 — this is the measure of hardness for silicone, polymers, and elastomers in the sense that the piece will resist indentation. The first twenty-four attempts all came out looking great, but not a single one of them would collapse and stay collapsed.

Eventually, [Eric] went back to the drawing board and played with the angles of the flex points, the thickness of the living hinges, and the wall thicknesses, which have to be strong enough to stay collapsed.

For attempt #25, [Eric] took the part out of the mold about three hours in and tried curing it in the collapsed state. Persistence paid off, and the part finally collapses and stays that way. Get yourself some popcorn and check out the fail-fest after the break. You know what we always say — fail fast, fail often.

[Eric] has made many molds both from silicone and for silicone. Some of them are really big!

Continue reading “How To Make A Collapsible Container Without Breaking Down”

Sunshine In A Bag

Ultraviolet (UV) curing lamps are crucial if you have a resin 3D printer or work with UV adhesives. Some folks line an old Amazon shipping box with foil and drop a spotlight somewhere inside. Other folks toss their work under the all-natural light source, Sol. Both options have portability and reliability problems, but [AudreyObscura] has it covered with a reflective mat lined with UV strip lights. This HackadayPrize2020 finalist exemplifies the ideal that good ideas are often simple, and this has a remarkably short bill of materials.

Foil bubble insulation is the medium because it provides structure and reflectivity, but it doesn’t cooperate with the LED strip’s adhesive. [AudreyObscura] demonstrates that masking tape as an interfacing layer makes everyone play nicely. A fine example of an experienced maker, their design covers bundling wires and insulating connections to keep everything tidy and isolated. With different arrangements, this can form a tunnel lit from above, a chimney lit from the walls, or you can drape it over some scaffolding.

If you need something a little less portable for your own shop you might consider a mirror-filled chamber. One nice touch to add is a turntable to help make sure the entire part is cured without any missing areas.

Continue reading “Sunshine In A Bag”