Swiss Army Keys

swiss-army-keys

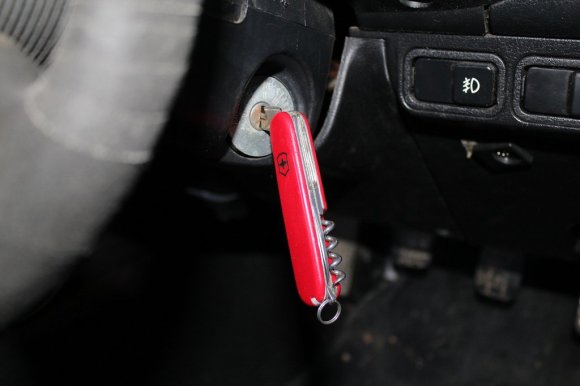
This isn’t a hack that shows you how to start a car without the keys. It’s a way to ditch the bulky keyring for a set of fold-out keys. [Colonel Crunch] removed the blades from the pocket knife and replaced them with the two keys for his car (one is ignition and door locks, the other opens the trunk). He didn’t take pictures of the process, but he did link to this unrelated guide on how it’s done.

About one minute into the video after the break we see each step in the build process. First the plastic trim is removed from either side of the knife. The blades are basically riveted on; there’s a pin which holds them in and either side of it has been pressed to that it can no longer move through the holes in the frame. To get around this one side is ground off with a rotary tool, and the pin is then tapped out with a hammer. The removed blade/scissors/tool is used as a template to cut the body of the key down to size and shape.  The pin is then hammered back into place before putting the plastic trim back on.

Continue reading “Swiss Army Keys”

A Table Saw To Cut Solar Panels

saw

Steampunker extraordinaire [Jake von Slatt] loves the idea of solar-powered garden lights soaking up the sun’s rays during the day and powering a LED in the evening. Commercially available solar lanterns, as [Jake], you, me, and everyone else on the planet have discovered, are universally terrible and either don’t have solar panels large enough to charge a battery, or only last a year or so. [Jake]’s solution was to make his own solar lanterns and in the process he came up with a great way of cutting his own solar panels.

[Jake] turned to ebay to source 100 3″ x 6″ solar panels for about $30. These are broken panels, factory rejects, but still are able to produce the 0.5 Volts they should. Since these are rather large panels for a solar lantern, [Jake] needed a way to cut these panels into manageable sizes.

To cut the panels, [Jake] made a box to fit a Dremel with a right angle attachment and a port for a vacuum cleaner. There’s a sled for the panels with markings at 40, 80, 75, and 150 mm so the panels can be quickly cut to size with a diamond cutting wheel.

After the boards are cut, [Jake] checks them out with a multimeter to be sure they’re producing the half volt they should. After that, it’s a simple matter of soldering them together and adding them to his solar lanterns.

Adding A Laser Sight To Your Drill Press In Just A Few Easy Steps

drill-press-laser-sight

[Derek] was using his Dremel drill press to prep a bunch of PCBs, and found that it was getting difficult to focus on the spinning drill bit each time to line it up with the solder pads on the boards. He figured that a laser sight would help move the process along, but since no off the shelf solution was available for his press, he built one of his own.

He bought a cheap desk lamp with a flexible metal neck, which he disassembled, saving the flexible metal sheath. He installed a conduit clamp on one end of the neck, and a laser module at the other. [Derek] then mounted the laser arm on the press’ crow’s nest aiming it at the tip of the drill bit.

As you can see in the video below, the ability to easily position the drill bit using the laser helps him make quick work of any PCB.

Continue reading “Adding A Laser Sight To Your Drill Press In Just A Few Easy Steps”

Handheld CNC Fabrication

While loading a 3D model into a CNC program and letting a machine go to town on a piece of stock is awesome, there’s a lot to be said about the artistry, craftsmanship and tactile feedback of carving a project by hand. [Amit Zoran] and [Joe Paradiso] created a nice bridge between these two approaches with their hand-held, but still digitally controlled milling device they call The Free D.

The Free D looks like your run-of-the-mill handheld Dremel tool with an engraving attachment and a few extra servos attached for good measure. These extra parts serve a purpose: the tool actually keeps track of its own orientation in 3D space. With the help of a few magnets underneath the work piece, the Free D sends its orientation back to a computer running a CNC program. When the computer detects the engraving attachment is getting too close to the desired shape, the Free D automatically retracts its own tool head.

Given the insanity or expense in building our buying a mill with six degrees of freedom, the Free D looks like it could be a useful tool in a few model maker’s toolboxes. Check out the demo video of the Free D after the break.

Continue reading “Handheld CNC Fabrication”

Building A CNC Router To Call My Own

As with most writers for [HAD], I enjoy doing projects as much as I like writing about them. As a mechanical Engineer that writes for a blog mostly about electronics, a CNC router seemed like something I needed in my garage. Building a router like this requires a bit of expertise in both electronics and mechanics, so it seemed like a good challenge.

This router kit, made by Zen Toolworks, comes fairly complete frame-wise, but requires a lot of knowledge on the electrical side to get things running correctly. In order to make it look decent and work correctly, I had to rely on some zip-tie and basic diagnostic skills that I’ve honed as a former engineering Co-op and technician. Also, I had to figure out a way to cheaply stack everything in my garage as we park two cars there (the footprint is 14″ x 22″, so I consider that a success).

One of the bigger challenges that I still have to overcome with this project is learning “G-code” and how to use software to generate it.  Although I’ve done some basic programming already, as seen in the video after the break, there’s still much to learn. I’d hope that having this tool around can lead to better projects as I won’t have to be restricted to simple milled lines and circles anymore.

Continue reading “Building A CNC Router To Call My Own”

Excuse Me IPad, May I Cut In?

[LostSpawn] loves his clamshell keyboard for the iPad, but he had one major beef with the design. When the tablet is installed in the landscape orientation there’s no way to plug in a dock connector for charging or other uses. He pulled out the cutting tools and altered the case to meet his needs.

The case is a Rocketfish iCapsule which provides a Bluetooth keyboard when you need to do a lot of typing. The hard shell does a great job of protecting the iPad, but who wants to pull it out to charge it? The thing that we can’t believe is that there’s a slot milled in the other side of the bezel so that you can plug in headphones. How did they overlook the dock connector?

To add it himself, [LostSpawn] started by drilling a dotted line along the portion that he wanted to remove. He finished shedding material with a Dremel and then set about sanding it flat. To make sure it didn’t look too much like a hack he used Bondo to build up the working edge and then sanded and painted for a factory finish. Now he can plug in the cable or an SD card adapter like the one seen to the right of the keyboard.

CNC Mill Built From Junk And Hardware Store Parts

[Csshop] is setting a new bar for building an inexpensive CNC mill. Not only did he complete his build at a very low cost, but it seems to work quite well too. Check out the video after the break to see the device cut out thin wood parts for a toy plane.

The majority of the build uses scrap wood for the body of the mill. The business end of the device is a flexible rotary attachment for a Dremel tool which takes a lot of the weight and bulk out of the gantry assembly. Old flat bed scanners were gutted for the precision ground rod and bearings, as well as the three stepper motors used to drive the axes. An Arduino board controls the device, commanding the stepper motors via EasyDriver boards.

Once the hardware is assembled there’s still a fair amount of work to do. [Csshop] builds his designs in Google Sketchup, but some conversion is necessary to arrive at code that the Arduino will understand. He’s got a second project write-up that covers the software side of things.

Continue reading “CNC Mill Built From Junk And Hardware Store Parts”