3D Printering: Laser Cutting 3D Objects

3D printing can create just about any shape imaginable, but ask anyone who has babysat a printer for several hours, and they’ll tell you 3D printing’s biggest problem: it takes forever to produce a print. The HCI lab at Potsdam University has some up with a solution to this problem using the second most common tool found in a hackerspace. They’re using a laser cutter to speed up part production by a factor of twenty or more.

Instead of printing a 3D file directly, this system, Platener, breaks a model down into its component parts. These parts can then be laser cut out of acrylic or plywood, assembled, and iterated on much more quickly.

You might think laser-cut parts would only be good for flat surfaces, but with techniques like kerf bending, and stacking layer upon layer of material on top of each other, just about anything that can be produced with a 3D printer is also possible with Platener.

To test their theory that Platener is faster than 3D printing, the team behind Platener downloaded over two thousand objects from Thingiverse. The print time for these objects can be easily calculated for both traditional 3D printing and the Platener system, and it turns out Platener is more than 20 times faster than printing more than thirty percent of the time.

You can check out the team’s video presentation below, with links to a PDF and slides on the project’s site.

Thanks [Olivier] for the tip.

Continue reading “3D Printering: Laser Cutting 3D Objects”

robot arm laser cutter

Robot Arm Wields Laser, Cares Not For Your Safety

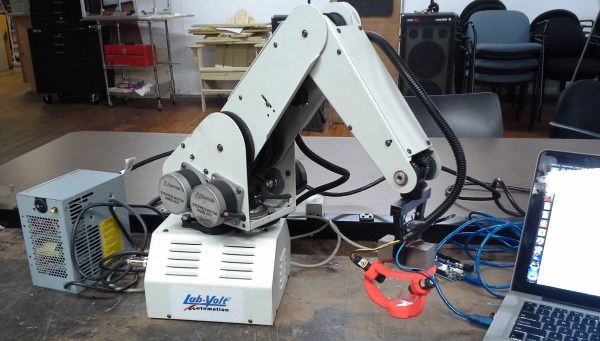
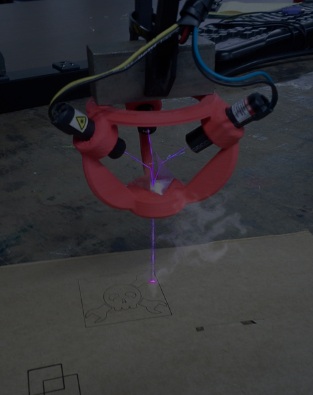
Here at Hackaday we’ve covered a bunch of DIY laser diode projects. And for good reason, they are just cool. We’ve seen people add lasers to their 3D printers, stick one in a milling machine, use a highly modified scanner and even build a simple XY gantry specifically for the task. To say the least there is definitely a wide range of methods for moving around a laser but we’ve never seen anything like what [Sp4rky] sent in to us. He and his friends outfitted an old educational robot arm with a laser.

The robot arm is a 5 axis Armdroid 5100 picked up from eBay for a couple hundred dollars. It didn’t come with a controller but all of the stepper drivers were housed in the base of the arm. After a little tinkering around with the inputs the team was able to get the arm to move by sending serial commands from a PC, through an Arduino Mega which then sends the appropriate signals to the uni-polar stepper drivers. That was the easy part of the build.

The hard part was getting the arm to hold the laser at a consistent angle and height above the table. Inverse Kinematics to the rescue! Since the desired position of the laser, as well as the length of the arm segments is known, mathematical formulas can be derived to determine the necessary arm segment and joint positions while moving the laser around. The process flow starts out with an image in Inkscape, g-code is then generated with this plugin, then sent to the Arduino running a modified version of GRBL that has the inverse kinematic formulas. The Arduino directly controls the stepper drivers and the robotic arm moves. The Arduino also controls 3 constant-current laser drivers made from LM317 regulators. Three laser drivers, why?

Triple Laser Robot[Sp4rky] got his laser diode modules out of surplus medical equipment and, unfortunately, the rated optical wattage was quite low. Since he had 3 diodes, he decided to try to combine the 3 low power beams into one high power beam. This can be done using a prism. A prism splits sunlight into a rainbow of colors because each wavelength(color) of light that passes through the prism is bent a different amount. Since the laser diodes only put out one wavelength of light, the beam bends but does not split or diffuse. A 3D printed bracket points each laser diode at a 3-sided pyramidal prism which sends the combined beam of light straight out the bottom towards the object to be cut or engraved.
This project is cool enough that we would have covered it even if [Sp4rky] wasn’t burning a Hackaday logo. Although it doesn’t hurt for anyone wanting their project to get covered!

Modern Tools From Old Table Saws

Somehow or another, the modern hackerspace isn’t centered around table saws, drill presses, band saws, lathes, or mills. The 3D printer and laser cutter are the tools of the future. No one has yet figured out how to build a 3D printer or laser cutter out of several hundred pounds of cast iron, so until then [Chad] will lead the charge modifying old table saws into these modern machine tools.

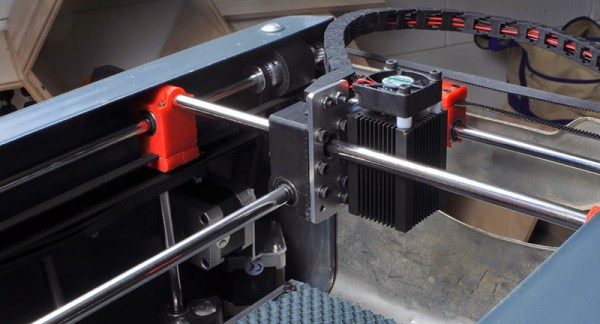
The build logs for the laser engraver and 3D printer are pic heavy and text lean, but there’s enough detail to make a few educated guesses. Both of these machines use Craftsman table saws from the early to mid 1950s for the chassis. Inside each chassis, the rails, belts, and shafts that make up a Cartesian bot are installed, and the electronics are tucked gently inside.

There’s a lot of creativity in this build; the electronics for the 3D printer are tucked away in the shell of the old motor. For the laser cutter, the focus adjustment is the same knob that used to lock the blade at an angle.

While this may look like a waste of two beautiful tools, keep in mind these are equivalent to contractor saws you can pick up at Home Depot for $500 today. They’re not professional cabinet saws, they just look really pretty. They’re still a solid piece of metal, though, and refurbishing the frames into useful tools is probably the best thing you could do with them.

Thanks [Frankie] for the tip.

Hackaday Links Column Banner

Hackaday Links: March 29, 2015

Every once in a while, the Hackaday Overlords have a Hardware Developers Didactic Galactic in San Francisco. Last week was #06 featuring [Mike Estee] from Othermill and Hackaday writer [Joshua Vasquez] talking about synthesizing an SPI slave in an FPGA. Video here.

It’s no secret that [Fran] is building a DSKY – the part of the Apollo guidance computer that was on-screen in Apollo 13. It’s time for a project update, and here’s where she stands: if anyone has a source of JAN-spec Teledyne 420 or 422-series magnetic latching relays (they’re in a TO-5 package), contact [Fran]. The backplane connector has been identified; it’s a Teradyne I/O 100 series connector with a 120mil spacing. Contact [Fran] if you know where to get them.

Let’s say you want a carbon fiber quadcopter frame. What’s the most reasonable thing you can do? 3D print a CNC machine, obviously. That’s a 200mm FPV racer cut from 1mm and 3mm carbon fiber sheets, but the real story here is the CNC machine. It’s a PortalCyclone, and even the cable chains are 3D printed.

What does an AMOLED display look like up close? Pretty cool, actually. That’s 20x magnification, and it’s not a Bayer filter. Can anyone fill us in on the reason for that?

Laser cutters are tricky if you want to do grayscale or half tones. [oni305] made an Inkscape extension to generate better GCode for engraving with a laser cutter.

19″ racks have no dimensions that are actually 19″. Also 2x4s aren’t 2 inches by four inches. Somehow, a 2×4 server rack works.

Playing Space Invaders With Real Fire And Lasers

Making a Space Invaders game is up there on the list of most unconventional things you could do with a laser cutter. In watching the tiny little ships burst into flames, [Martin Raynsford’s] modification has got to be one of the more dangerous looking ones we’ve seen as well.

[Martin] always had the desire to make a tangible version of the classic game. Since his Whitetooth A1 laser cutter already contained the bulk of the moving hardware needed, not to mention an actual high powered laser to “pew pew” with, he decided it was the perfect starting point for such a project. The game is played looking down into the cutter since the laser of course fires in that direction, however a basic webcam is mounted to the laser assembly so that you can view the game on a computer screen at the proper perspective. An Arduino Mini is responsible for stepper control, allowing the player to jog back and forth and fire with a keyboard. [Martin] added an extra gear to the z-axis bed-leveler so that it could drive rows of paper invaders left and right across the bottom. Paperclips wedged into slots along a modified backboard hold each of the paper slips in place. This works ideally since they can be reloaded easily and won’t be maimed during use.

Due to the heat of the laser, landing a well positioned shot will likely nuke all of the nearby invaders as well, making for a theatrical inferno and easy win. Now to step up the difficulty level and figure out how to make them fire back…

Continue reading “Playing Space Invaders With Real Fire And Lasers”

How To Identify Plastics Before Laser Cutting Them

If you own a pickup truck, you’ll quickly find yourself making friends with people who just happen to need help moving next weekend. Trust me, it’s almost magical. And if you own a laser cutter (or work in a hacker/maker space that has one) you’ll get some odd requests to cut or engrave plastic items of unknown type. Before you do, you should read this (pdf) chemistry lab written by [David A. Katz] to learn how to identify what type of plastic it is.

There are several reasons why you don’t want to cut or engrave some types of materials. A few make a gooey mess that you’ll regret even trying. Others make a horrendous odor. Some hackerspaces will even charge you extra if you stink up the place (aka: malodorous material charge.) Some tend to catch on fire. Yikes.

But that’s not the worst of it. Some types of plastic release potentially deadly hydrogen chloride gas. It’s bad for the optics, it’s wreaks havoc on the electronics and mechanics of the machine, and could do a really good job of messing up your lungs forever. In the video after the break, you can see the flame test for such plastics in action at the NYC Resistor as they test several common items using nothing more than a blow torch and some copper wire. In short, if the flame test produces a green flame, do not put it in the laser.

If you want to see a good list of what is and what isn’t ok to cut, head on over to ATXHackerspace’s wiki. They will give you a nice run down with lots of notes and helpful hints as well.

Continue reading “How To Identify Plastics Before Laser Cutting Them”

Laser Cut Settlers Of Catan Board = Best Christmas Gift Ever

[JoshBaker] wanted to make something special for his brother this past Christmas.  He decided on making a wooden game board version of the Settlers of Catan game. [Josh] used CorelDraw to construct the vector images needed for the board. Then, he set out cutting the base, engraving and cutting out the many wooden pieces with a laser cutter. All the pieces were stained and then sealed with polyurethane. He assembled the base so that the removable hex tiles, ports, and resource numbers sit nicely in the recessed parts and don’t shift during gameplay. He complemented the board with tokens and game pieces that he hand-painted. [Josh] also created a new set of cards to fit with the board’s aesthetic.

The board is done incredibly well, not to mention beautiful to look at. The hex tiles’ designs are very detailed. The stained and engraved wood really adds to the atmosphere of the game. We featured a coffee table that would be perfect to play it on. [Josh] has listed all of the vector files for the version he gave his brother, as well as additional ones for the Cities and Knights Expansion. We wish we could have seen the look on his brother’s face when he got such an awesome Christmas gift!

[via Instructables]