Use The Internet To Get Your Kadabra To Evolve

If you grew up playing Pokemon Red or Blue, you might have moved far away from your childhood friends by now. If you’re still playing Pokemon Red or Blue, you can now literally reconnect with these friends using [Pepijn]’s new and improved Game Boy link that lets players trade Pokemon over the internet.

Based on [Pepijn]’s previous work building an Arduino-based Pokemon storage system (which was inspired by a separate project that was able to spoof trades), the device allows a Game Boy (including Pocket, Color, and Advance versions) to connect to the Internet via a Teensy shield. The online waiting room software is called TCPoke which facilitates the Internetting of the Game Boys. From there, all you have to do is connect via the project’s wiki!

The TCPoke software is available on the project’s site. Also, be sure to check out the video below which shows a demonstration of how the software works. There is noticeable delay compared to a direct link between Game Boys, but it functions very well. We didn’t see this link system work for a battle, but it would be interesting to see if it is possible. If so, you might never have to go to a Pokemon League meeting again!

Continue reading “Use The Internet To Get Your Kadabra To Evolve”

A Stack Of Boards For An Edison Breadboard Adapter

The Intel Edison is a neat piece of hardware, but the connector for the Edison is extremely intimidating and the Mini breakout board is incompatible with breadboards. What’s [Federico], a builder of Internet of Things to do? Etch their own breakout board.

The Mini Breakout board for the Intel Edison is the official ‘minimal’ offering for getting the Edison up and running with a mess of jumper wires and LEDs. While this breakout board handles the USB to UART bridge, power regulation, and exposes all the pins on the Edison connector, it is terrible for prototyping. It’s a 4×14 array of holes on a 0.1″ grid that are hidden underneath the Edison.

[Federico] handled this problem with a copper clad board and a little bit of ferric chloride. He jumped into Eagle and created a breakout board to turn the 4×14 pin grid into a more sensible breadboard-friendly layout.

The breadboard-friendly adapter doesn’t have level shifters, but by using the mini-breakout board between the Edison and the breadboard adapter [Federico] still has the UART to USB hardware and a battery charging circuit. Still, there’s room for improvement and we can’t wait to see what he comes up with next.

Temperature, Altitude, Pressure Display

During a recent trip to Bhutan, [electronut] wished for a device that would show the temperature and altitude at the various places he visited in the Kingdom. Back home after his trip, he built this simple Temperature, Altitude and Pressure Display Device using a few off the shelf parts.

Following a brief search, he zeroed in on the BMP 180 sensor which can measure temperature and pressure, and which is available in a break-out board format from many sources. He calculates altitude based on pressure. The main parts are an Arduino Pro Mini clone, a BMP180 sensor and a Nokia 5110 LCD module. A standard 9V battery supplies juice to the device. A push button interface allows him to read the current parameters when pressed, thus conserving battery life.

Standard libraries allow him to interface the LCD and sensor easily to the Arduino. He wrapped it all up by enclosing the hardware in a custom laser cut acrylic box. The result is bigger than he would like it to be, so maybe the next iteration would use a custom PCB and a LiPo battery to shrink it in size. While at it, we think it would be nice to add a RTC and some sort of logging capability to the device so it can store data for future analysis. The schematic, code and enclosure drawing are available via his Github repository.

CRAYFIS Hijacks Our Cellphones For A Worldwide Cosmic Ray Detector

Although scientists have known about Ultra-High Energy Cosmic Rays (UHECRs) for years, nobody can pinpoint their origin. When these UHECRs hit the ground, however, they cause a widespread local disturbance called an air shower. This air shower is a wide dispersion of photons, muons, and electrons at sea level. The means of observing this air shower mandates a widespread geographic region for detecting them. One solution would be a very big detector. Physicists [Daniel] and [Michael] discovered an alternative to pricey hardware, though. By leveraging the CMOS sensors in our smartphones, they can borrow some CPU cycles on our phones to create a worldwide detector network.

According to their paper, the CMOS camera in our smartphones is sensitive to the spectrum of radiation induced by muons and photons from these air showers. With an app running on our phones, [Daniel], [Michael], and other scientists can aggregate the data from multiple detections in a similar region to better understand their origins.

If you’re concerned about CRAYFIS taking away from your talk or web-browsing time, fear not; it runs in the background when a power source has been detected, hopefully, when you are asleep. It’s not the first time we see scientists tap into our computing resources, but this is certainly an achievement made possible in only the last few years by the sensor-loaded smartphone that charges on many of our night stands. With over 1.5 billion smartphones active in the world, we’re thrilled to see a team cleverly leveraging a ubiquitous and already-well-distributed resource.

via [NPR]

robot arm laser cutter

Robot Arm Wields Laser, Cares Not For Your Safety

Here at Hackaday we’ve covered a bunch of DIY laser diode projects. And for good reason, they are just cool. We’ve seen people add lasers to their 3D printers, stick one in a milling machine, use a highly modified scanner and even build a simple XY gantry specifically for the task. To say the least there is definitely a wide range of methods for moving around a laser but we’ve never seen anything like what [Sp4rky] sent in to us. He and his friends outfitted an old educational robot arm with a laser.

The robot arm is a 5 axis Armdroid 5100 picked up from eBay for a couple hundred dollars. It didn’t come with a controller but all of the stepper drivers were housed in the base of the arm. After a little tinkering around with the inputs the team was able to get the arm to move by sending serial commands from a PC, through an Arduino Mega which then sends the appropriate signals to the uni-polar stepper drivers. That was the easy part of the build.

The hard part was getting the arm to hold the laser at a consistent angle and height above the table. Inverse Kinematics to the rescue! Since the desired position of the laser, as well as the length of the arm segments is known, mathematical formulas can be derived to determine the necessary arm segment and joint positions while moving the laser around. The process flow starts out with an image in Inkscape, g-code is then generated with this plugin, then sent to the Arduino running a modified version of GRBL that has the inverse kinematic formulas. The Arduino directly controls the stepper drivers and the robotic arm moves. The Arduino also controls 3 constant-current laser drivers made from LM317 regulators. Three laser drivers, why?

Triple Laser Robot
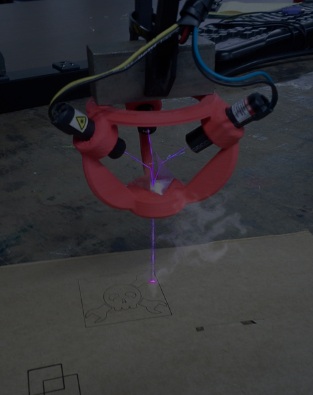
[Sp4rky] got his laser diode modules out of surplus medical equipment and, unfortunately, the rated optical wattage was quite low. Since he had 3 diodes, he decided to try to combine the 3 low power beams into one high power beam. This can be done using a prism. A prism splits sunlight into a rainbow of colors because each wavelength(color) of light that passes through the prism is bent a different amount. Since the laser diodes only put out one wavelength of light, the beam bends but does not split or diffuse. A 3D printed bracket points each laser diode at a 3-sided pyramidal prism which sends the combined beam of light straight out the bottom towards the object to be cut or engraved.

This project is cool enough that we would have covered it even if [Sp4rky] wasn’t burning a Hackaday logo. Although it doesn’t hurt for anyone wanting their project to get covered!

Reverse-Engineering A Wireless BBQ Thermometer

[Bob] has his own smoker and loves to barbecue, but doesn’t like spending all day checking on his smoker’s temperature. He thought about building his own wireless thermometer setup, which would have been pretty awesome, but then he had a better idea: why not hack an existing wireless barbecue thermometer? [Bob] purchased an off-the-shelf wireless BBQ thermometer and reverse-engineered its wireless protocol to make his own wireless thermometer setup.

The first problem [Bob] encountered was figuring out the frequency of the transmitter. Thankfully [Bob] had access to a spectrum analyzer, where he discovered the transmitter was running at 433.92MHz (a cheap RTL-SDR dongle would also get the job done). Next, [Bob] started digging into the manufacturer’s FCC filings and found that it actually called out the transmit frequency, which matched the transmit frequency he measured. He also found a ton of other helpful information in the filing, like a block diagram and full transmitter schematic.

[Bob] used a Radiometrix RF module to receive the thermometer’s signal. He hooked up the output to his logic analyzer to start decoding the protocol. After a quick visual analysis, [Bob] found that the signal was a preamble followed 13 bytes of Manchester-encoded data being transmitted at 2kbps. He started collecting data with known temperatures, created a table of the data, and began looking for patterns. After quite a bit of searching [Bob] was successfully able to find and parse the temperature values out of the data stream. [Bob] did a great job of documenting his process and results, so check out his writeup if you want to try it out yourself.

The Raspberry Pi Wearable Revolution

With the human URL [will.i.am] serving as Chief Creative Director of 3D Systems, and [Martha Stewart] selling her own line of 3D printer filament through MakerBot, more and more celebrities are piling onto the hacker, maker, and DIY revolution. Now, the partnership we’ve all been waiting for: the Raspberry Pi Foundation and [The Artist Formerly Known As Prince_logo] are teaming up to produce a line of Pi-based wearable electronics. The first product from this new, fashionable line of electronics is beyond anything you would expect. It’s called the Raspberry Beret, and it’s shaping up to be a Revolution in wearables.

The wearable Raspberry Beret is exactly what you would expect: a habadasher’s masterpiece that pairs equally well with figure skating costumes and skin-tight cloud print suits. Inside, though, is a new piece of hardware based on the Raspberry Pi compute module. This module includes a Bluetooth module that will sync with any Windows phone. The Raspberry Beret also includes enough sensors that will blow away everything from a Fitbit to the new Apple Watch. The Raspberet will keep track of your heart rate, activity, and exercise routine.

The Raspberry Beret is just the beginning; the Pi Foundation and [The Artist Formerly Known As Prince_logo] are also teaming up with OSH Park to produce a limited, special edition Raspberry Pi 2. This board will be clad in the beautiful OSH Park purple soldermask and sports 4GB of eMMC Flash. This Flash will not be usable; instead it will contain a remastered edition of Purple Rain that will play as a startup chime. There will be no option to skip the chime.

Pancakes.