IoT Archaeology Leads To API Resurrection

What happens when someone’s personal project is turned into a startup which becomes something of a publicity darling, then collapses with very little product shipped and takes all its customers’ money with it?

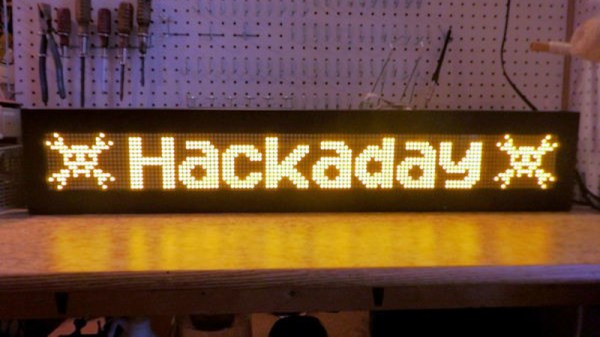
That’s the subject of a blog post from [Kevin Chung], who investigated the legacy of NYCTrainSign, a company whose product was an LED NYC subway sign and which has become a meme byword for a startup scam. Along the way he found himself reverse engineering its API, and eventually even purchasing the expired domain name to resurrect the API for any NYCTrainSigns that may still be out there.

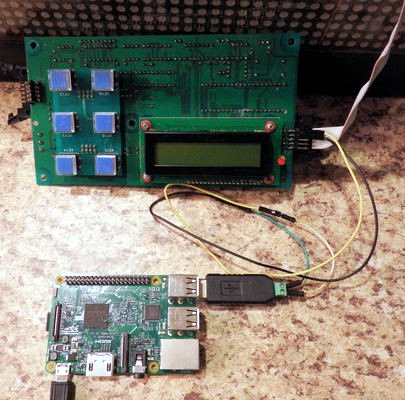
Securing a second-hand NYCTrainSign, he dismantled it to see what made it tick. Inside the handmade wooden case was an array of LED panels, driven by a Raspberry Pi 3 and an Adafruit LED panel HAT. This gave pause for thought, as the component choice gives rise to a very high BoM cost which was unsustainable given their habit of steep discounts.

The software proves straightforward enough to reverse engineer, and since the original domain was for sale he bought it and set up a replacement API. Do you have one of the few signs that made it to customers? Now you can run it again.

The rest of the piece tells a tale that will be familiar to startup veterans: one of far too much marketing, too many bosses, and too little engineering to create a viable product. The founders remain tight-lipped about what happened and where the money went, but since there are few more efficient money pits than a badly-run startup, it’s more likely that ill-advised spending is to blame than someone running off with suitcases of cash.

If you’d like a public transit sign without the dodgy start-up, we’ve got you covered.

Reverse Engineering Saves Trashed LED Panels

While out riding his bike, [Hammond Pearce] came across a dumpster overflowing with large LED panels. Despite the fact that the model numbers didn’t reveal anything helpful after some online searching, he decided to pedal off with as many as he could safely carry. The COVID-19 lockdown left him with only a limited set of tools, be he still managed to crack the protocol used to control his e-waste score and document it for our reading pleasure.

Between the helpful labels on the PCB silkscreen and the advice of a friend that used to work on digital road signs, it didn’t take [Hammond] long to get a general idea of what the panels were looking for in terms of power and control. Especially once he noticed the MBI5024 shift registers dotting the board.

The next step was to take an ATmega328PB based development board and start throwing data at the panel’s input lines to see if he could elicit a response. With careful attention and some custom code, he eventually figured out that each byte of data sent down the line would control a 4 x 2 section of LEDs.

Once he had the basics down, the next step was to start expanding his code to handle things like shapes, text, and daisy-chained panels. After posting some of his work to Reddit, cyber-sleuths determined that the protocol appeared to be some variation of HUB75, which gave [Hammond] hints on what some of the other pins in the connector might be used for. He’s released all of his code online for anyone who might find it useful, but since he still doesn’t know who made these panels and why there’s really no telling how many of them are actually floating around out there.

Figuring out how to talk to an unknown or undocumented piece of hardware can be intimidating, but success stories like these are reminders of why it’s worth putting the effort in. As we’ve seen, the difference between trash and treasure is often a keen eye and a few lines of code.

Reverse Engineering An Old Bus Display

When his makerspace was gifted a pair of Luminator LED signs of the sort you might see on the front of a bus, [PWalsh] decided to pull one apart to see what made it tick. Along the way, he managed to reverse engineer its control protocol and replace its original control board with a WiFi-connected Raspberry Pi. Now they can use the LED signs to show whatever they want; no bus required.

As they were designed for automotive use, the signs were wired for 12 volts DC. So the first order of business was fitting it with an AC/DC converter so it could be plugged into the wall. After he measured the display’s current consumption, [PWalsh] estimated it’s maximum energy consumption and determined an old ATX computer power supply was more than up to the task.

With the sign happily running battery-free, he could begin figuring out how to talk to it. Noticing a MAX485 RS-485 converter on the PCB, gave a pretty good idea of what language it was speaking, and with the aid of his trusty oscilloscope, he was able to suss out the baud rate. A cheap USB to RS-485 converter was then wired in between the sign and its control board so he could sniff the data passing over the line.

From there, the final piece of the puzzle was studying the captured data and figuring out the protocol. [PWalsh] was able to identify packet headers and ASCII characters, and pretty soon knew enough about how the sign communicated that he was able to remove the control board entirely and just push text and images to it right from the Pi. He’s even made his framework available for anyone else who might have a similar piece of bus-signage laying around.

Even if you’re not looking to add one of these signs to your lab, this project is a fantastic example of protocol reverse engineering with low-cost tools and simple techniques. We always love to see the process broken down step by step like this, and our hat’s off to [PWalsh] for delivering the goods in a big way.

This isn’t the first time we’ve seen these sort of LED signs get the “Internet of Things” treatment, and if you’re content with a somewhat scaled down version, you could always just build your own display rather than waiting on the local public transit vehicle to get parted out.

Zach Archer: Live Coding 500 Watts For ToorCamp

ToorCamp is a five-day open air tech camping event held every two years somewhere around the northwest corner of Washington state. Think of it as something like Burning Man, except you can survive for three hours without water, there aren’t a whole bunch of scenesters and Instagram celebs flying in on private planes, and everyone there can actually build something. Oh, and ToorCamp has delivery drones that will send you creme brulee. These mini creme brulees were probably made with the hot air gun hanging off a soldering station. Don’t worry, you’re getting fresh air that’ll balance out the heavy metal poisoning.

For last year’s ToorCamp, the biggest welcome sign was a 40-foot-long illuminated ToorCamp sign. This was designed, built and coded by Zach Archer, and he was at the 2018 Hackaday Superconference to give us the details on how he made it and how it was coded.

Continue reading “Zach Archer: Live Coding 500 Watts For ToorCamp”

Animated X-mas Sign

Sure, it may be two and a half months until Christmas. That doesn’t mean we can’t start building a few Christmas decorations. Last year, [RB] over at Embedded Lab made an animated Christmas sign using a simple microcontroller setup. This year, [RB] is adding a blinking LED border and doing the entire project with 74xx ICs.

The letters for this year’s sign were recycled from last years’. This time, however, two strings of 12 LEDs are used for the blinking border. The blinking circuitry uses a 74hc14 Schmitt trigger to provide the clock. A pair of 74hc595 shift registers turn each letter on one at a time. The speed is controlled with a small trim pot.

Using ICs to drive a series of lights in a pattern isn’t a new thing – you’d be hard pressed to not find a similar setup in the blinking panels of sci-fi shows of the 60s and 70s. Of course this sign doesn’t compare with what can be done with a microprocessor a lot of patience, it’s still a very nice build. Check out the video after the break to see the X-mas sign in action.

Continue reading “Animated X-mas Sign”