Reverse Engineering An Old Bus Display

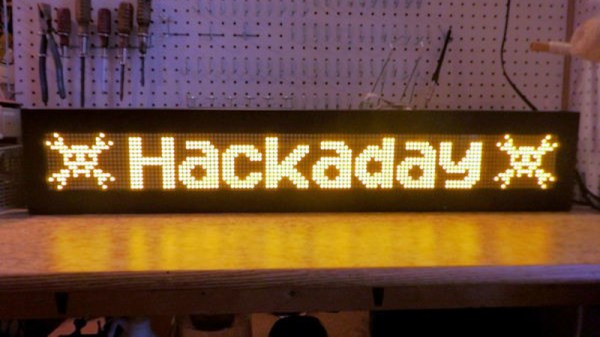
When his makerspace was gifted a pair of Luminator LED signs of the sort you might see on the front of a bus, [PWalsh] decided to pull one apart to see what made it tick. Along the way, he managed to reverse engineer its control protocol and replace its original control board with a WiFi-connected Raspberry Pi. Now they can use the LED signs to show whatever they want; no bus required.

As they were designed for automotive use, the signs were wired for 12 volts DC. So the first order of business was fitting it with an AC/DC converter so it could be plugged into the wall. After he measured the display’s current consumption, [PWalsh] estimated it’s maximum energy consumption and determined an old ATX computer power supply was more than up to the task.

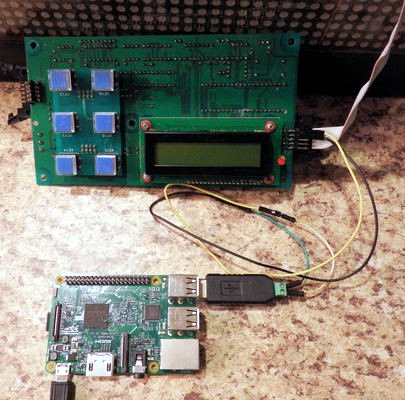
With the sign happily running battery-free, he could begin figuring out how to talk to it. Noticing a MAX485 RS-485 converter on the PCB, gave a pretty good idea of what language it was speaking, and with the aid of his trusty oscilloscope, he was able to suss out the baud rate. A cheap USB to RS-485 converter was then wired in between the sign and its control board so he could sniff the data passing over the line.

From there, the final piece of the puzzle was studying the captured data and figuring out the protocol. [PWalsh] was able to identify packet headers and ASCII characters, and pretty soon knew enough about how the sign communicated that he was able to remove the control board entirely and just push text and images to it right from the Pi. He’s even made his framework available for anyone else who might have a similar piece of bus-signage laying around.

Even if you’re not looking to add one of these signs to your lab, this project is a fantastic example of protocol reverse engineering with low-cost tools and simple techniques. We always love to see the process broken down step by step like this, and our hat’s off to [PWalsh] for delivering the goods in a big way.

This isn’t the first time we’ve seen these sort of LED signs get the “Internet of Things” treatment, and if you’re content with a somewhat scaled down version, you could always just build your own display rather than waiting on the local public transit vehicle to get parted out.

Code The Classics Is Coming

We feel sorry for youth of today. If you spend a few hours playing a modern video game and decide you want to write your own, there’s a big job ahead of you. Games now are as much performances as programs, with cinematic 3D renderings, polyphonic sound and music tracks, and detailed storylines. That wasn’t true 40 years ago, when you could play Pong and then think about writing your own version. The Raspberry Pi people must agree as they are taking preorders for a book called “Code the Classics.” In it, they interview designers of several classic arcade games and then show Python versions of the games you can run — and hack — yourself. You can see their video about the title, below.

The code is from Raspberry Pi founder [Eben Upton] and as you might expect the games aren’t necessarily faithful reproductions but inspired by the old arcade standards.

Continue reading “Code The Classics Is Coming”

Programmable Wrist Synth Pushes The Envelope

Synths are a ton of fun no matter how good or bad they sound. Really, there are no bad-sounding ones, it’s just that some are more annoying to listen than others to if you’re not the one making the beep boops. [Clem] had built a tiny LDR-based synth into a watch case a few years back and took it to many a Maker Faire, where it delighted and annoyed until it ultimately broke.

Naturally, it was time to make a new version that’s more capable. Whereas the first one was Atari-punk-console-meets-light-Theremin, this one has a bunch of inputs and can be programmed on the fly to record and play back bendable tones. It’s driven by an Arduino MKR, and the inputs are managed by an impressively squash bug-wired shift register. [Clem] used beefy switches this time in the hopes that this one will last longer. We think the slide pots are a great touch, as are the candy-colored knobs printed in PMMA.

Our favorite part is that [Clem] took advantage of the random states the microcontroller pins are in when it’s first powered on. If you don’t want to program any notes, you can use the ones generated at boot and just play around with those. Be sure to check out the build video after the break.

We’ve seen our share of synths, but few as delicious-looking as KELPIE from this year’s Hackaday Prize.

Continue reading “Programmable Wrist Synth Pushes The Envelope”

Stackable Open Source 3D Printer Enclosure

One of the unfortunate realities of desktop FDM 3D printing is that environmental factors such as ambient temperature and humidity can have a big impact on your results. Even with the exact same settings, a part that printed beautifully in the summer can warp right off the bed during the winter months. The solution is a temperature-controlled enclosure, but that can be a daunting project without some guidance. Luckily, [Jay Doscher] has spent the last few months designing a very impressive enclosure that he’s released to the community as open source.

While we’ve seen no shortage of DIY printer enclosures over the years, they tend to be fairly lightweight. But that’s not the case here. Obviously not wanting to leave anything to chance, [Jay] designed this enclosure with 2020 extrusion and aluminum side panels. You could probably sit on the thing with no ill-effects, which is good, since he also designed the enclosure to be stackable should your print farm need to expand vertically.

Of course, there’s more to this enclosure than just an aluminum box. It’s packed with features like an integrated Raspberry Pi for running Octoprint, internal and external environmental monitoring with the Adafruit SHT31-D, and a Logitech Brio 4K video camera to watch the action. While not currently implemented, [Jay] says he’s also working on an internal fire suppression system and a fan controller system which will circulate air inside the enclosure should things get a little too toasty.

The enclosure has been designed around the ever-popular Prusa i3 MK3/S, even going so far as to relocate the printer’s display to the outside so you don’t have to open the door to fiddle with the settings. But adapting it to whatever rig you happen to be running shouldn’t be a problem. Though admittedly, perhaps not as easy as adjusting an enclosure made out of metal shelving.

Continue reading “Stackable Open Source 3D Printer Enclosure”

Angela Sheehan Is Developing Wearable Tech With Whimsy

As a concept, wearable technology excites many of us, but in practice, it’s been hard to nail down. Up to this point, the most high-tech thing the average person might reasonably wear has been a wrist watch. Devices like Google Glass tried to push the state-of-the-art, but it arguably raised more questions than it answered. It demonstrated in a very public way that developing wearable technology that’s simultaneously visually appealing, useful, and robust enough to handle daily life is exceptionally difficult. If Google couldn’t pull it off, what hope do we lowly hackers have?

But maybe we’ve been going about things the wrong way. Compelling as the end result may seem, the move from wrist watches to head-mounted computers is simply too large of a technical and psychological leap to make. To help develop the skills and techniques necessary to build practical wearable electronics, it might help to take a slightly more fanciful approach.

It seems to be working pretty well for Angela Sheehan, at least. In her talk “Building Whimsical Wearables: Leveling Up Through Playful Prototyping” at the 2019 Hackaday Superconference, she went over some of the things she’s learned while developing her Color Stealing Fairy costume. The product of several years of iterative design, the costume is able to mimic colors seen in the environment through the use of a wireless sensor wand, and features a number of design elements that are critical to any successful wearable project.

Even if a custom RGB Fairy costume isn’t on your short list of projects, there’s information in this talk that will surely be of interest to anyone who’s even contemplated a wearable project. From technical aspects like battery placement to logistical considerations such as making adjustments for multiple wearers, Angela’s make-believe creation has become a testbed for real-world considerations.

Continue reading “Angela Sheehan Is Developing Wearable Tech With Whimsy”

Linux Fu: Debugging Bash Scripts

A recent post about debugging constructs surprised me. There were quite a few comments about how you didn’t need a debugger, as long as you had printf. For that matter, we’ve all debugged systems where you had nothing but an LED to flash or otherwise turn on to communicate with the user. However, it is hard to deny that a debugger can help with complex code.

To say you only need printf would be like saying you only need machine language. Technically accurate — you can do anything in machine language. But it sure makes things easier to have an assembler or some language to help you work out your problem. If you write a simple bash script, you can use the equivalent to printf — maybe that’s the echo command, although there is usually a printf command on a typical system, if you want to use it. However, there are other things you can do with bash including a pretty cool debugger if you know how to find it.

I assume you already know how to use echo and printf, but let’s dig into how to use trace execution line by line without the need for echo statements on every other line. Along the way, you’ll learn how to get started with the bash debugger.

Continue reading “Linux Fu: Debugging Bash Scripts”

A Tree Of LEDs That Blows Out Like A Candle

The beautiful workmanship in [Andrew]’s LED tree is gorgeous all on its own, but of course there’s more going on than meets the eye. ThisĀ  LED tree can be blown out like a candle and it even playfully challenges a user to blow out all the lights at once in a single breath.

Some of you may remember the fascinating example of an LED you can blow out like a candle which had the trick of using the LED itself as a sensor. Like any diode, the voltage drop across the LED changes very slightly based on temperature. By minimizing thermal mass with surface-mount LEDs and whisker-thin wires, it was possible to detect when the LED was being blown on.

The LED tree shown here uses the same basic principle, but with a few important changes. The electronics have been redesigned and improved, and the Arduino used in the original proof of concept is ditched for stacked custom PCBs. Each board has a diameter under 100 mm in order to take advantage of the fab house’s lower cost for small boards. [Andrew] says that while the boards required a lot of time-consuming hand soldering and assembly, the payoff was that five boards rang in at barely five dollars (plus shipping) and that’s hard to beat.

Watch the tree in action in the brief video embedded below.

Continue reading “A Tree Of LEDs That Blows Out Like A Candle”