When [JZSlenker] was challenged to find a creative way to destroy a bunch of compact discs that were burned incorrectly, he did not disappoint. He came up with a rather simple but fun contraption that launches the CD’s at high speeds and with a fast rate of fire. He doesn’t share many details about how this machine was built, but the 18 second video makes it pretty obvious how it works.
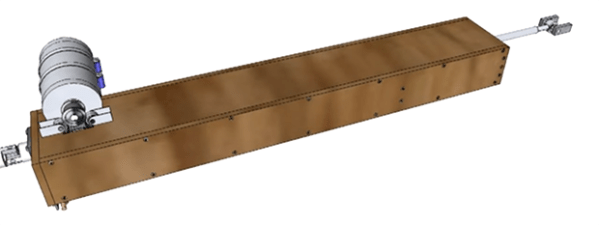
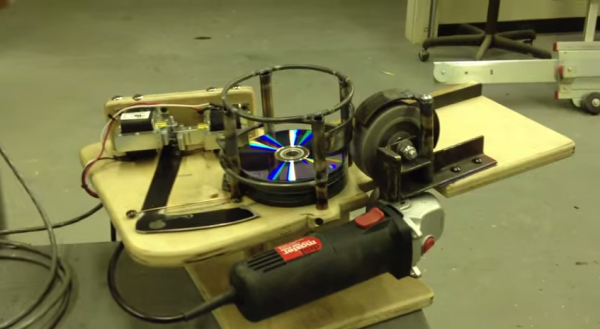
The CD gun is built mainly from a piece of plywood. This provides a flat base with which to mount the other components. A stack of compact discs is held in place by what appears to be a metal cage that was welded together. An inexpensive angle grinder is used as the propulsion mechanism. The grinding wheel is mounted just in front of the stack of CD’s in a vertical orientation. The wheel must be placed just high enough above the plywood base for a CD to fit in between the wheel and the base. This design is remarkably similar to the Sticker Gun which our own [Brian Benchoff] is building.
Some type of linear actuator is used as the firing mechanism. The actuator is hooked up to a thin piece of metal, cut into an L shape. It almost looks like a reaper tool. When a button is pressed, the actuator fires instantly. This pushes the metal hammer into the CD on the bottom of the stack. The CD is pressed forward into the grinder wheel which then shoots the CD into the air. Based on the below video, it looks like [JZSlenker] is able to fire at a rate of about three CD’s per second with this rig.
This has got to be a super-villain weapon for an upcoming movie, right? Maybe AOL-man?
Continue reading “Fully-Automatic CD Launcher Looks Dangerously Fun”