Status Light Tells You The Code Is Borked Again

status light

[Arthur] is teaching himself product development. Rather than create a few mock-up products, he’s taking the path of designing real devices he can use. His current device is a status light for automated software tests.  We’ve seen test and GitHub status lights before, however this is the first one to integrate with an outside web service. The status light’s state is based upon output from CodeShip, an online continuous deployment test engine.

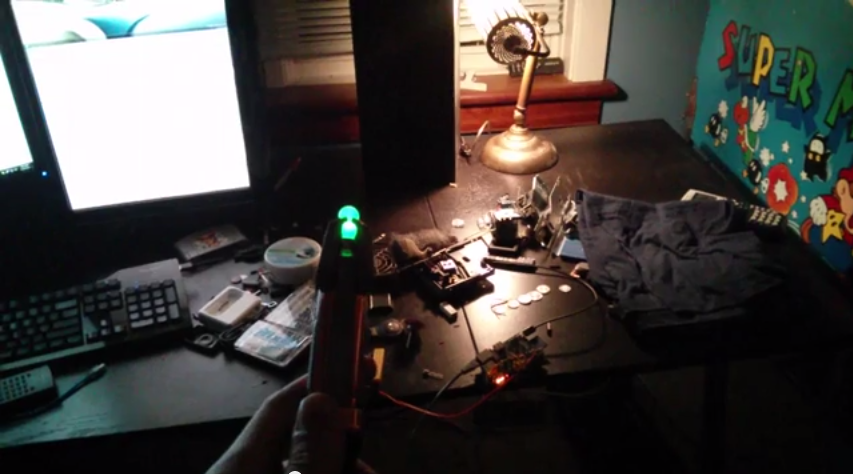
The electronic design is simple. An Electric Imp retrieves test status data from CodeShip. The Imp then sends the status data over two GPIO lines to an AdaFruit Trinket. The Trinket controls a NeoPixel ring. A green ring indicates all tests are passing. Purple means tests are in progress. A spinning red ring (of death) means one or more tests have failed. Power is supplied via a mini USB connector.

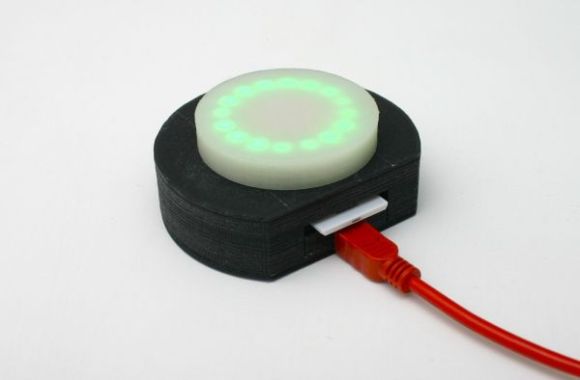
[Arthur] spent quite a bit of time on the mechanical design of the status light as well. All the parts are 3D printed. This allowed him to quickly go through several revisions of each part. We like the use of white PLA for a frosted effect on the top section of the light, as it diffuses the eye piercing glow from all those RGB LEDs. As a finishing touch, [Arthur] created a fake product page for his light. He doesn’t have any plans to sell it, but we hope he drops the source and STL files so we can create one of our own.

Continue reading “Status Light Tells You The Code Is Borked Again”

Inverted Christmas Tree Made Of Nespresso Tubes

1468516_376724969131752_925434023_n

What happens when you put a few geeks in a room with a curtain rod, 240 Nespresso tubes, some planks, some tape, fairy lights, and a Raspberry Pi? Well, apparently this!

There’s not too much information on how they made it, but there is a pretty extensive gallery of photos. When we consider how much packaging we waste, it’s nice to see some being reused for a project, at least temporarily! The Nespresso tubes are pretty nice looking which certainly lends itself to this project, but our real question is who drank all the coffee…

The LED fairy lights are voice controlled using a Raspberry Pi model B, nothing too fancy, but a nice added affect. Check out the video after the break — the voice commands are in French though!

Continue reading “Inverted Christmas Tree Made Of Nespresso Tubes”

Real Life Sonic Screwdriver For Home Automation

sonic

Any Doctor Who fans out there? [Pat] just sent us his project on home automation… using a Sonic Screwdriver!

Ever since he pre-ordered his Raspberry Pi at the beginning of February 2012, he knew he wanted to try his hand at home automation. The easy way was to use X10 outlets, but at $20+ an outlet, it’s not that affordable. Instead, he managed to find a rather cheap system on Amazon — RF controlled outlets. They only cost about $35 for a 5-pack!

It’s a very basic system: five outlets with five buttons on the remote. All he had to do was wire up the Raspberry Pi to simulate the button presses by setting the GPIO pins high, and presto, a simple but effective home automation setup.

This is where it starts to get fun. Unfortunately, unlike a real Time Lord, [Pat] didn’t build his sonic from scratch. Instead, he found a universal remote control — styled after [Smith]’s sonic. Add another RF receiver to the Pi, a web-based interface to extend the range, and bam, you’ve got one geeky, but awesome, home automation setup.

Stick around after the break to see it in action!

Continue reading “Real Life Sonic Screwdriver For Home Automation”

HDD Driven Table Tennis Robot

12

Need to hone up your ping pong skills? Nobody to play with? That’s okay, you could always build a hard drive powered ping pong ball launcher!

[Vendel Miskei] must like 3D modeling. He’s drawn up his entire project in some kind of 3D CAD program (the textures look vaguely like Sketchup?).  It makes use of two HDDs, a computer power supply, a bunch of PVC pipe, a microwave synchronous motor, and an overhead light projector!

In order for the hard drives to grip the ping pong balls, it looks like [Vendel] removed all but one of the platters, then glued some foam to it, and what looks like the rubber from a table tennis paddle on top. He’s also made use of the original hard drive case by cutting the end off to expose half of the platter. It seems to be pretty effective!

The overhead light projector is actually just used as a convenient weighted stand for the entire project. The recycled microwave motor indexes the balls in a bucket, allowing for a huge number of balls to be queued up! Stick around after the break to see some of the awesome 3D renderings of the project, and the actual table tennis robot playing a game with its master!

Continue reading “HDD Driven Table Tennis Robot”

Modifying A PS4 Dualshock4 Controller To Use A Mouse And Keyboard

[Mori] wanted to use his keyboard and mouse to play his favorite games on the PS4, so he decided to modify his Dualshock4 controller to feed it custom input signals.

In the heart of this build is an STM32F407 discovery board, which is connected to a USB hub. To perform this hack, [Mori] tore open the Dualshock4 controller to find the PCB traces coming from the sticks and buttons. He then used the STM32F407 and 2 Digital to Analog Converters (DACs) to create similar signals. Unfortunately for us, [Mori] only released the schematics but not the firmware. Our guess is that he had to configure the microcontroller as a USB host, enumerate the mouse/keyboard, parse the HID reports and feed the controller the corresponding inputs.

We embedded a video of the hack in action after the break. If you own a PS4, you may also want to see how to disable the Dualshock LEDs.

Continue reading “Modifying A PS4 Dualshock4 Controller To Use A Mouse And Keyboard”

Finally, An Animated GIF Light Painter

led_strips_dragon-flap

Light painting, or taking a picture of a moving RGB LED strip with a very long exposure, is the application du jour of Arduinos, photography, and bright, glowey, colorful things. Hackaday alumnus [Phil Burgess] has come up with the best tutorial for light painting we’ve seen. It’s such a good setup, it can be used to create animated .gifs using multiple camera exposures.

The build uses an Arduino Uno, SD card shield, and Adafruit’s new NeoPixel strip with 144 RGB LEDs per meter. Despite a potentially huge mess of wires for this project, [Phil] kept everything very, very neat. He’s using an Altoids case for the ‘duino, an 8 AA-cell battery holder and 3A UBEC  for the power, and a wooden frame made out of pine trim.

Part of the art of light painting involves a lot of luck, exponentially so if you’re trying to make a light painted animated .gif. To solve this problem, [Phil] came up with a very clever solution: using a rotary encoder attached to a bicycle. With the rotary encoder pressed up against the wheel of a bike, [Phil] can get a very precise measurement of where the light strip is along one dimension, to ensure the right pixels are lit up at the right time and in the right place.

It’s a wonderful build, and if Santa brings you some gift certificates to your favorite electronics retailer, we couldn’t think of a better way to bring animated .gifs into the real world.

Fail Of The Week: Physical Pixel Display

fotw-physical-pixel-display

This physical pixel display reminds us of a couple of different hacks that we’ve seen over the years. It looks impressive, but [Matt] couldn’t quite get it to work. It wasn’t the Kinect sensor and image interpretation that was the problem. It was a failure to get the hardware components seen above to perform reliably.

If you can’t figure out what this is supposed to do, take at look at the inFORM morphing table or the pixel wall installed at the Hyundai expo last year. [Matt’s] attempt is much more modest with a grid of just 10×6. The pixels themselves are ballpoint pens (he gets bonus points for cheap and easy materials). The pens move in and out thanks to some Bowden cables connected to hobby servos. The mechanical engineers have probably already figured out the fail… the pixels seem to get hung up and despite several revisions in the materials used , it couldn’t be fixed.

The hobby servos were chosen because they are much less expensive than proper linear actuators. We thought maybe [Matt] should build his own solenoids but that’s not a great idea because you can’t have variable depth that way (can you?).  Perhaps the pens should be vertical and the servos could pull on a string attached to the pen via a pulley with gravity to return them to the starting position? There’s got to be an inexpensive and relatively simple way get this thing working. Let us know how you’d get the project back on track by leaving a comment below.


2013-09-05-Hackaday-Fail-tips-tileFail of the Week is a Hackaday column which runs every Wednesday. Help keep the fun rolling by writing about your past failures and sending us a link to the story — or sending in links to fail write ups you find in your Internet travels.