Cook Up A Yoke In Five Minutes

When it comes to flight simulators, we’ve seen people go all-out with their immersive setups, with all kinds of hyper-realistic control systems and monitors as far as the eye can see. But for those gaming on a budget this can seem a little overwhelming and daunting. We all have to start somewhere, though, so if you’re looking for your first semi-realistic flight simulator control mechanism take a look at this yoke which can be cobbled together for almost no money or time.

The yoke can be built around any optical mouse that happens to be lying around. A custom housing for it is constructed from cardboard, which lets it sit above a cardboard tube which functions as the control interface. This mechanism rests in a cardboard box it uses as a frame, with a yoke-styled control interface built out of packing foam at the front. One optional modification to the device allows it to have more realistic control throw, and another replaces the cardboard tube with a wooden dowel to give the device a little more strength.

While relatively quick and easy to build, it works as a fully-functional yoke in flight simulator programs like FlightGear almost effortlessly, mostly thanks to the fact that it is based on a nearly unmodified mouse. Assuming you have a mouse in your parts drawer and have access to some sort of cardboard, it’s estimated to take not much longer than five minutes to put together. But if you’re looking for something DIY that’s a little more substantial, it’s not too much of a step up to another DIY yoke we’ve featured before which is centered around an Arduino and a few 3D-printed parts.

Thanks to [Stephen] for the tip!

Up Your Game With A Battle Tested Input Device

If you’re looking to add some realism to your flight setup without converting the guest bedroom into a full-scale cockpit simulator, you might be interested in the compromise [MelkorsGreatestHits] came up with. He bolted a genuine military keypad to his PC joystick and instantly added 100% more Top Gun to his desktop.

The Rockwell Collins manufactured keypad came from eBay, and appears to have been used in aircraft such as the EA-6B Prowler and Lockheed C-130 Hercules for data input. Each key on the pad is wired to the 37 pin connector on the rear, which [MelkorsGreatestHits] eventually mapped out after some painstaking work with a breakout board.

Once the matrix was figured out, he made up a cable that would go from the connector to a Teensy 2.0 microcontroller. The Teensy reads the keypad status and converts button presses over to standard USB HID that can be picked up in any game.

The joystick side of the build is a VKB Gunfighter, which is already a pretty nice piece of kit on its own. No modifications were necessary to the joystick itself, other than the fact that it’s now mounted to the top of a black project enclosure. It still connects directly to the computer via its original USB cable, as the keypad has its own separate connection. As luck would have it, the joystick is almost a perfect fit in the opening on the keypad, which presumably would have been for a small screen when installed in the aircraft.

Finding cockpit components from military aircraft on eBay is not as hard as you may think; something to keep in mind if you ever decide to tackle that custom flight simulator build.

Home Built Flight Sim Combines Virtual And Actual Reality

Virtual Reality (VR) and actual reality often don’t mix: watch someone play a VR game without seeing what they see and you see a lot of pointless-looking flailing around. [Nerdaxic] may have found a balance that works in this flight sim setup that mixes VR and AR, though. He did this by combining the virtual cockpit controls of his fight simulator with real buttons, knobs, and dials. He uses an HTC Vive headset and a beefy PC to create the virtual side, which is mirrored with a real-world version. So, the virtual yoke is matched with a real one. The same is true of all of the controls, thanks to a home-made control panel that features all of the physical controls of a Cessna 172 Skyhawk.

[Nerdaxic] has released the plans for the project, including his 3D printable knobs for throttle and fuel/air mixture and the design for the wooden panel and assembly that holds all of the controls in the same place as they are in the real thing. He even put a fan in the system to produce a gentle breeze to enhance the feel of sticking your head out of the window — just don’t try that on a real aircraft.

Continue reading “Home Built Flight Sim Combines Virtual And Actual Reality”

The Immersive Flight Simulator From 1989

The history of PC gaming showers games such a Wolfenstein 3D and Doom with the honor of having the most advanced graphics of the day. Often overlooked is Microsoft Flight Simulator and earlier, pre-Microsoft versions from subLOGIC, including the 1977 Apple II version. [Wayne Piekarski] was playing around with MS Flight Simulator 4 recently, and wanted it to be a bit more like his modern flight sim based on X-Plane 11. That meant multiple monitors, and the results are amazing.

The video and networking capabilities for MS Flight Sim 4, while very impressive for the late 80s, are still very limited. In 1989, computers only supported a single display, and while FS4 had the ability to network machines together for dogfighting, there was no way to set the camera viewpoint to the remote aircraft.

The solution to this problem came in the form of memory dumps. Since [Wayne] is running FS4 in DOSBox, he’s able to read the memory of one instance of the game, and write those memory locations to another instance of the game. There were only 18 bytes of memory in the instance of DOSBox that included heading, altitude, roll, and pitch information for the simulated aircraft. [Wayne] is sending this data to other instances of FS4 — effectively mirroring the game on another machine — and changing the camera view to look out the left and right windows. He displayed those views on additional monitors, and was done.

The results are exactly what you would expect. [Wayne] is now taking off from Meigs Field and buzzing the ten or twelve buildings in downtown Chicago with a panoramic 180° view. Check out the videos of that in action below.

Continue reading “The Immersive Flight Simulator From 1989”

[Tom Sachs] Builds His Own Space Program

sachslunarcapsuleinterior

Born in the mid 60’s, [Tom Sachs] has always been fascinated with space, especially the Apollo program. Just like every kid of his generation, [Tom] imagined himself in Neil Armstrong’s and Buzz Aldrin’s boots, gazing over the lunar surface. He never gave up that dream, and years later as a successful modern artist, he built his own space program.

[Tom Sachs] is a master of bricolage . Taken from the French word for tinkering, Wikipedia defines bricolage as “… the construction or creation of a work from a diverse range of things that happen to be available, or a work created by such a process.”  The term could also describe the junkbox procurement methods we use on many of our own projects.

sachs-lunar-landerBoth [Tom’s] 2007 lunar program and his 2012 Mars program featured his astonishing lunar lander. Built from plywood, found items, and junk, the lander literally made us do a double take the first time we saw it. The attention to detail is incredible. At first glance one could mistake this for a simulator built by NASA themselves. After a few seconds the custom touches start to jump out, such as a “Thank You” garbage door from a fast food restaurant, or a bar stocked with tequila and vodka. The lander’s tools are not just for show either, as the gallery opens with a simulated space mission, which could best be described as a mix of art, improv, and an epic game of make-believe for adults.

[Tom’s] installations also include mission control, which in his Mars piece consisted of a dizzying array of screens, controls and an 80’s boombox. Dressed in the white shirt, thin tie, and horn rimmed glasses we’ve come to associate with NASA engineers of the 60’s, this is where [Tom] works. He truly is the engineer of this mission.

Editor’s Note [Tom] and the entire hacker community at large have a chance to go to space by entering The Hackaday Prize!

Continue reading “[Tom Sachs] Builds His Own Space Program”

Custom Controllers For Kerbal Space Program

kerbal
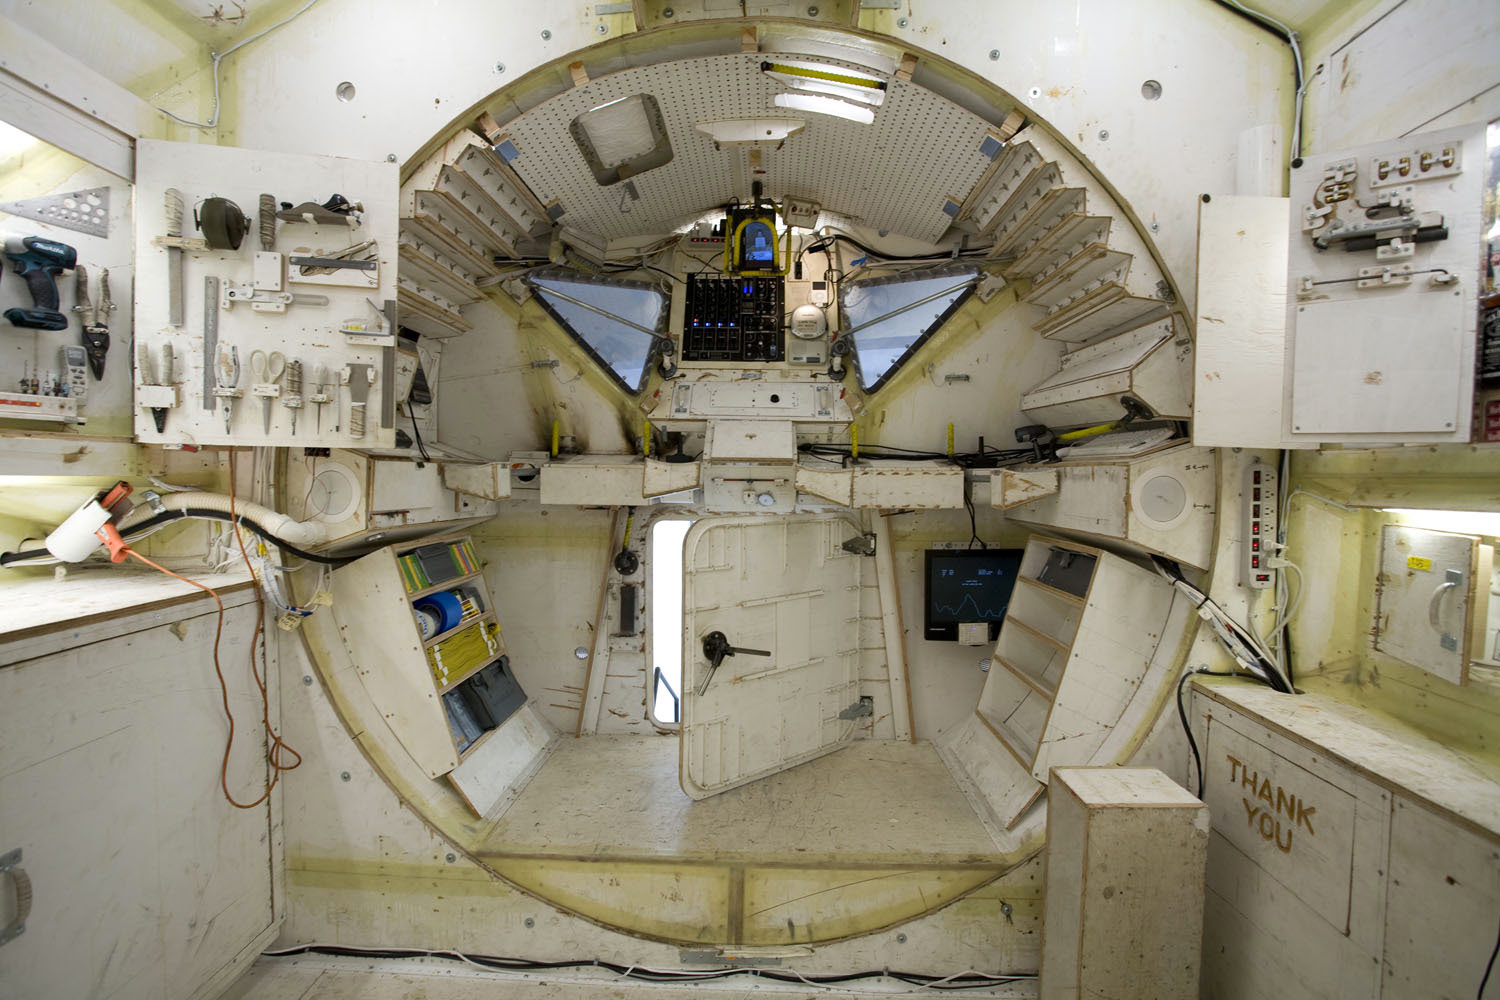
Kerbal Space Program is already a runaway indie video game hit, and if you ask some people, they’ll tell you it is the way to learn all about orbital dynamics, how spaceships actually fly, the challenges of getting to the mün. The controls in KSP are primarily keyboard and mouse, something that really breaks the immersion for a space flight simulator. We’ve seen a few before, but now custom controllers well suited for a Kerbal command pod can be made at home, with all the blinkey LEDs, gauges, and buttons you could want.

[Freshmeat] over on the KSP forums began his space adventures with a keyboard but found the fine control lacking. An old Logitech Dual Shock controller offered better control, but this gamepad doesn’t come with a throttle, and USB throttles for flight sims are expensive. He found a neat plugin for KSP made for interfacing an Arduino, and with a few modifications, turned his controller into a control panel, complete with sliders, pots, gauges, and all the other goodies a proper command pod should have.

[Freshmeat]’s work is not the only custom Kerbal controller. There’s a whole thread of them, with implementations that would look great in everything from a modern spaceplane to kerbalkind’s first steps into the milky abyss of space. There’s even one over on the Hackaday projects site, ready to fly Bill, Bob, and Jeb to the mün or a fiery explosion. Either one works.

Thanks [drago] for the tip.

DIY Linear Actuators For A Flight Sim

[Roland] has already built a few very cool and extremely realistic flight sims, but his latest project will put his current rig to shame. He’s building a six degree of freedom simulator based on homebuilt linear actuators of his own design.

The actuator is powered by a large DC motor moving timing belts along the length of the enclosure. These timing belts are connected to a shaft that’s coupled to the frame with a few bungee cords. The bungee cords are important; without them, the timing belts would be carrying all the load of the sim – not a good thing if these actuators are moving an entire cockpit around a living room.

Also on [Roland]’s list of awesome stuff he’s building for his flight sims is a vibration system based on the BFF Shaker. This board takes data in from sim software and turns it into vibrations produced by either unbalanced DC motors or one of those ‘bass kicker’ transducers.

It’s all very cool stuff, and with all the crazy upgrades [Roland] is doing to his sim rig, he’s doing much better than paying $300/hour to rent a Beechcraft Baron.

Continue reading “DIY Linear Actuators For A Flight Sim”