Repairing A Wounded Mantis

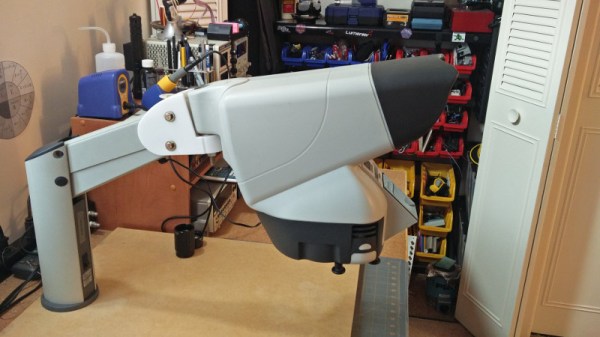
While it’s true that we didn’t specifically say making Hackaday staff exceedingly jealous of your good fortune would deduct points from your entry into our ongoing “Repairs You Can Print Contest”, we feel like [Sam Perry] really should have known better. During a recent dumpster dive he found an older, slightly damaged, but still ridiculously awesome Mantis stereo inspection microscope. Seriously, who’s throwing stuff like this away?

Rendered replacement mount in Fusion 360

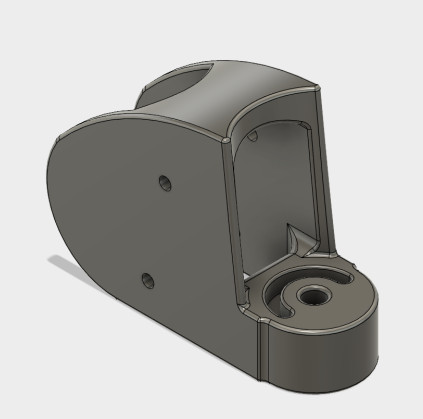
Apparently, the microscope itself worked fine, and beyond some scratches and dings that accumulated over the years, the only serious issue was a completely shattered mount. Luckily he still had the pieces and could get a pretty good idea of what it was supposed to look like. After what we imagine was not an insignificant amount of time in Fusion 360, he was able to model and then print a replacement.

The replacement part was printed on a Tronxy P802M in PLA. Even at 0.3mm layer height, it still took over 10 hours to print such a large and complex component. A few standard nuts and bolts later, and he had a drop-in replacement for the original mount.

Whether it’s due to how big and heavy the Mantis is, or a slight miscalculation in his model, [Sam] does mention that the scope doesn’t sit perfectly level; he estimates it’s off by about 5 degrees.

We’re somewhat suspicious that mentioning an error of only 5 degrees is a stealth-brag on the same level as telling everyone you found a Mantis in the trash. But if [Sam] gives us the GPS coordinates of the dumpster in which people are throwing away high-end lab equipment, all will be forgiven.

There’s still plenty of time to get your entry into the “Repairs You Can Print” contest! The top twenty projects will receive $100 in Tindie store credit, and the top entries in the Student and Organization categories will each receive a Prusa i3 MK3 with the Quad Material upgrade kit: arguably one of the best 3D printers currently on the market. If you were considering going back to school, or finally leaving your basement and joining a hackerspace, now would definitely be the time.

Caption CERN Contest Turns Out Big Brains And Comic Brilliance

Week 1 of Hackaday’s Caption CERN Contest is complete. We have to say that the Hackaday.io users outdid themselves with funny captions but we also helped CERN add meaning to one of their orphan images. First a few of our favorite captions:

The Funnies:

If you adjust that scope again, when I haven’t touched the controls, I’m donating you to a city college. – [Johnny B. Goode]

SAFTEY FIRST – The proper way to test a 6kv power supply for ripple on the output. – [milestogoh]

Dr. Otto Gunther Octavius – R&D some years before the accident. – [jlbrian7]

The prize though, goes to Hackaday commenting superstar [DainBramage], who proved he knows us all too well with his Portal inspired caption:

Here we see Doug Rattmann, one of Aperture’s best and brightest, perfecting our neurotoxin prior to delivery.

Congrats [DainBramage], enjoy your shirt from The Hackaday Store!

The Meaning of the Image:

8106409Funny captions weren’t the only thing in the comments though – the image tickled [jlbrian7’s] memory and led to a link for CERN Love. A four-year old blog entry about robots at CERN turned out to be the key to unraveling the mystery of this captionless photo. The image depicts [Robert Horne] working with a prototype of the MANTIS system. MANTIS was a teleoperation manipulator system created to work in sections of the CERN facility which were unsafe for humans due to high levels of radioactivity. The MANTIS story is an epic hack itself, so keep your eyes peeled for a future article covering it! We’ve submitted the information to CERN, and we’re giving [jlbrian7] a T-shirt as well for his contribution to finding the actual caption for this image.

Get Started on Next Week:

The image for week 2 is already up, so head over and see for yourself. We’re eager for your clever captions. Ideally we can also figure out the backstory for each week’s randomly chosen image.

Mantis9 PCB Mill

This is the Mantis9 PCB mill. It’s the first time we’ve featured the project, but it’s already well known by some as it keeps popping up in the comments for other CNC mill projects. Yes, it’s made out of wood — which some frown upon — but we’re happy with the build instructions and the especially the price tag (parts as low as $85).

We did feature an earlier revision of the hardware back in 2010. Subsequent versions changed the frame to use an open-front design, but it’s the build techniques that saw the biggest evolution. The problem was getting the holes for the parallel rods to align accurately. In the end it’s a simple operation that solves the problem; clamp both boards together and drill the holes at the same time. A drill press is used for all of the fabrication, ensuring that the holes are perpendicular to the surface of the boards. From there the rods are given some bronze bushings and pressed into place. Only then are the platforms secured to the bushings using epoxy. This is to ensure that the bushings don’t bind from poor alignment. We think it should end up having less play in it than other builds that use drawer slides.

Check out a PCB milling run in the clip after the break.

Continue reading “Mantis9 PCB Mill”