Repairs You Can Print: Fixing A Rat-Attacked Mic Cord

We’ve all been there — a steamy night in the rainforest of Papua New Guinea, sweaty slumber disturbed by the unmistakable sounds of gnawing. In the morning we discover that a rodent of unusual tastes has chewed the microphone cable of our transceiver right half in two, leaving us out of touch with base camp. If we had a nickel for every time that’s happened.

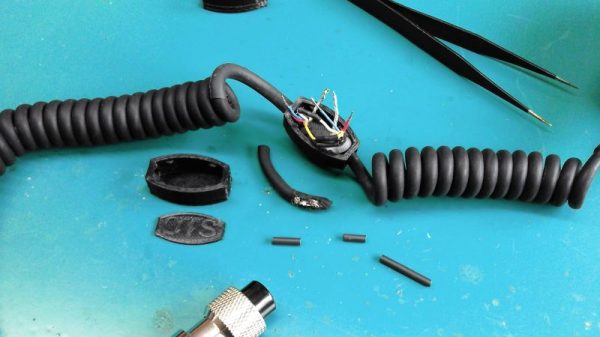
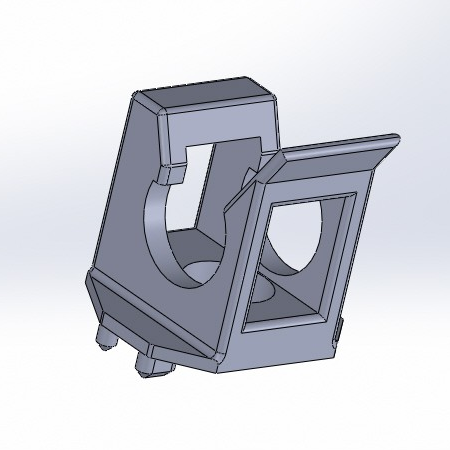
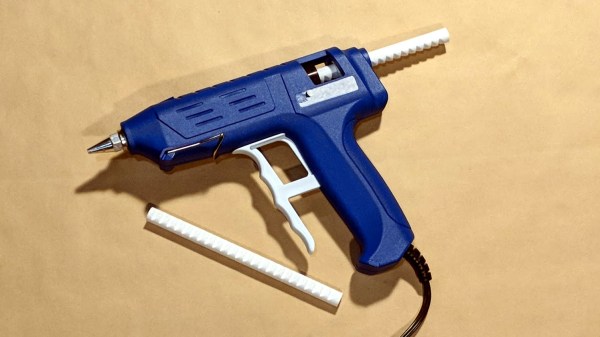
It may sound improbable, but that’s the backstory behind [Marius Taciuc]’s 3D-printed mic cord repair. Even with more mundane failure modes, the retractile cords on microphones are notoriously difficult to fix. Pretty much any of the usual suspects, like heat-shrink tubing or electrical tape, are going to do very little to restore the mechanical stability lost once that tough outer jacket is breached. [Marius]’s solution was to print as small an enclosure as possible to mechanically support the splice. The fit is tight, but there was just enough room to solder the wires and stuff everything back in place. Cable ties provide strain relief where the cord exits the splice, and a liberal squirt of hot glue pots the joint. It’s not perfect — we’ll bet the splice acts as a catch point and gets a little annoying after a while — but if it gets you back on the air fast and cheap, it probably makes sense.

[Marius] entered this rat-race beating hack into the Repairs You Can Print contest. Do you have an epic repair that was made possible by a 3D printer? Let the world know about it and you might just win a prize.

Continue reading “Repairs You Can Print: Fixing A Rat-Attacked Mic Cord”

Repairs You Can Print: Model Coal Car Fix

Model railways are a deep and rewarding hobby, and the mechanisms involved can be both surprisingly intricate and delightful. A great example that may surprise the unfamiliar is that of model train carriages, such as coal cars, that are capable of both receiving and dumping a load at various points on a model layout. This adds realism and, if we’re honest, just plain old fun.

When [Phil]’s father received his Lincoln coal car from eBay, it was unfortunately damaged, and incapable of dumping properly. Instead of throwing it away, a replacement part was developed and 3D printed. The part was iterated on until the coal hopper could dump and retract smoothly.

This is the perfect example of a tidy repair executed through 3D printing. The broken part was extremely detailed and would be difficult and expensive to repair or fabricate through other measures. However, through the power of 3D printing, all that’s required is a 3D modelling job and a few hours to print it.

It’s a great entry into our Repairs You Can Print challenge, and covers the fundamentals of modelling and iterative design well. Got a neat repair you’ve done yourself? Document it on Hackaday.io and enter yourself!

Circuit Bent Casio SK-1 Gets An Arduino Brain

The Casio SK-1 keyboard is fairly well-known in the “circuit bending” scene, where its simple internals lend themselves to modifications and tweaks to adjust the device’s output in all sorts of interesting ways. But creating music via circuit bending the SK-1 can be tedious, as it boils down to fiddling with the internals blindly until it sounds cool. [Nick Price] wanted to do something a bit more scientific, and decided to try replacing his SK-1’s ROM with an Arduino so he could take complete control it.

Replacing the ROM chip with header pins.

That’s the idea, anyway. Right now he’s gotten as far as dumping the ROM and getting the Arduino hooked up in place of it. Unfortunately the resulting sound conjures up mental images of a 56K modem being cooked in a microwave. Clearly [Nick] still has some work ahead of him.

For now though, the progress is fascinating enough. He was able to pull the original NEC 23C256 chip out of the keyboard and read its contents using an Arduino and some code he cooked up, and he’s even put the dump online for any other SK-1 hackers out there. He then wrote some new code for the Arduino to spit data from the ROM dump back to the keyboard when requested. In theory, it should sound the same as before, but with the added ability to “forge” the data going back to the keyboard to make new sounds.

The result is what you hear in the video linked after the break. Not exactly what [Nick] had in mind. After some snooping with the logic analyzer, he believes the issue is that the Arduino can’t respond as fast as the original NEC chip did. He’s now got an NVRAM chip on order to replace the original NEC chip; the idea is that he can still use the Arduino to reprogram the NVRAM chip when he wants to play around with the sound.

We’ve covered some pretty fancy circuit bent instruments here in the past, but if you’re looking for something a bit easier to get your feet wet we ran a start-to-finish guide back in the Ye Olden Days of 2011 which should be helpful.

Continue reading “Circuit Bent Casio SK-1 Gets An Arduino Brain”

Repairs You Can Print: A Little Love For The Glove Box

A few years ago, [Brieuc]’s car blew a fuse. He went to replace it, which unfortunately means removing the entire glove box. In his haste to get his baby back on the road, he accidentally broke one of the clips that holds the glove box on the dashboard.

[Brieuc] tried to just glue the thing back together, but it didn’t hold because the part has to flex a little bit for people who need to get into the fuse box. No one seems to offer a replacement for this small but vital hunk of plastic, though he did find someone offering total glove box replacements at highway robbery prices. Since there was still one good clip, he used it to design and print a strong ABS replacement.

This is a great example of the one-off utility of 3D printers. [Brieuc] didn’t need an exact copy, and since he was replacing an injection-molded part with additive manufacturing, he had the freedom to start with a bare-bones design, make adjustments as needed, and iterate until he got it right. It didn’t take long. The layer orientation of the first print made the legs too weak, but that’s a simple fix. The second version has lasted for three years and counting.

We get it. You don’t have the same car as [Brieuc], so this particular fix doesn’t sway you. But someday in the future when your zipper breaks or your dishwasher detergent cup won’t latch, 3D printing will be there to help.

3D Printering: Printing Sticks For A PLA Hot Glue Gun

When is a hot glue stick not a hot glue stick? When it’s PLA, of course! A glue gun that dispenses molten PLA instead of hot glue turned out to be a handy tool for joining 3D-printed objects together, once I had figured out how to print my own “glue” sticks out of PLA. The result is a bit like a plus-sized 3D-printing pen, but much simpler and capable of much heavier extrusion. But it wasn’t quite as simple as shoving scrap PLA into a hot glue gun and mashing the trigger; a few glitches needed to be ironed out.

Why Use a Glue Gun for PLA?

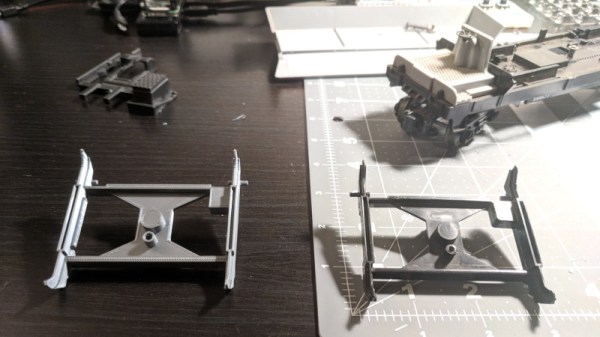
Some solutions come from no more than looking at two dissimilar things while in the right mindset, and realizing they can be mashed together. In this case I had recently segmented a large, hollow, 3D model into smaller 3D-printer-sized pieces and printed them all out, but found myself with a problem. I now had a large number of curved, thin-walled pieces that needed to be connected flush with one another. These were essentially butt joints on all sides — the weakest kind of joint — offering very little surface for gluing. On top of it all, the curved surfaces meant clamping was impractical, and any movement of the pieces while gluing would result in other pieces not lining up.

An advantage was that only the outside of my hollow model was a presentation surface; the inside could be ugly. A hot glue gun is worth considering for a job like this. The idea would be to hold two pieces with the presentation sides lined up properly with each other, then anchor the seams together by applying melted glue on the inside (non-presentation) side of the joint. Let the hot glue cool and harden, and repeat. It’s a workable process, but I felt that hot glue just wasn’t the right thing to use in this case. Hot glue can be slow to cool completely, and will always have a bit of flexibility to it. I wanted to work fast, and I wanted the joints to be hard and stiff. What I really wanted was melted PLA instead of glue, but I had no way to do it. Friction welding the 3D-printed pieces was a possibility but I doubted how maneuverable my rotary tool would be in awkward orientations. I was considering ordering a 3D-printing pen to use as a small PLA spot welder when I laid eyes on my cheap desktop glue gun.

Continue reading “3D Printering: Printing Sticks For A PLA Hot Glue Gun”

Making Smoke That Really Performs

Smoke is a useful thing, whether you want to hide from enemy combatants or just make a big scene at a local sporting match. Smoke devices have lots of applications, many of which will likely cause a nuisance to somebody, somewhere. With that said, they can also be really cool, and [Tech Ingredients] is here to tell you how to make them.

Far from a simple tutorial, the video guide is loaded with detail. It begins with an explanation of the basic chemistry involved, using potassium nitrate and sugar. This is the basis of rocket candy, a popular method for making solid rocket motors at home. However, it’s then explained how the formula is altered to suit a smoke-making, rather than a thrust-making device. The trick is the addition of paraffin to moderate the reaction.

The tips don’t stop there. The guide explains how to use a coffee grinder to make the coarse ingredients finer, which increases the surface area and allows the powder constituents to blend with the wax more easily. Enclosures are also discussed, with a cardboard tube and bentonite clay favored for its heat resistance and stability.

Overall, it’s an excellent guide which takes the time to explain the rationale behind each step in the process. It’s great to see the underlying concepts explained with the practical execution, giving a strong understanding of not just how to do it, but why. Video after the break.

Continue reading “Making Smoke That Really Performs”

Black Holes And The Elusive Mystery That Lies Within An Equation

“If I have seen further than others, it is by standing upon the shoulders of giants.” This famous quote by Isaac Newton points to an axiom that lies at the heart of The Sciences — knowledge precedes knowledge.

What we know today is entirely based upon what we learned in the past. This general pattern is echoed throughout recorded history by the revelation of one scientific mystery leading to other mysteries… other more compounding questions. In the vast majority of cases these mysteries and other questions are sprung from the source of an experiment with an unexpected outcome sparking the question: “why the hell did it do that?” This leads to more experiments which creates even more questions and next thing you know we go from moving around on horse-drawn carriages to landing drones on Mars in a few generations.

The observant of you will have noticed that I preceded a statement above with “the vast majority of cases.” Apart from particle physics, almost all scientific discovery throughout recorded history has been made via experiment and observation. There are a few, however, that have been discovered hidden within the confines of an equation, only later to be confirmed with observation. One such discovery is the Black Hole, and how it was stumbled upon on a dusty chalkboard in the early 1900s will be the focal point of today’s article.

Continue reading “Black Holes And The Elusive Mystery That Lies Within An Equation”