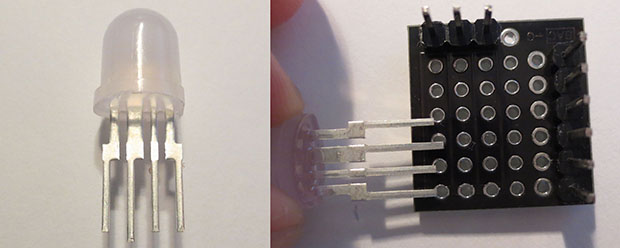
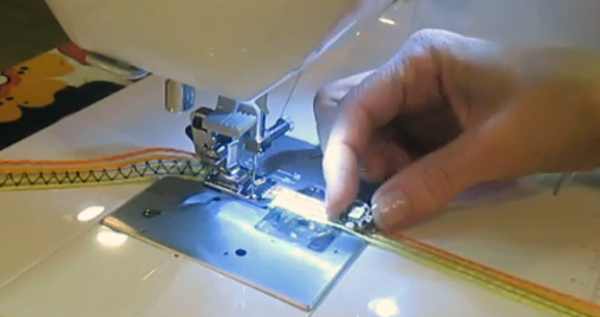
Handheld Tetris Is Retro And We Love It

handheld tetris

[Eduardo Zola] has been playing around with Arduinos, and ever since he started, he wanted to try making a game. Having fond memories of playing Tetris back on Windows 3.1, he decided to try giving a handheld version of it a shot.

He started with two 8×8 Neopixel Matrices due to their simplicity — not to mention the massive library of code available! To make it truly portable, he’s also included a 3.7v 4400mAh lithium ion battery which will keep him gaming for hours. He found a 5-way navigation switch on eBay which makes up the joystick. A small LED bar display tells you what level you’re on, and he’s even included a smaller speaker for music, and a vibrating motor for successfully completed lines in the game!

He borrowed the Tetris algorithm (and added some improvements) from the source code by [Valentin Ivanov], who completed a similar project last fall. Stick around to see a demonstration video of it in action.

Continue reading “Handheld Tetris Is Retro And We Love It”

3D Printed RGB LED Bracelet

3dprintedrgbbraclet

[Marcus’s] 3D-printed LED bracelet has moved through a number of revisions recently, but each iteration is impressive in both simplicity and functionality. Inspired to experiment with his print of [nervoussystem’s] Diagrid Bracelet, [Marcus] took the opportunity to add some LEDs with his first build, which combined a strip of RGB LEDs, a small battery, and an Adafruit Trinket microcontroller.

A second build soon followed, which overhauled the bracelet’s design into a more solid form and managed to double the amount of LEDs by upgrading to a different strip. The bracelet is currently in its third revision, cycling through the spectrum for around 3.5 hours on a single charge. This build also sports a 3-axis accelerometer: when the wearer shakes the bracelet, the colors skip around. If shaken long enough, the bracelet will enter a dazzling flurry of color flickering. Stick around after the break for a few demonstration videos. If you want to print your own, head over to [Marcus’s] Thingiverse file.

Continue reading “3D Printed RGB LED Bracelet”

Breadboardable WS2812 LEDs

LED

Hackaday sees a ton of projects featuring the WS2812 series of digitally controllable RGB LEDs, in the form of bare chips, RGB LED strips, or some form of Adafruit’s NeoPixels. All these WS2812 LED products have one thing in common – they’re chip LEDs, making some projects difficult to realize. Now there’s a new member of the WS2812 family – a through-hole LED version – that should be available through the usual sources sometime later this year.

The key difference between these and the usual WS2812 LEDs is the packaging; these are 8mm LEDs with pins for power, ground, data in, and data out. With the preexisting libraries, this 8mm LED should work just the same as any other WS2812 LED.

Aside from a through-hole package, these new LEDs are very diffuse and aren’t as blinding as the normal chip LEDs. If you want to pick up a few of these LEDs, they’re available here, 13 LEDs for $15. There’s a lot of potential here for RGB LED cubes, something we hope to see sooner rather than later.

Companion Cube Christmas Lights Improved With Neopixels

cubes

[Crenn] obtained a string of official companion cube lights from Valve, but being in Australia couldn’t put them to their non-judgemental glory without the use of a step down transformer. They sat on the workbench for a few months until an idea was hatched: replace the bulbs with an Adafruit Neopixel strip, making these wonderful inanimate friends a string of individually addressable RGB LEDs.

The process of converting these cubes required stuffing a very small 9.4mm PCB inside. This PCB was designed in KiCAD thanks to a few classes at the Melbourne hackerspace. The board files were sent off, PCBs received, soldered up, and stuffed into the cubes.

Control is via a Duemilanove with a single IO pin using the Neopixel library. All the code, board files, and schematics are available on the gits. Future improvements might include a 3D printed cable relief and a way to securely mount the PCBs to the inside of the cubes.

Video available below.

Continue reading “Companion Cube Christmas Lights Improved With Neopixels”

Controlling Ten Thousand RGB LEDs

RGB LEDs are awesome – especially the new, fancy ones with the WS2812 RGB LED driver. These LEDs can be individually controlled to display red, green, and blue, but interfacing them with a microcontroller or computer presents a problem: microcontrollers generally don’t have a whole lot of RAM to store an image, and devices with enough memory to do something really cool with these LEDs don’t have a real-time operating system or the ability to do the very precise timing these LEDs require.  [Sprite_tm] thought about this problem and came up with a great solution for controlling a whole lot of these WS2812 LEDs.

[Sprite] figured there was one device on the current lot of ARM/Linux boards that provides the extremely precise timing required to drive a large array of WS2812 LEDs: the video interface. Even though the video interface on these boards is digital, it’s possible to turn the 16-bit LCD interface on an oLinuXino Nano into something that simply spits out digital values very fast with a consistent timing. Just what a huge array of RGB pixels needs.

Using a Linux board to drive RGB pixels using the video output meant [Sprite_tm] needed video output. He’s running the latest Linux kernel, so he didn’t have the drivers to enable the video hardware. Not a problem for [Sprite], as he can just add a few files to define the 16-bit LCD interface and add the proper display mode.

[Sprite_tm] already taken an oscilloscope to his board while simulating 16 strips of 600 LEDs, and was able to get a frame rate of 30 fps. That’s nearly 10,000 LEDs controlled by a single €22/$30USD board.

Now the only obstacle for building a huge LED display is actually buying the RGB LED strips. A little back-of-the-envelope math tells us a 640×480 display would be about $50,000 in LEDs alone. Anyone know where we can get these LED strips cheap?

Continue reading “Controlling Ten Thousand RGB LEDs”

Finally, An Animated GIF Light Painter

led_strips_dragon-flap

Light painting, or taking a picture of a moving RGB LED strip with a very long exposure, is the application du jour of Arduinos, photography, and bright, glowey, colorful things. Hackaday alumnus [Phil Burgess] has come up with the best tutorial for light painting we’ve seen. It’s such a good setup, it can be used to create animated .gifs using multiple camera exposures.

The build uses an Arduino Uno, SD card shield, and Adafruit’s new NeoPixel strip with 144 RGB LEDs per meter. Despite a potentially huge mess of wires for this project, [Phil] kept everything very, very neat. He’s using an Altoids case for the ‘duino, an 8 AA-cell battery holder and 3A UBEC  for the power, and a wooden frame made out of pine trim.

Part of the art of light painting involves a lot of luck, exponentially so if you’re trying to make a light painted animated .gif. To solve this problem, [Phil] came up with a very clever solution: using a rotary encoder attached to a bicycle. With the rotary encoder pressed up against the wheel of a bike, [Phil] can get a very precise measurement of where the light strip is along one dimension, to ensure the right pixels are lit up at the right time and in the right place.

It’s a wonderful build, and if Santa brings you some gift certificates to your favorite electronics retailer, we couldn’t think of a better way to bring animated .gifs into the real world.

Turning A Storefront Into A Video Game

invasion

[Kris]’ house/office has a huge store window, and instead of covering it up with newspapers, decided to do something cool. He’s had projections and other art pieces on display for his neighbors, but his new storefront arcade game very likely beats all of those.

Every video game needs a display, and this one is no slouch. The display is a 16*90 matrix of WS2812 LEDs with inset into a laser cut grid and put behind a layer of plexiglass. With this grid, the display has a great raster effect that’s great for the pixeley aesthetic [Kris] was going for. In front of the window is an MDF and steel arcade box powered by an Arduino Due.

The game is driven by the Adafruit neopixel library, with a few modifications to support alpha blending. There’s no external memory for this game – everything is running on a second Arduino Due inside the window.

It’s a great looking game, and if you’re ever in [Kris]’ area – behind the zoo in Antwerp – you’re free to walk up and give this game a spin.

Video demo below.

Continue reading “Turning A Storefront Into A Video Game”