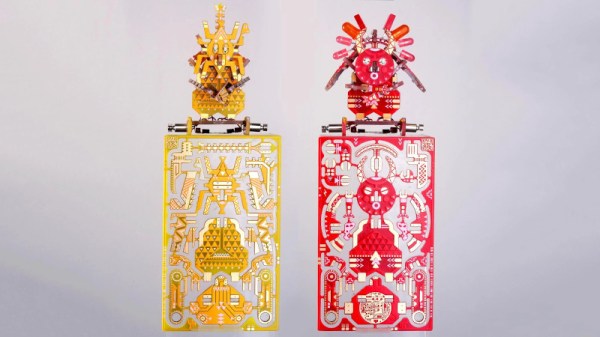
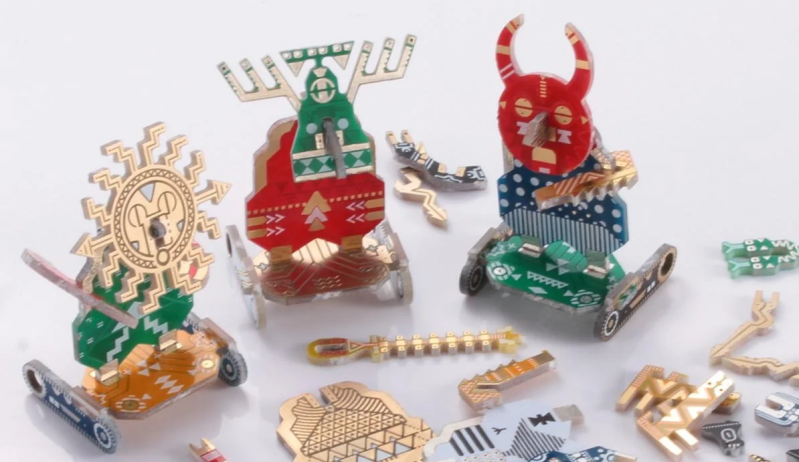
Printed circuit boards, they’re a medium designed primarily to mount electrical components with the wires themselves places as copper traces on the boards. To accommodate wide range of needs that have arisen over decades, board houses have evolved all manner of advanced techniques in routing and plating. To our benefit, this also makes it possible to leverage PCBs in an entirely artistic way, taking advantage of the highly-optimized manufacturing process. [GeeekClub] did just that, creating awesome vibrating robots out of custom-made PCBs.
The ‘bots come as a single PCB, with the parts snapped out akin to removing parts from sprues in a plastic model kit. They can then be assembled, with a pair of pager vibration motors installed to provide motive power. But really it’s the aesthetic of the boards and not the functionality that make these so incredible.
The design nestles a coin cell in the base of each bot, providing power and using the weight to help keep them upright. There’s a smattering of LEDs on board, and the art style of the ‘bots draws from Hopi Indian, Asian, and South American influences.
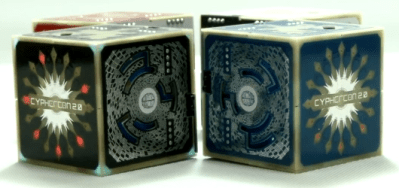
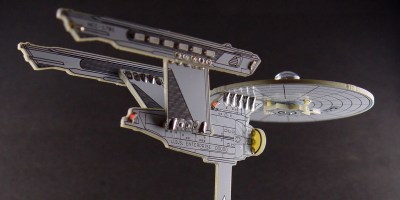
Cyphercon 2017 featured these exciting cubic badges, created from PCBs and soldered by hand.This Star Trek inspired piece shows just how far you can go with the right color soldermask and some creativity.
[Rickysisodia] had a few dead ATmega128 chips laying around that he didn’t want to just throw away, so he decided to turn them into his own light-up fidget toy. The toy is in the form of a six-sided die so small that you can hang it on a keychain. He soldered an ATmega128 on each side of the cube and added a few dot circles to give his toy the look of a functional dice. We were pretty amazed by his impressive level of dexterity. Soldering those 0.8 mm-pitch leads together seems pretty tedious if you ask us.
Then he wired a simple, battery-powered tilt switch LED circuit on perfboard that he was able to sneakily place inside the cube. He used a mercury switch, which, as you may figure, uses a small amount of mercury to short two metal contacts inside the switch, completing the circuit and lighting the LED. We would suggest going with the non-mercury variety of tilt switches just to avoid any possible contamination. You know us, anything to mitigate unnecessary disasters is kind of a good route. But anyway, the die lights up a different color LED based on the orientation of the cube and it even blinks.
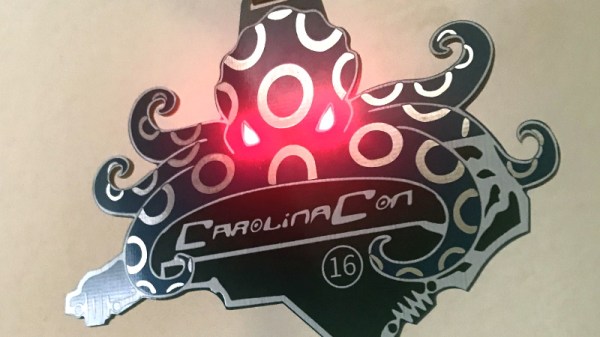
It’s something of an unwritten rule at this point that you can’t hold a hacking conference without providing a badge with at least a few LEDs on it. Not only can they be a great way to learn electronics for the attendees that tinker with them, but they’re a keepsake to commemorate the event. As a perfect example, [Matt Agius] recently wrote in to tell us about the badge he’s made for the upcoming CarolinaCon 16.
As [Matt] explains, the idea with this badge was to make it as easy as possible for attendees to assemble. In the final version there are only going to be three components that need to be soldered, so even if they’ve never touched SMD components before, they should still be able to get their badge lit up.
The badge largely makes up for its simplistic electronics with some fantastic board art on the flip side. The two red LEDs illuminate the eyes of a rather sinister looking octopus that’s ensnaring the unsuspecting state of North Carolina in its tentacled grip. The art was originally done by [Katie Dorn], with [Matt] spearheading its conversion into something that could be sent out for PCB fabrication.
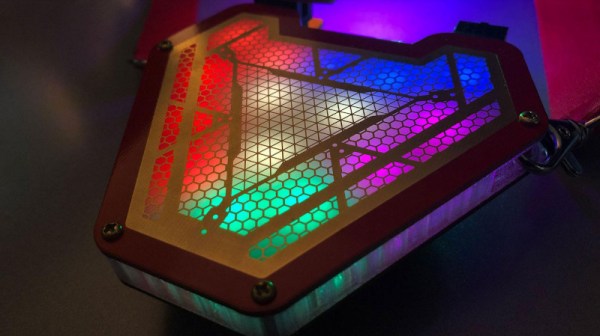
Getting your own PCBs made is a rite of passage for the hardware hacker. Oftentimes, it’s a proud moment, and many of us choose to immortalise the achievement with a self-aggrandizing credit on the silk screen, or perhaps a joke or personal logo. However, as far as artistically customized PCBs go, the sky really is the limit, and this is the specialty of [TwinkleTwinkie], whose Supercon talk covers some of the pitfalls you can run into when working at the edges of conventional PCB processes.
[TwinkleTwinkie]’s creations are usually badges of one type or other — they’re meant to be worn on a lanyard around your neck, as a pin, or as a decoration added to another badge. The whole point is the aesthetic, and style is just as important as functionality. With diverse inspirations like Futurama, Alice in Wonderland and the shenanigans of the GIF community, his badges blend brightly colored boards with a big helping of LEDs and artistic silkscreening to create electronic works of art.
Keeping PCB Fab Houses from Upsetting the Artwork
These days, PCB fab houses offer more choice than ever, in terms of silkscreens, soldermask colors, and other options. However, fundamentally, their primary concern is to produce reliable, accurate, electronically functional boards — and it’s something that can cause problems for #badgelife hackers designing for more aesthetic reasons. Continue reading “The Way Of The PCB Artist: How To Make Truly Beautiful Circuit Boards”→
Digital electronics are all well and good, but it’s hard to ignore the organic, living qualities of the analog realm. It’s these circuits that Kelly Heaton spends her time with, building artistic creations that meld the fine arts with classic analog hardware to speak to the relationship between electronics and nature. During her talk at the 2019 Hackaday Superconference, Kelly shared the story of her journey toward what she calls Electronic Naturalism, and what the future might bring.
Kelly got her start like many in the maker scene. Hers was a journey that began by taking things apart, with the original Furby being a particular inspiration. After understanding the makeup of the device, she began to experiment, leading to the creation of the Reflection Loop sculpture in 2001, with the engineering assistance of Steven Grey. Featuring 400 reprogrammed Furbys, the device was just the beginning of Kelly’s artistic experimentation. With an interest in electronics that mimicked life, Kelly then moved on to the Tickle Me Elmo. Live Pelt (2003) put 64 of the shaking Muppets into a wearable coat, that no doubt became unnerving to wear for extended periods.
Analog electronics parallel living organisms while programmable logic merely simulates life.
—Forrest Mims
Wanting to create art with a strong relationship to organic processes, Kelly focused on working with discrete components and analog circuitry. Basic building blocks such as the astable multivibrator became key tools that were used in different combinations to produce the desired effects. Through chaining several oscillators together, along with analog sequencers, circuits could be created that mimicked the sound of crickets in a backyard, or a Carolina wren singing in a tree.
The artistic elite exists in a stratum above we hoi polloi, a world of achingly trendy galleries, well-heeled collectors, and art critics who act as gatekeepers to what is considered the pinnacle du jour of culture. Artistic movements that evolve outside this bubble may be derided or ignored as naive and unsophisticated, even in complete denial of their raw creative edge. When they are discovered by the establishment a few of their artists are selected and anointed, while inevitably the crucible in which they were formed is forgotten. On the streets of Bristol the incredible work of far more graffiti artists can be seen than just that of Banksy.
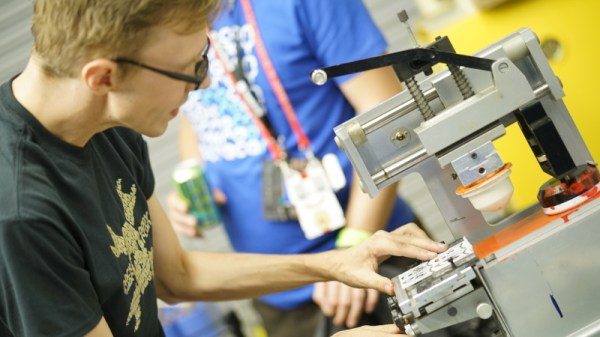
Our community has an art form all of its own, in the guise of PCB artwork and the #BadgeLife community. One day you will see electronic badges from darlings of the art world behind glass in those trendy galleries, but for now they live in glorious abundance in the wild. Here at Hackaday we are lucky enough to have in Brian Benchoff a colleague who is pushing the boundaries of PCB art, and at the Hackaday Superconference he took us through one of his more recent pieces of work.
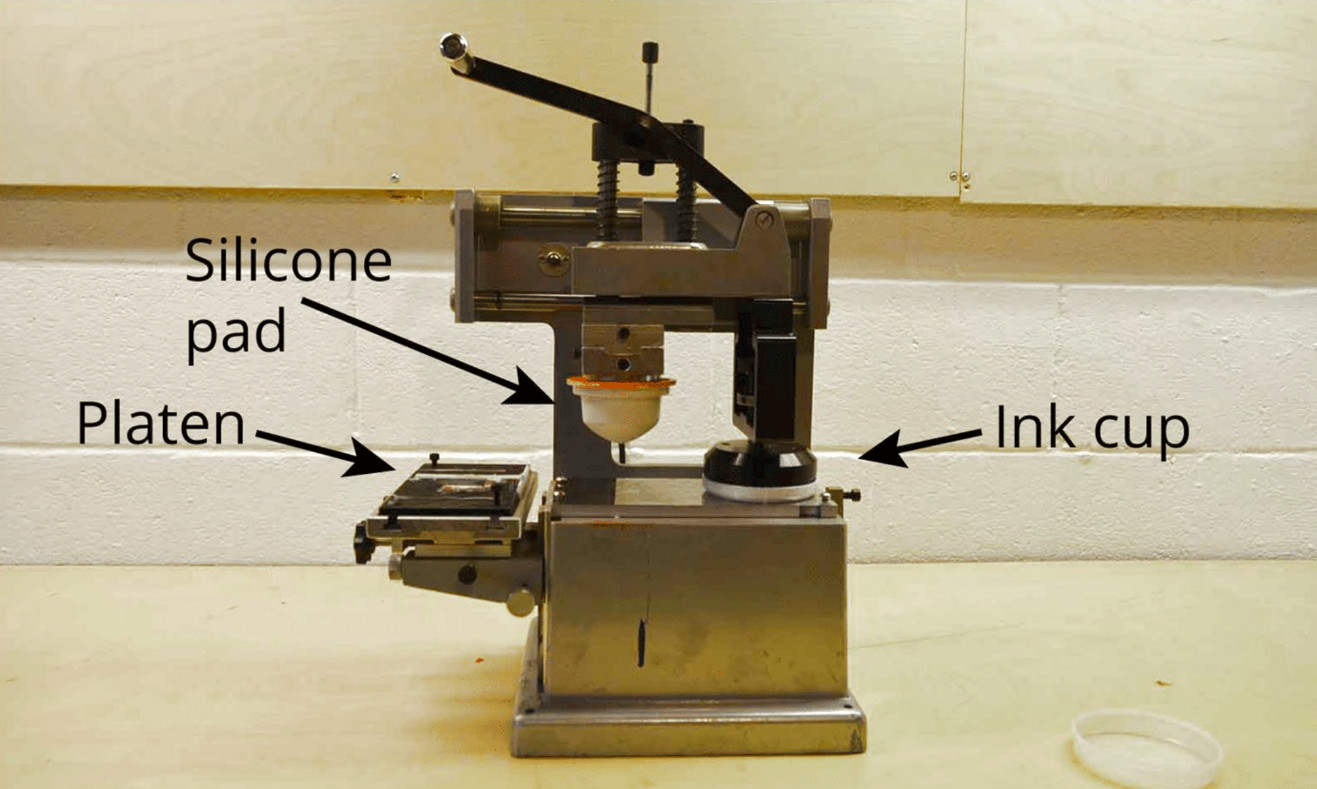
Brian’s pad printer.
The colour palette of a typical printed circuit board is limited by the combination of fibreglass, copper, soldermask, plating, and silkscreen its designer selects. Thus while the variety of soldermask colours and plating materials can make for an eye-catching work, they have remained a colour-tinted near monochrome. The Holy Grail of the PCB artist has been to step into the world of full colour, and Brian has been pursuing that goal by exploring pad printing to produce extra colours beyond the sodermask..
It’s a subject he’s written about here in the past, and he introduces it in the talk with a look at existing badge artwork and a mention of an expensive commercial inkjet process before considering the type of printing you see daily on the sides of promotional pens. Those company titles are deposited on pens using pad printing, an offset process in which ink is first deposited upon a photo-etched metal plate before being picked up on a silicone rubber pad for transfer to the object to be printed. It’s not the panacea for all coloured-PCB tasks, but for adding relatively small blocks of pigment to an otherwise monochromatic board it can be very successful.
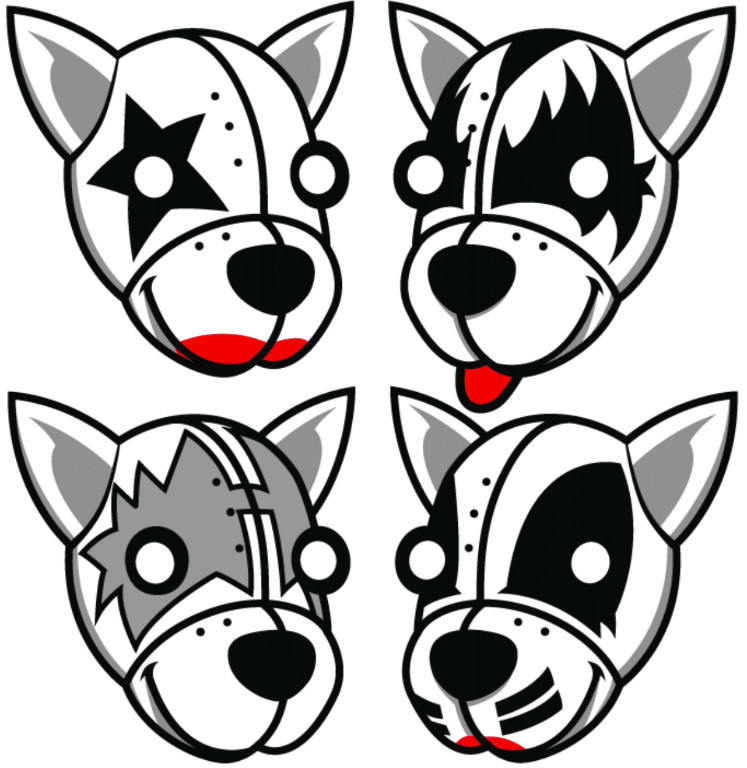
The eye-catching Kiss -themed Tindie badges.
Brian’s examples are a panelised set of Tindie badges as a homage to the rock band Kiss, and his Tide pod addon containing a serial number in an EEPROM that was part of a Blockchain-inspired game. The Kiss Tindie badges use black soldermask with extensive white silkscreen and a modest area of red pad printing for the stage makeup, while the Tide addon makes clever use of the same swoosh printed in alternate colours at 180 degrees to each other.
In both cases there is some labour involved in creating the prints, and as his detailed write-up of printing the Tide pods reminds us, the process of creating the printing plate is not exactly an easy one. But it remains the best way yet to add extra colours to a board without paying a small fortune for the inkjet process, and if you’d like to put your own designs at the bleeding edge of PCB art you might wish to read his writeups and watch the video below the break.
This is just one example of the kind of manufacturing techniques, and electronic design principles on display at the Hackaday Superconference. There’s another Supercon just around the corner, so grab your ticket and send in your own talk proposal right away!
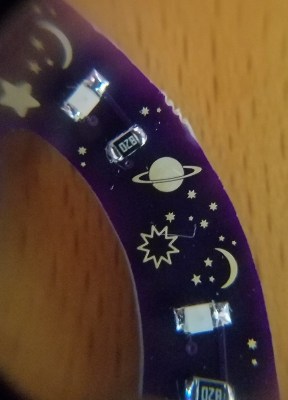
Remember when PCBs were green and square? That’s the easy default, but most will agree that when you’re going to show off your boards instead of hiding them in a case, it’s worth extra effort to make them beautiful. We’re in a renaissance of circuit board design and the amount of effort being poured into great looking boards is incredible. The good news is that this project proves you don’t have to go nuts to achieve great results. This stars, moons, and planets badge looks superb using just two technical tricks: exposed (plated) copper and non-rectangular board outline.
Don’t take that the wrong way, there’s still a lot of creativity that [Steve] over at Big Mess o’ Wires used to make it look this great. The key element here is that copper and solder mask placements have extremely fine pitch. After placing the LEDs and resistors there’s a lot of blank space which was filled with what you might see in the night sky through your telescope. What caught our eye about this badge is the fidelity of the ringed planet.
The white ink of silk screen is often spotty and jagged at the edges. But this copper with ENIG (gold) plating is crisp through the curves and with razor-sharp tolerance. It’s shown here taken under 10x magnification and still holds up. This is a trick to keep under your belt — if you have ground pours it’s easy to spice up the look of your boards just by adding negative-space art in the solder mask!
[Steve] mentions the board outline is technically not a circle but “a many-sided polygon” due to quirks of Eagle. You could have fooled us! We do like how he carried the circle’s edges through the bulk of the board using silk screen. If you’re looking for tips on board outline and using multiple layers of art in Eagle, [Brian Benchoff] published a fabulous How to do PCB art in Eagle article. Of course, he’s gone deeper than what the board houses offer by grabbing his own pad printing equipment and adding color to white solder mask.
The art was the jumping off point for featuring this badge, but [Steve] is known for his technical dives and this one is no different. He’s done a great job of recounting everything that popped up while designing the circuit, from LED color choice to coin cell internal resistance and PWM to low-power AVR tricks.


 Don’t take that the wrong way, there’s still a lot of creativity that [Steve] over at Big Mess o’ Wires used to make it look this great. The key element here is that copper and solder mask placements have extremely fine pitch. After placing the LEDs and resistors there’s a lot of blank space which was filled with what you might see in the night sky through your telescope. What caught our eye about this badge is the fidelity of the ringed planet.


