knex_plotter

K’nex Whiteboard Plotter

[Jerry] has been wanting to put together a whiteboard plotter for some time and just recently got around to building one.

The plotter draws pretty much about anything he can imagine on a white board measuring just shy of 2′ x 3′. The design first started off with a Basic Stamp board at the helm, which he sourced from another project he no longer had any use for. The Stamp worked for awhile, but eventually he ran into problems due to the board’s limited 128 bytes of program space. Needing a more robust micro controller, he switched to an Arduino mid-project, which he says runs the plotter far faster than the Stamp ever did.

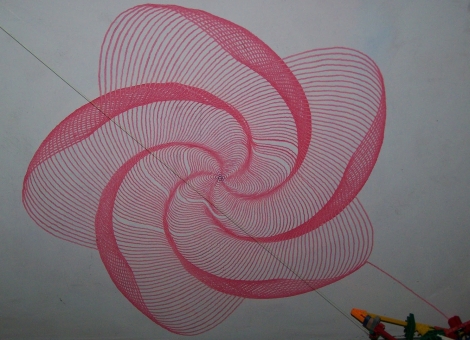
The plotter uses a pair of stepper motors mounted on a horizontal platform situated above the whiteboard. Much like this large-format printer we featured earlier this week, the steppers vary the length of a pair of fishing lines, moving the pen precisely across the board.  As you can see in the image above, [Jerry] has been able to create some pretty intricate patterns with his plotter, and we imagine they will only get better with more refinement.

Be sure to check out his site for more details on his build process as well as several additional samples of the plotter’s capabilities.

Redeye Printer Interface

This handy printer interface started out as a request on our very own forums when forum member [victorf] needed some output via thermal printers. He had scored a number of HP82240B thermal printers intended for use with HP calculators, but of course they used the somewhat arcane HP protocol first drafted in the 1960’s and needed some help.

Fellow forum member [wireb] started to look into it, found out it uses a standard 32KHz carrier signal, and started asking questions about its use. Grabbing a pdf of the manual he was able to find out all the details to what the printer was expecting in the form of communications.

After a few weeks, [wireb] was able to make a convenient, logic level serial to HP-IR adapter based around a PIC16F1824 who’s firmware supports 9600 8N1 or 2400 8N1 speeds, ASCII text, and the printer’s “advanced” graphical modes via escape sequences.

If you have not checked out our forums yet we suggest you do!

Hackaday Links: March 27, 2011

Magnified glasses

A late hacking session, and parts-on-hand came together as the inspiration for [BadWolf’s] magnified glasses with LED lighting.

Pendulum Printer

This orb, when swung like a pendulum, prints images by dropping ink out the bottom. A processing sketch works in conjuction with a Wii Remote and an IR LED in the orb to sense when the print head is in just the right position for dispensing ink.

ITead PCB fab house tips and tricks

[Flemming] uses a PCB fab house called ITead Studio. We hadn’t heard of it before but if you consider giving it a try make sure you look over his tips and tricks about the service before submitting your designs.

Katamari Bookmarklet

[Spi] wrote in to let us know about this Java Bookmarklet he came across that lets you turn any webpage into a Katamari Damacy level. It’s a pretty clever bit of code.

Color-picker pen

Here’s a pen concept inspired by Photoshop. On one end there’s a scanner that lets you pick your color from any physical object. Then just turn it around and write with the exact same color. Now go out and make this reality! [Thanks Frank]

Direct To PCB Resist Printing Requires Minimal Additional Components

epson_inkjet

Printing PCBs using the toner transfer method works pretty well, but there are some downsides, such as incomplete trace transfers and the like. HackHut user [rucalgary] decided to go the inkjet route instead, and picked up an Epson printer on clearance at his local electronics shop. This method is not new by any means, but his printer conversion is one of the simplest we’ve seen as it does not rely on any additional sensors to function.

Once he got home, he tore the printer down immediately, removing the paper input and output trays as well as the scanner bed. After all of the extraneous parts were removed, he got to work raising up the printer head, as well as the printer head rest mechanism. He mentions that the latter component is absolutely crucial to proper functionality down the line. Once the print head and its associated components were relocated, he added a pair of aluminum rails for feeding his print tray into the machine.

With everything complete, he filled up a spare cartridge with ink (he says that MISPRO yellow works best) and ran some test boards through. He is quite pleased with how things turned out, and is more than happy to give you a quick tour of his completed printer via the video below.

Continue reading “Direct To PCB Resist Printing Requires Minimal Additional Components”

Direct To PCB Etch Resist Printing

Here’s a step-by-step guide for printing etch resist directly to copper clad boards. Two methods of making printed circuit boards at home have long dominated as the favorites; using photo-resist, and the toner-transfer method. The latter involves printing board artwork on a laser printer and then ironing it onto the copper clad. We’ve seen some efforts to print toner directly to the copper, or to use ink to adhere toner and then heat fuse it, but this hack is the first one we remember seeing that uses an inkjet printer directly.

The best reason inkjet printing isn’t often used is do to the ink’s iability to protect copper from the etchant. This method uses MISPRO ink that is pigment based and will resist the acid. An Epson Stylus Photo R260 printer was chosen because you can get refillable printer cartridges which work with the ink, and they’re fairly easy to modify. In order to feed substrate through the device it needs some physical alteration to make room for the thickness of the material, and an ATtiny13 has been added to trick one of the sensors.

Unfortunately we didn’t find photos of the printed resist. But there is source code available for the tiny13 if you do give this a try.

[Thanks Pavlejo]

Emulating Ink Cartridges

[Smartie_on_computer] wanted to do some experimenting with an epson printer.  After getting a somewhat disassembled one, the first step was to simply get it running. Unfortunately, one of the ink cartridges was missing and these printers refuse to do pretty much anything without all the cartridges installed.  Rather than go purchase a costly cartridge that they didn’t intend to actually use, [Smartie_on_computer], chose to emulate the cartridge using a microcontroller. After some searching for the protocol used on the cartridge, the info ended up being in the patent. [Smartie_on_computer] now has a functional printer that is destined to be a 3d printer in the near future. You can see a video breakdown after the break.

Continue reading “Emulating Ink Cartridges”

DTG: Improved Printing On T-shirts

[Jeff German] improved upon his DIY direct to garment printer an ended up with a machine he thinks is equivalent to anything you can buy commercially. We last looked in on this project in June but much has been done since then. Most notably, there are build instructions available (requires login). [Jeff’s] printer is based around an Epson R1900 plus the base that holds and feed a garment. Take a look after the break to see it printing full color designs in high resolution. From the YouTube description it sounds like he wants to go into production with this. Kudos to him for also sharing the build techniques.

Continue reading “DTG: Improved Printing On T-shirts”