ANTIRTOS: No RTOS Needed

Embedded programming is a tricky task that looks straightforward to the uninitiated, but those with a few decades of experience know differently. Getting what you want to work predictably or even fit into the target can be challenging. When you get to a certain level of complexity, breaking code down into multiple tasks can become necessary, and then most of us will reach for a real-time operating system (RTOS), and the real fun begins. [Aleksei Tertychnyi] clearly understands such issues but instead came up with an alternative they call ANTIRTOS.

The idea behind the project is not to use an RTOS at all but to manage tasks deterministically by utilizing multiple queues of function pointers. The work results in an ultra-lightweight task management library targeting embedded platforms, whether Arduino-based or otherwise. It’s pure C++, so it generally doesn’t matter. The emphasis is on rapid interrupt response, which is, we know, critical to a good embedded design. Implemented as a single header file that is less than 350 lines long, it is not hard to understand (provided you know C++ templates!) and easy to extend to add needed features as they arise. A small code base also makes debugging easier. A vital point of the project is the management of delay routines. Instead of a plain delay(), you write a custom version that executes your short execution task queue, so no time is wasted. Of course, you have to plan how the tasks are grouped and scheduled and all the data flow issues, but that’s all the stuff you’d be doing anyway.

The GitHub project page has some clear examples and is the place to grab that header file to try it yourself. When you really need an RTOS, you have a lot of choices, mostly costing money, but here’s our guide to two popular open source projects: FreeRTOS and ChibiOS. Sometimes, an RTOS isn’t enough, so we design our own full OS from scratch — sort of.

Autodrop3D Continues Working At 3D Printer Automation

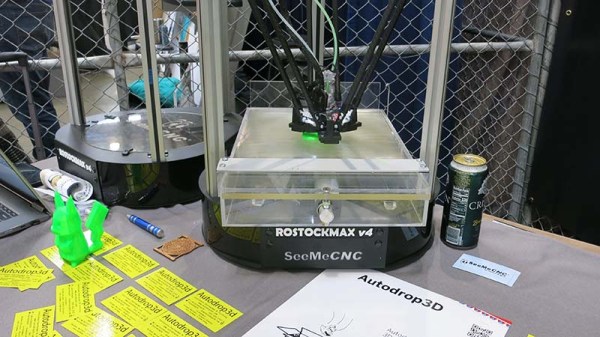
It is an unfortunate fact that 3D printers spend most of their time sitting idle, waiting for a human to remove finished prints or waiting for the next print to start. Hackers see such inefficiency as an open invitation to devise a better way, and we’ve seen several innovative ideas come across these pages. Some have since been abandoned, but others have kept going. At Maker Faire Bay Area 2019 we had the chance to revisit one presented as Autodrop3D.

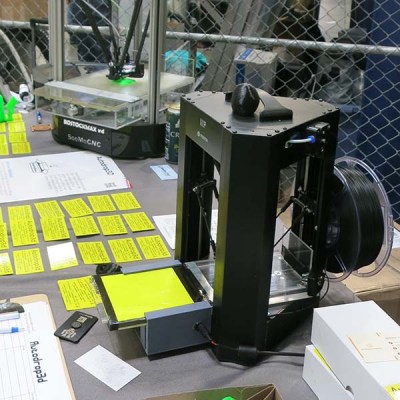
We saw a much earlier iteration entered in our Hackaday Prize in 2017 and it was fascinating to see how the basic ideas have developed over the past few years. The most visible component of the system is their print ejection system, which has greatly improved in robustness. Because the mechanism modifies the print bed and adds significant mass, it is best suited to delta printers as their print bed remains static. The concept might be adaptable to printers where the print bed only has to move along Z axis, but for now the team stays focused on deltas. There were two implementations on display at Maker Faire: a large one built on a SeeMeCNC RostockMAX v4, and a small one built on a Monoprice Mini Delta.

The ejection system is novel enough by itself, but the hardware is only one part of the end-to-end Autodrop3D vision. Their full software pipeline starts with web-based CAD, to integrated slicing, to print queue management, before G-code is fed to a printer equipped with their ejection system.

We admire inventors who keep working away at turning their vision to reality, and we look forward to seeing what’s new the next time we meet this team. In the meantime, if you like the idea of an automated print ejection mechanism but want more cartoon style, look at this invention from MatterHackers.

Thread Carefully: An Introduction To Concurrent Python

The ability to execute code in parallel is crucial in a wide variety of scenarios. Concurrent programming is a key asset for web servers, producer/consumer models, batch number-crunching and pretty much any time an application is bottlenecked by a resource.

It’s sadly the case that writing quality concurrent code can be a real headache, but this article aims to demonstrate how easy it is to get started writing threaded programs in Python. Due to the large number of modules available in the standard library which are there to help out with this kind of thing, it’s often the case that simple concurrent tasks are surprisingly quick to implement.

We’ll walk through the difference between threads and processes in a Python context, before reviewing some of the different approaches you can take and what they’re best suited for.

Continue reading “Thread Carefully: An Introduction To Concurrent Python”

Hackaday Prize Entry: A 3D Printer Management System

Since the first desktop 3D printers, people have been trying to figure out a way to manage desktop 3D printers and turn them into tiny little automated factories. One of the first efforts was a conveyor belt build plate that was successfully used by MakerBot until it wasn’t anymore. Octoprint has been a boon for anyone who wants to manage a few printers, but that’s only half the solution.

For his Hackaday Prize entry, [Mike] has come up with a solution that turns a desktop 3D printer into a completely automated factory. Not only does this project take care of removing the part from the bed when the print is done, it also manages a web-based print queue. It is the simplest way to manage a printer we’ve ever seen, and it’s a great entry for the Hackaday Prize.

First up, the software stack. [Mike] has developed a web-based queue and slicing software that ingests 3D models and spits out Gcode to a printer. This, really, is nothing new. Octoprint does it, Astroprint does it, and even a few 3D printers have this capability. This is only one part of the project though, although it is geared more as a maker space management software than simply a dedicated 3D printer controller.

You can’t have an automated mini factory without an automated build plate, though, and here [Mike] has come up with something really great. His solution for dispensing prints after they’re completed is brilliant in its simplicity. All you need to do is drop the floor out from underneath the print. [Mike]’s solution is a trap door print bed. At the beginning of the print, an inkjet printer spits out a piece of paper, with a few lines of text, onto the print bed. When the print is finished, a stepper motor unwinds a cable, and a trap door opens up underneath the print. The part drops into a bin, the door closes, and the next print is loaded up in the queue. It’s brilliantly simple.

You can check out [Mike]’s demo of this system after the break. It’s awesome and so sublimely simple we’re shocked no one has thought of this before.

Continue reading “Hackaday Prize Entry: A 3D Printer Management System”