Multicolor RepRap Prints The Really, Really Hard Way

[Adrian Bowyer] just posted his progress with multicolored printing to the RepRap blog.

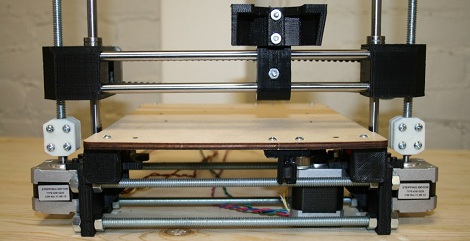
The new developments are a continuation of [Adrian]’s experiments with a mixer extruder that squirts four different colored filaments out of the same nozzle. [Myles Corbett] took this idea and ran with it producing the two-color print seen above. To squirt two different colored filaments out of the nozzle, [Myles] used two Bowden extruders mounted near the apex of the RepRap with tubes leading to the nozzle. Right now, the color of a print is controlled by loosening the grip screws of the extruder, but there are plans for moving that task over to electronic control of the extruders.

While it may be only black and white now, it’ll be a very interesting development once five extruders are loaded up with cyan, magenta, yellow, black, and white filament. Yes, it is now theoretically possible to print full-color 3D objects on a RepRap. While we’re not looking forward towards having to upgrade our one-motor extruder to a four- or five-motor model, the possibilities for desktop fabrication are becoming amazing.

Printrbot Files In The Wild

After a few months of eager waiting, [Brook Drumm] has finally released the files for his paradigm-shifting 3D printer, the Printrbot. If you didn’t order one of these during the Kickstarter, you can now print your own set of parts.

[Brook] gave his Printrbot to the world last November with the promise of being extremely cheap, extremely easy to build, and having a relatively high print quality. The simplicity of the Printrbot was amazing, which probably led to the Printrbot getting $830k worth of funding on the initial Kickstarter. Although the files for the 3D printed parts are out in the wild now, there still aren’t any instructions on how to build it apart from a Flickr slideshow.

[Brook] promised to release the files for the Printrbot much earlier, but we’re guessing he’s been busy printing and assembling  the 1200 Printrbots that were claimed in his Kickstarter. While we’re on the subject of cheap 3D printers, [Richard Sum], the English gent behind the SUMPOD sent in a link of one of his $600 printers milling MDF and extruding for seven hours straight. We’re on the cusp of Star Trek-style replicators here, people.

3D Printed Helicopter Blades

If you’re like us, you’ve been infatuated with the small RC helicopter you picked up on Amazon up until the point where it careened off a wall and broke its blades. Now that you’re wondering about what to do with that small pile of plastic, metal, and electronics, why not print some helicopter blades on your 3D printer?

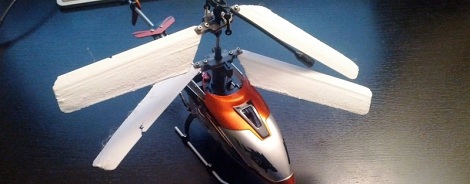
[Taylor] printed these blades on his Utilimaker, but we don’t see why they couldn’t be printed on a Makerbot or other RepRap. The first set of printed blades worked on the top rotor, but they were too heavy when all four blades were replace. The parts were edited in netfabb using a 0.08mm layer height and now they’re working perfectly. As far as free tools go, Slic3r is the new hotness for .STL to Gcode conversion and now that [Taylor] put the files up on Thingiverse, anyone can print a set of spare blades.

Check out [Taylor] comparing his printed blades to the stock ones that came with his awesome heli after the break.

Continue reading “3D Printed Helicopter Blades”

DIY Ultrasonic Plastic Welding

Here’s something that may be of interest to all the reprappers, vacuum formers, and other plastic fabbers out there: ultrasonic welding of plastics. If you’ve ever wanted to join two pieces of plastic without melting them together with acetone or screwing them together, [circuitguru] is your guy.

Ultrasonic welder setups are usually reserved for companies that don’t mind spending tens of thousands of dollars on a piece equipment. There are smaller versions made for heat staking – melting plastic pillars into rivets on the work piece – and [circuitguru] was lucky enough a somewhat reasonable price.

Because the heat staking gun was a handheld unit, a rotary tool drill press was put to work. The end result is a relatively inexpensive way to join two plastic parts without screws, glue, or solvents. The bond is pretty strong, too. Check out the video after the break to see [circuitguru] join two pieces of a plastic enclosure and try to tear them apart.

Continue reading “DIY Ultrasonic Plastic Welding”

3D Printing Minecraft Worlds

If you’ve ever wanted to build an awesome tabletop game or model train layout scenery, you probably couldn’t do better than printing Minecraft worlds on a RepRap. This guide comes courtesy of [Nudel] who figured out how to use Mineways with his RepRap. While [Nudel]’s landscape print doesn’t have the full color of something from Shapeways, he only spent $3 in materials. Not bad if you’d like to print out your server’s world.

We have to give a shout out to [erich666] for his amazing work on Mineways. He bills his work as a bridge between Minecraft and a 3D printer or Blender. You can check out [erich]’s demo of Mineways after the break.

Of course the state of printing voxels wouldn’t be where it is today without the work of two guys at the MIT Media Lab and their work on Minecraft.Print(). If you manage to print out your base/castle/village, add it to the Mineways Flickr group.

Continue reading “3D Printing Minecraft Worlds”

The Cheapest And Easiest 3D Printer We’ve Seen So Far

3D printers are awesome, but boy are they frustrating. If you’ve built a RepRap Mendel, Prusa or Huxely, you know there’s nothing quite like trying to get a washer off of a threaded rod without disassembling the entire machine. This frustration in part sourcing, assembling and correctly aligning a printer is where printers like the Makerbot find their niche. There’s a new printer on the block that promises a 45 minute assembly time and less than 2 hours from starting the build to first print. It will do all this for under $500, electronics and motors included.

From the Flickr photoset, we can see that the Printrbot has 2 motors for the z-axis, uses sanguinololu electronics, and uses a derivative of Wade’s extruder – all proven design choices. Unlike the RepRaps, most of the frame is actually printed, and not built out of threaded rods. This drastically reduces the assembly and calibration time.

The inventor of the Printrbot, [Brook Drumm], has a Kickstarter up where he’s selling complete kits (electronics, motors and vitamins) for $499. This beats the very inexpensive SUMPOD in affordability. We haven’t been able to find the 3D design files for the Printrbot (although you can buy these printed parts for $75), and there’s no word on the build volume of the stock printer. That being said, the printrbot does have pretty good resolution. Check out the video of a Printrbot in action after the break.

Continue reading “The Cheapest And Easiest 3D Printer We’ve Seen So Far”

Pololu Compatible Relay Driver

[Bart] built a couple dozen Pololu compatible relay drivers.

If you have a Reprap, you’re probably familiar with the Pololu stepper motor driver. These tiny pieces of kit provide stepper motor control for Gen 6, RAMPS, or Sanguinololu Reprap electronics. There’s a small problem with all these boards, though; there’s no way to control any high-power devices from these boards except for stepper motors. Controlling a spindle for a home-built CNC router would be great, but apart from attaching a Dremel to your x-axis, you’re just about out of luck.

[Bart]’s relay driver takes the step and direction inputs from the stock Pololu stepper driver and connects each of those to a MOSFET. From there, a relay can be hooked up to the driver to control the spindle for a router, or a whole bunch of fans for a homebrew laser cutter.

The schematic and Gerber files are up on [Bart]’s webzone. The part count is very low, and the entire board could easily be built on a piece of perfboard. Check out the demo on the other side of the jump.

Continue reading “Pololu Compatible Relay Driver”