Autonomous Metal Detector Lets You Sit Back, Get Rich

thunderbird7-autonomous-metal-detector

As a kid, metal detectors seemed like great fun. Every commercial I saw beckoned with tales of buried treasure “right in my own back yard” – a bounty hard for any kid to pass up. In reality, the process was both time consuming and tedious, with little reward to be had. [Gareth] liked the idea of scouring the Earth with a metal detector, but he liked sitting and relaxing even more. He decided he could easily partake in both activities if he built himself an autonomous metal detecting robot.

He stripped down a hand held metal detector, and installed the important bits on to the front of an R/C chassis. An Arduino controls the entire rig via a motor shield, allowing it to drive and steer the vehicle while simultaneously sweeping the metal detector over the ground. He fitted the top of the rover with a camera for remotely watching the action from the comfort of his patio, along with a laser which lets him pinpoint the location of his new found goods.

Continue reading to see a short video of the robot in action, and be sure to check out his site for more build details.

Continue reading “Autonomous Metal Detector Lets You Sit Back, Get Rich”

A TV-B-Gone With A PIC Twist

pic-tvbgone

[Kayvon] thought that the TV-B-Gone was a fun little device and wanted to build one, but he didn’t have an AVR programmer handy. Rather than picking up some AVR kit and simply building a replica, he decided to give his PIC skills a workout and build a Microchip derivative of his own.

The PIC-based TV-B-Gone is pretty similar to its AVR-borne brethren, featuring a PIC24F08KA101 at the helm instead of an ATTiny. His version of the TV-B-Gone can be left on indefinitely, allowing him to situate the device in a convenient hiding place to wreak havoc for as long as he likes.

[Kayvon’s] TV-B-Gone does everything the original can at just under $7, which is quite a bit cheaper than the Adafruit kit. If you’re not averse to perfboard construction, be sure to check out the build thread over in the Adafruit forums. [Kayvon] has done most of the heavy lifting for you – all you need to do is build it.

Multicolor RepRap Prints The Really, Really Hard Way

[Adrian Bowyer] just posted his progress with multicolored printing to the RepRap blog.

The new developments are a continuation of [Adrian]’s experiments with a mixer extruder that squirts four different colored filaments out of the same nozzle. [Myles Corbett] took this idea and ran with it producing the two-color print seen above. To squirt two different colored filaments out of the nozzle, [Myles] used two Bowden extruders mounted near the apex of the RepRap with tubes leading to the nozzle. Right now, the color of a print is controlled by loosening the grip screws of the extruder, but there are plans for moving that task over to electronic control of the extruders.

While it may be only black and white now, it’ll be a very interesting development once five extruders are loaded up with cyan, magenta, yellow, black, and white filament. Yes, it is now theoretically possible to print full-color 3D objects on a RepRap. While we’re not looking forward towards having to upgrade our one-motor extruder to a four- or five-motor model, the possibilities for desktop fabrication are becoming amazing.

Worried About Haloween This Year? Why Not A Giant T-Rex Costume?

Although some might note that [Jamie]’s creation could mistaken for a Velociraptor or even Allosaurus, his giant T-Rex costume/model is quite a feat of artistry. It stands at over 14 feet tall and 10 feet long. For comparison, the room that you see in the picture above measures 25 x 25 feet. If you happen to live in the Atlanta area, or are willing to travel, this costume is expected to make an appearance at Dragon*Con in 2012, so be sure to look for it there.

The whole thing is made from poly foam plank cut with a CNC router.  It also has a metallic support structure. As noted in the article, you could, in theory, cut all these parts out by hand. Persistence would be required though, since there are over 140 parts!

[Jamie]’s making capabilities are obviously quite advanced at this point, but he’s trying to expand them by winning a router in the Instructables Shopbot contest. If you like his creation, be sure to vote for him! Check out the video of this costume in action after the break. Continue reading “Worried About Haloween This Year? Why Not A Giant T-Rex Costume?”

Checking The Accuracy Of Fake Watches

Since [th3badwolf] realized a wrist watch is the ultimate men’s fashion accessory, he’s been trolling around eBay looking for a nice looking, but still inexpensive wearable chronometer. The Fauxlex brand isn’t normally regarded for accurate time keeping, so he decided measure the accuracy of his off-brand watches in a really clever way.

[th3badwolf] had a camera with a built-in intervalometer lying around and figured if the camera was set to take one picture a minute, the second hand would stay still while the minute and hour hands moved. An hour-long test confirmed his theory and he pointed his cameras towards his knock-off watches.

In the resulting time-lapse video available after the break, [th3badwolf] calculated that the first and third watches lose about 24 seconds a day. He attributes this fact to the watches having the same clockworks. The second watch gains nearly three minutes a day, and he’s trying to send that one back to the supplier. We’re not sure how that will end up, but at least [th3badwolf] has two reasonably accurate watches now.

Continue reading “Checking The Accuracy Of Fake Watches”

Control MIDI With An Android Device

[Lewis] wanted to control MIDI devices with the huge touch screen that is his Android phone. After he couldn’t find a simple hardware implementation of MIDI out, he turned to an IOIO board to send MIDI notes to just about any imaginable musical hardware. It’s a clean build and fills a gap in the abilities of the Android platform.

Because of the woeful support of MIDI in Android, [Lewis] couldn’t find a good way to push MIDI notes from his phone to other devices. While there are a few high-overhead options like MIDI over wi-fi or a Bluetooth connection, there wasn’t much in the way of a straight-up hardware connection to other MIDI devices. [Lewis] got around this limitation by using an IOIO board and the right software to send MIDI notes though a DIN-5 connector.

Although the project works as intended, [Lewis]’ build could be made more permanent by building one of these MIDI interfaces and wiring that to the IOIO. All the Android code is up and available, along with a neat demo of [Lewis] controlling the delay time of an effects unit in his guitar rig. You can check that video out after the break.

Continue reading “Control MIDI With An Android Device”

Doing It Right With A Morse Code Keyboard

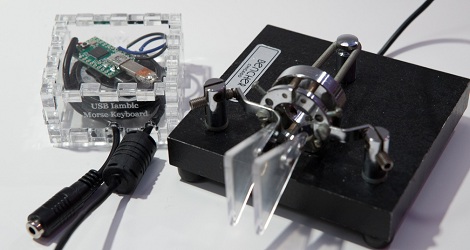
Hackaday has seen dozens of Morse code keyboards over the years, but [Hudson] at NYC Resistor finally managed to give that idea the justice it deserves. He built a USB Morse code keyboard with the same type of telegraph key the pros use.

For his project, [Hudson] got his hands on a wonderful iambic paddle that is usually hooked up to CW rigs. Unlike previous Morse keyboards we’ve seen, [Hudson] used iambic paddles, a telegraph key with one lever for dits and another for dahs. Because the dits and dahs are separate electrical connections, it’s extremely easy for the microcontroller – a Teensy – to parse the Morse code and send the correct letter to the computer.

[Hudson] also added some audio feedback for the dits and dahs, and designed a laser-cut enclosure for the Teensy and speaker. Check out the video of the iambic keyer keyboard in action after the break.
Continue reading “Doing It Right With A Morse Code Keyboard”