1970s Lab Equipment Turned Retro Pi Terminal

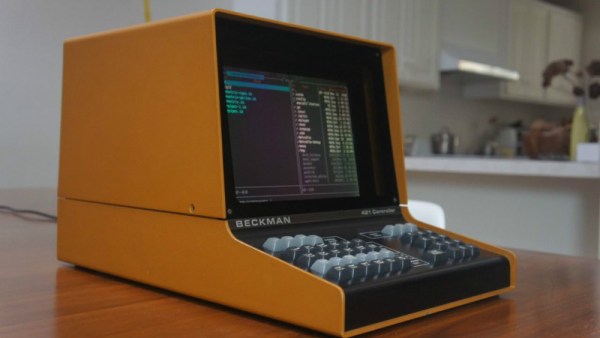
When it was released, the Beckman Model 421 CRT controller represented the latest and greatest in liquid chromatography technology. Its 12 inch screen would allow the operator to view critical information such as flow rate and concentration, and its integrated keyboard simplified system control. It made liquid chromatography faster and easier, allowing lab technicians to focus on analysis rather than the complexities of operating the equipment.

But none of that matters right now. What matters is that [Igor Afanasyev] found one of these gloriously vintage devices at a local swap meet and decided it deserved a second chance at life. With a Raspberry Pi and a surprising amount of support hardware, he was able to turn this roughly 40 year old piece of scientific equipment into a multipurpose device that does everything from classic gaming to multimedia playback. It’s got a few quirks, but overall this is a gadget that any hacker would love to have kicking around their modern-day lab.

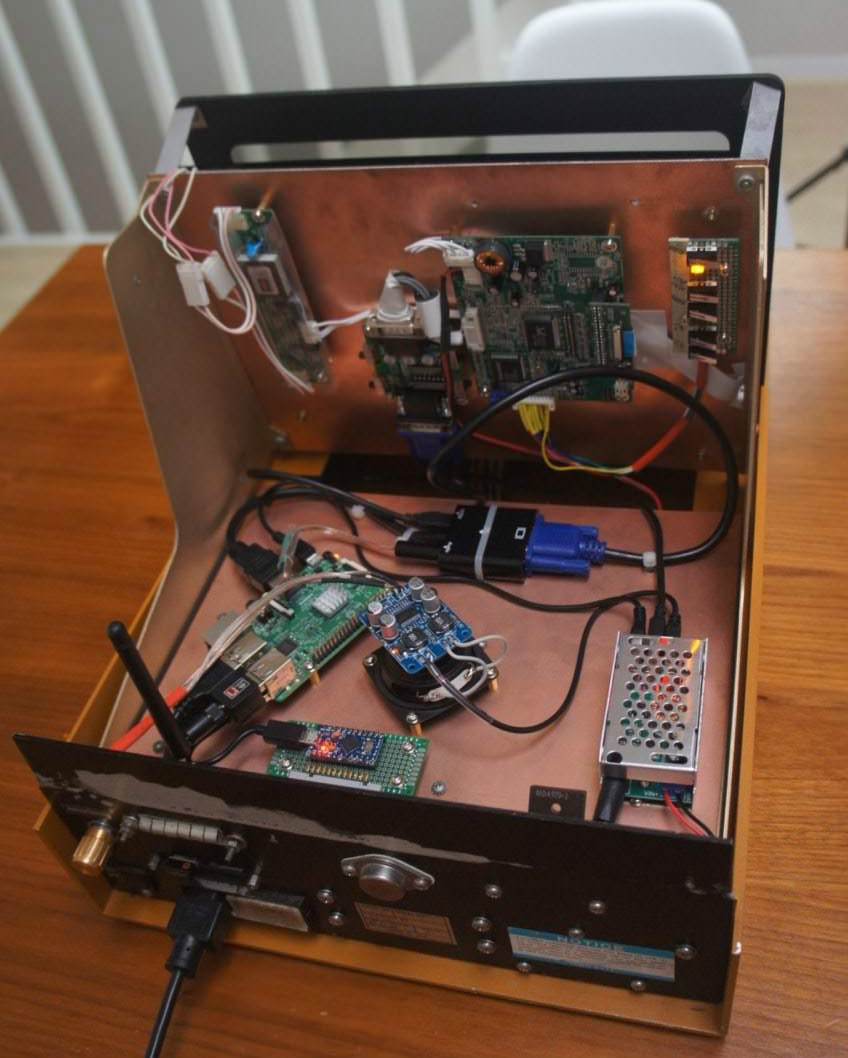
[Igor] explains that the Model 412 is essentially just a dumb terminal with no internal logic, so in theory it should have been possible to just hang the thing on a serial port and be done with it. But unfortunately the display drive board was dead, so a full rebuild was in order. This meant that there’s little left of the original device other than the keyboard and the case itself, but since it isn’t exactly a “vintage computer” in the traditional sense, we think the purists will allow it.

For the display, [Igor] used an LCD he salvaged from an old digital picture frame. It was the right size to fit the opening, and thanks to an unpopulated VGA header on the board, wasn’t too difficult to get connected to the Pi with an HDMI adapter. He also added a hardware VGA scanline generator board so that no matter what the Pi shows it will have that classic old-school look; a fantastic detail we don’t usually see on builds like this.

The keyboard on the Model 412 was more of a control panel than a traditional input device, so not only does it have keycaps which say things like “FLOW RATE” and “WRITE TAPE”, but it has a fairly weird layout. After reverse engineering the somewhat unusual key matrix, he spun up a custom firmware for the Arduino Pro Micro using QMK which would let him use the board on the Pi as a standard USB input device. But rather than replace the keys, [Igor] created a little cheat-sheet overlay that he could put over the board to see what keys translate to which letters. It’s awkward for sure, but we really appreciate that he preserved the unique nature and look of the Model 412.

Like the Heathkit H19 that was brought back to life with an internal Raspberry Pi or the DEC VT100 with a BealeBone inside there’s something about the visual aesthetic and no-nonsense approach of these vintage terminals which continue to make them compelling into the 21st century.

A Portal Port Programmed For Platforms Of The Past

If you still have a Commodore 64 and it’s gathering dust, don’t sell it to a collector on eBay just yet. There’s still some homebrew game development happening from a small group of programmers dedicated to this classic system. The latest is a Portal-like game from [Jamie Fuller] which looks like a blast.

The Commodore doesn’t have quite the same specs of a Playstation, but that’s no reason to skip playing this version. It has the same style of puzzles where the player will need to shoot portals and manipulate objects in order to get to the goals. GLaDOS even makes appearances. The graphics by [Del Seymour] and music by [Roy Widding] push the hardware to its limits as well.

If you don’t have a C64 laying around, there are some emulators available such as VICE that can let you play this game without having to find a working computer from the 80s. You can also build your own emulator if you’re really dedicated, or restore one that had been gathering dust. And finally, we know it’s not, strictly speaking, a port of Portal, but some artistic license in headlines can be taken on occasion.

Continue reading “A Portal Port Programmed For Platforms Of The Past”

The Complete Beginner’s Guide To Building A CNC Machine

Despite appearances, [This Old Tony]’s latest series has little to do with CNC-ifying an Etch A Sketch. Although he certainly achieves that, more or less, automating the classic toy is just the hook for a thorough lesson in CNC machine building starting with the basics.

Fair warning: we said basics, and we mean it. [Old Tony]’s intended audience is those who haven’t made the leap into a CNC build yet and need the big picture. Part one concentrates on the hardware involved – the steppers, drivers, and controller. He starts with one of those all-in-one eBay packages, although he did upgrade the motion controller to a Mach4 compatible board; still, the lessons should apply to most hardware.

By the end of part one, the Etch A Sketch is connected to two of the steppers and everything is wired up and ready to go for part two, the first part of which is all about inputs and outputs. Again, this is basic stuff, like how relays work and why you might need to use them. But that’s the kind of stuff that can baffle beginners and turn them off to the hobby, so kudos to [Old Tony] for the overview. The bulk of the second part is about configuring Mach4 Hobby, with a ton of detail and some great tips and tricks for getting a machine ready to break some end mills.

For someone looking to get into a CNC build, [Old Tony]’s hard-won CNC experience really fills in the gaps left by other tutorials. And it looks like a third part, dealing with making all this into something more than an automated Etch A Sketch, is in the works. We’re looking forward to that.

Continue reading “The Complete Beginner’s Guide To Building A CNC Machine”

Thrift Store Razor Scooter Gets More Kick

Beyond pride, the biggest issue keeping adults off small motorized scooters is the fact that their tiny motors usually don’t have the power to move anything heavier than your average eighth grader. That didn’t stop [The_Didlyest] from snapping up this $7 thrift store find, but it did mean the hot pink scooter would need to be beefed up if it had any hope of moving 170 lbs of hacker.

Logically, the first step was fitting a more capable motor. [The_Didlyest] used an electric wheelchair motor which had a similar enough diameter that mounting it was fairly straightforward. The original sprocket and chain are still used, as are the mounting holes in the frame (though they had to be tapped to a larger size). That said, the new motor is considerably longer than its predecessor so some frame metal had to be cut away. This left the scooter without a kickstand and with a few inches of motor hanging out of its left side, but it’s all in the name of progress.

Naturally the upgraded motor needed similarly upgraded batteries to power it, so [The_Didlyest] put together a custom pack using eighteen 18650 cells spot welded together for a total output of 25V. Coupled with a 60A battery management system (BMS), the final 6S 3P configured pack is a very professional little unit, though the liberal application of duct tape keeps it from getting too full of itself.

Unfortunately the original motor controller consisted of nothing but relays, and didn’t allow adjusting speed. So that needed to go as well. In its place is a homebrew speed controller made with three parallel MOSFETs and an Arduino to read the analog value from the throttle and convert that into a PWM signal.

[The_Didlyest] says the rear tire is now in need of an upgrade to transmit all this new power to the road, and some gearing might be in order, but otherwise the scooter rebuild was a complete success. Capable of mastering hills and with a top speed of about 10 MPH, the performance is certainly better than the stock hardware.

Of course this is far from the first time we’ve seen somebody put a little extra pepper on a scooter. Some of them even end up being street-legal rides.

The Filament Pelletizer For Fused Granular Fabrication

The ABS and PLA that goes into your 3D printer is sold in two forms. The first, naturally, is filament. The second is plastic granules, the raw material for your filament, and costs an order of magnitude less than the filament itself. For years we’ve been seeing machines that either print directly with plastic granules or are converted into filament with fancy filament-extruding machines. Now we can do it the other way. [Aubrey Woern] and [Joshua Pearce] of Michigan Tech have been working on a polymer pelletizer chopper that takes plastic filament and turns it into pellets.

The system uses a large corded drill motor to drive a Forstner drill bit. Filament is then threaded into the top of this spinning drill bit with the help of a small DC motor and grippy wheel printed out of Ninjaflex. The system works, and the authors of the paper were able to vary the size of the chopped filament by feeding it into the Forstner bit faster or slower.

While turning an expensive product (filament) back into its raw material (pellets) may not seem like a great idea, there have been a significant number of advancements in the state of manufacturing filament on a desktop and printing directly from pellets in recent years. A machine that turns plastic back into its raw state is something that’s needed if you want to experiment with plastic recycling, and this machine is more than capable of chopping up a spool of filament in two hours or so.

Ken Shirriff Explains His Techniques For Reverse Engineering Silicon

When it comes to reverse engineering silicon, there’s no better person to ask than Ken Shirriff. He’s the expert at teasing the meaning out of layers of polysilicon and metal. He’s reverse engineered the ubiquitous 555 timer, he’s taken a look at the inside of old-school audio chips, and he’s found butterflies in his op-amp. Where there’s a crazy jumble of microscopic wires and layers of silicon, Ken’s there, ready to do the teardown.

For this year’s talk at the Hackaday Superconference, Ken walked everyone through the techniques for reverse engineering silicon. Surprisingly, this isn’t as hard as it sounds. Yes, you’ll still need to drop acid to get to the guts of an IC (of course, you could always find a 555 stuck in a metal can, but then you can’t say ‘dropping acid’), but even the most complex devices on the planet are still made of a few basic components. You’ve got n-doped silicon, p-doped silicon, and some metal. That’s it, and if you know what you’re looking for — like Ken does — you have all the tools you need to figure out how these integrated circuits are made.

Continue reading “Ken Shirriff Explains His Techniques For Reverse Engineering Silicon”

Many Uses For A Single Button

When building projects with a simple goal in mind, it’s not unheard of for us to add more and more switches, buttons, and complexity as the project goes through its initial prototyping stages. Feature creep like this tends to result in a tangled mess rather than a usable project. With enough focus, though, it’s possible to recognize when it’s happening and keep to the original plans. On the other hand, this single-button project with more than one use seems to be the opposite of feature creep. (YouTube, embedded below.)

[Danko]’s project has one goal: be as useful as possible while only using a single button and a tiny screen. Right now the small handheld device can be used as a stopwatch, a counter, and can even play a rudimentary version of flappy bird. It uses an Arduino Pro Mini, a 64×48 OLED screen running on I2C, and has a miniscule 100 mAh 3.7V battery to power everything. The video is worth watching if you’ve never worked with this small of a screen before, too.

Getting three functions out of a device with only one button is a pretty impressive feat, and if you can think of any other ways of getting more usefulness out of something like this be sure to leave it in the comments below. [Danko] is no stranger to simple projects with tiny screens, either. We recently featured his homebrew Arduino calculator that uses an even smaller screen.

Continue reading “Many Uses For A Single Button”