Ambilight For Your Piano (Hero)

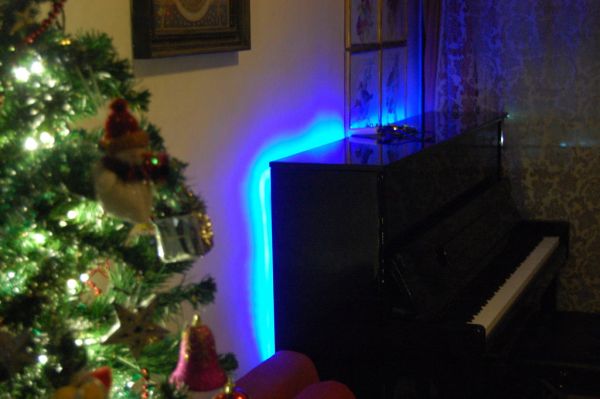
That old upright piano still sounds great, and now it can easily have its own special effects. [DangerousTim] added LED strips which change color when he tickles the ivories. The strips are applied along the perimeter of the rear side of the upright causing the light to reflect off of the wall behind the instrument. This is a familiar orientation which is often seen in ambilight clone builds and will surely give you the thrill of Guitar Hero’s brightly changing graphics while you rock the [Jerry Lee Lewis].

Key to this build is the electret microphone and opamp which feed an Arduino. This allows the sound from the piano to be processed in order to affect the color and intensity of the LED strips. These are not addressable, but use a transistor to switch power to the three colors of all pixels simultaneously.

We think there’s room for some clever derivative builds, but we’re still scratching our heads as to how we’d use addressable pixels. Does anyone know a relatively easy way to take the mic input and reliably establish which keys are being played? If so, we can’t wait to see your ambilight-piano-clone build. Don’t forget to tip us off when you finish the hack!

Desk lamp

Sleek Desk Lamp Changes Colors Based On Sun Position

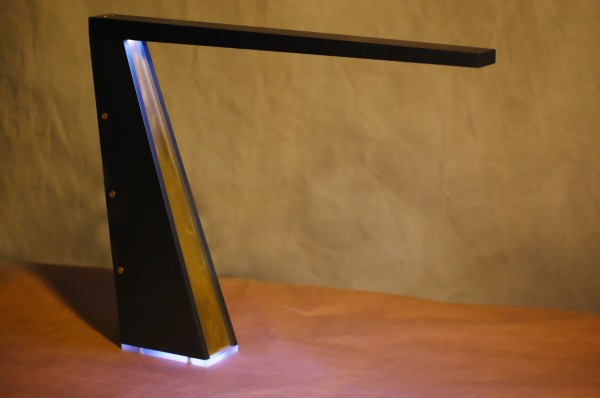
[Connor] was working on a project for his college manufacturing class when he came up with the idea for this sleek desk lamp. As a college student, he’s not fond of having his papers glowing brightly in front of him at night. This lamp takes care of the problem by adjusting the color temperature based on the position of the sun. It also contains a capacitive touch sensor to adjust the brightness without the need for buttons with moving parts.

The base is made from two sheets of aluminum and a bar of aluminum. These were cut and milled to the final shape. [Connor] found a nice DC barrel jack from Jameco that fits nicely with this design. The head of the lamp was made from another piece of aluminum bar stock. All of the aluminum pieces are held together with brass screws.

A slot was milled out of the bottom of the head-piece to make room for an LED strip and a piece of 1/8″ acrylic. This piece of acrylic acts as a light diffuser.  Another piece of acrylic was cut and added to the bottom of the base of the lamp. This makes for a nice glowing outline around the bottom that gives it an almost futuristic look.

The capacitive touch sensor is a pretty simple circuit. [Connor] used the Arduino capacitive touch sensor library to make his life a bit easier. The electronic circuit really only requires a single resistor between two Arduino pins. One of the pins is also attached to the aluminum body of the lamp. Now simply touching the lamp body allows [Connor] to adjust the brightness of the lamp.

[Connor] ended up using an Electric Imp to track the sun. The Imp uses the wunderground API to connect to the weather site and track the sun’s location. In the earlier parts of the day, the LED colors are cooler and have more blues. In the evening when the sun is setting or has already set, the lights turn more red and warm. This is easier on the eyes when you are hunched over your desk studying for your next exam. The end result is not only functional, but also looks like something you might find at that fancy gadget store in your local shopping mall.

kaleidoscope

Arduino Powered Digital Kaleidoscope

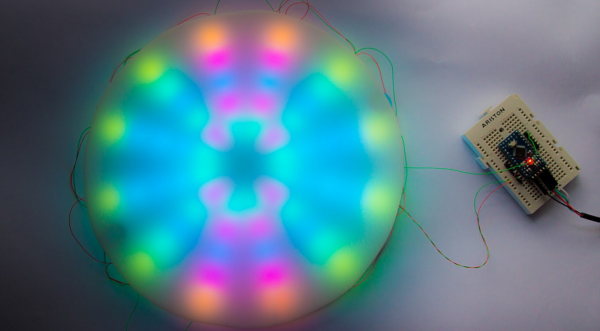
[Jose’s] latest project brings an old visual effect toy up to date with digital electronics. Most of us are familiar with inexpensive kaleidoscope toys. Some of us have even built cheap versions of them with paper tubes, mirrors, and beads. [Jose] wanted to try to recreate the colorful pattern effects created by a kaleidoscope using an Arduino and an addressable LED strip.

The build is actually pretty simple. The base is a disc of PVC cut to just a few inches in diameter. [Jose] started with an addressable LED strip containing 60 LEDs. He then cut it into 12 sections, each containing five LEDs. The smaller strips were then mounted to the disc, similar to spokes on a bicycle wheel. The LED strip already has an adhesive backing, so that part was trivial.

The final step was to add some kind of diffuser screen. The LED strips on their own are not all that interesting. The diffuser allows the light to blend together, forming interesting patterns that are more reminiscent of the patterns you might see in a real kaleidoscope. Without the diffuser you would just see individual points of light, rather than blended color patterns.

The whole thing is controlled by a small Arduino. [Jose] has made the code available at the bottom of his blog post. Be sure to watch the video of the system in action below. Continue reading “Arduino Powered Digital Kaleidoscope”

Developing A Better Way To Control 10,000 LEDs

The SoundPuddle project drives thousands of LEDs based on audio input. The team is working on a replacing the controller for this wire-filled setup with something more robust. They took the mess seen above to the Apogaea Festival and were plagued by loose wires and unreliable communications due to noise and interference. The aim of the new system is to reliably control up to 10,000 LEDs.

The red PCB seen at the center of the rats-nest is a Papilio FPGA board. They still want to use it to drive the installation, but a new hardware interface is necessary. The solution is to design what they call a megawing (wings are to Papilio as shields are to Arduino).  The LEDs will be in RGB strip form, so one of the requirements is to supply enough connectors to drive 16 channels of SPI devices. The wing will also include the 48V power source and connectors for the condenser microphone that serves as an input for the SoundPuddle. There are also two other options for audio input, one via a Bluetooth module (which can double as a control device) and the other via MIDI.

After the break you can see a lighting demo. Be ready with the volume controls as most of the sounds used in the test are quite annoying.

Continue reading “Developing A Better Way To Control 10,000 LEDs”