Build Your Own Tape Recorder/Player

If you want to read something from magnetic tape, you need a tape head, right? Or you could do like [Igor Brichkov] and make your own. It looks surprisingly simple. He used a washer with a small slot cut in it and a coil of wire.

The first experiment, in the first video below, is using a commercial tape head connected to a preamp. Music playing “through” the homemade head is readable by the commercial tape reader. This is a prelude to creating an entire tape deck using the head, which you can see in the second video below.

Continue reading “Build Your Own Tape Recorder/Player”

Recorded Programming — Thanks To Bing Crosby

If you look up Bing Crosby in Wikipedia, the first thing you’ll notice is his real name was Harry. The second thing you’ll read, though, is that he is considered the first “multimedia star.” In 1948, half of the recorded music played on the air was by Bing Crosby. He also was a major motion picture star and a top-selling recording artist. However, while you might remember Bing for his songs like White Christmas, or for his orange juice commercials, or for accusations of poor treatment from his children, you probably don’t associate him with the use of magnetic tape.

In a way, Bing might have been akin to the Steve Jobs of the day. He didn’t power the technology for tape recording. But he did see the value of it, invested in it, and brought it to the market. Turns out Bing was quite the businessman. Want to know why he did all those Minute Maid commercials? He was a large shareholder in the company and was the west coast distributor for their products. He also owned part of the Pittsburgh Pirate baseball team and other businesses.

So how did Bing become instrumental in introducing magnetic tape recording? Because he was tired of doing live shows. You see, in 1936, Crosby became the host of a radio variety show, The Kraft Music Hall. This very popular program was live. That means you have to show up on time. If you go off on a tangent, you’ll run out of time. And if you make a mistake, there is no editing. Oh and one other thing. You have to do a nationwide live show twice: once for the east coast and another for the west. This was cutting into Bing’s “family time” which, as far as we can ascertain was a code phrase for golf.

Continue reading “Recorded Programming — Thanks To Bing Crosby”

ESP8266 As A Tape Drive

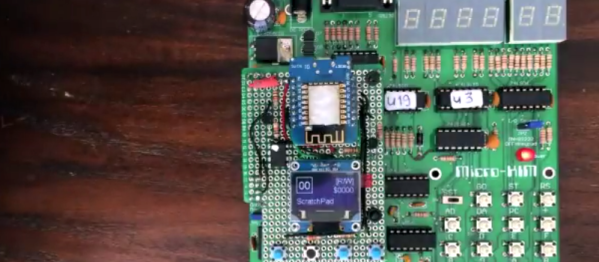
1976 was the year the Apple I was released, one of several computers based on the MOS 6502 chip. MOS itself released the KIM-1 (Keyboard Input Monitor) initially to demonstrate the power of the chip. The single board computer had two connectors on it, one of which could be used for a tape recorder for long-term storage. When [Willem Aandewiel] went to the Apple Museum Nederland in 2016, he saw one and felt nostalgic for his youth. He was able to get a replica, the microKIM, and build it but he wanted to use new technology to interface with this old technology, so he decided to use an ESP8266 as a solid state tape recorder.

One of the reasons the KIM-1 was so popular when it was released was that there was lots of documentation available. [Willem] used this documentation to figure out how the KIM-1 saves data to the recording device. An ATTiny85 is used to decode the pulse stream that the KIM-1 sends when saving because the timing was too tight to both “listen” and decode the bits as well as convert and store them. For loading programs, the data can be sent digitally as 1’s and 0’s to the KIM-1. This means that the ATTiny is only used for decoding and doesn’t have to re-encode the data.  Because of this, saving is slow, but loading is very quick.

To complete the project, [Willem] added four buttons, one each for rewind, record, play and fast-forward, and a screen so you can see which program is currently selected and can go from one program to another. As a nice throwback touch, record and play have to be pressed at the same time when saving. For more 6502 projects, check out this 6502 based DIY computer, or this 6502 built from discrete parts.

Continue reading “ESP8266 As A Tape Drive”

Building A Tape Recorder In 1949

tape

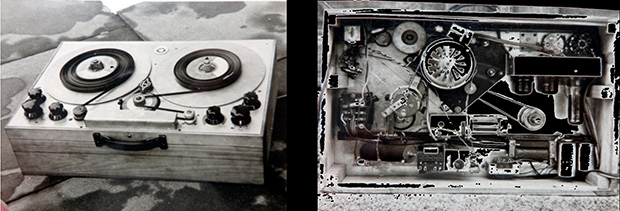
After telling a few stories about how he built a tape recorder as a 16-year-old boy in post-war Germany, [Hans] was finally cajoled into retelling this story in a proper form, giving the Internet one more example of how clever old-school tinkerers could be.

In 1949, [Hans] was but a wee lad of 16 and having built a crystal and tube radio set at 13 and 14 respectively desperately wanted a tour of the local radio station in Hamburg. A kind engineer responded to a letter and a month after requesting a tour [Hans] and his friend found themselves being guided around a proper radio station. One of the most impressive pieces of technology at the time was a tape recorder, which the engineer demonstrated by recording and playing back the voices of [Hans] and his friend. This was the first time [Hans] had ever heard his voice played back and instantly knew he needed to build one of these for himself.

Technical details on the theory and operation of a tape recorder were sparse, but [Hans] managed to come up with an amplifier, tape transport mechanism, a recording and playback head, and homemade magnetic tape made from a reel of iron filings glued to a reel of 8mm film stock.

Testing the equipment, [Hans] and his friend found the device simply wouldn’t work; the homemade magnetic tape was simply too thick, and you couldn’t just go out and buy a reel of magnetic tape. Undeterred, they mailed BASF, the only manufacturer of magnetic tape, and after a month received a 1000m reel of tape.

With tape that worked, [Hans] set about improving his recorder with a tape transport mechanism built from a turntable and a new recording head. This time, his tape recorder worked. When word got around of this amazing machine that could record music, [Hans] was invited to record the local symphony and the speeches for a senior group.

The first commercial reel to reel recorders were released in Germany a little more than a year after [Hans] completed his project, making this one of the more impressive DIY projects we’ve seen.