Hackaday Prize Entry: A $100 CT Scanner

What do you do when you’re dad’s a veterinarian, dumped an old x-ray machine in your garage, and you’re looking for an entry for The Hackaday Prize? Build a CT scanner, of course. At least that’s [movax]’s story.

[movax]’s dad included a few other goodies with the x-ray machine in the garage. There were film cassettes that included scintillators. By pointing a camera at these x-ray to visible light converting sheets, [movax] can take digital pictures with x-rays. From there, it’s just building a device to spin around an object and a lot – a lot – of math.

Interestinly, this is not the first time a DIY CT scanner has graced the pages of Hackaday. [Peter Jansen] built a machine from a radiation check source, a CMOS image sensor, and a beautiful arrangement of laser cut plywood. This did not use a proper x-ray tube; instead, [Peter] was using the strongest legally available check source (barium 133). The scan time for vegetables and fruit was still measured in days or hours, and he moved on to build an MRI machine.

With a real source of x-rays, [movax]’s machine will do much better than anything the barium-based build could muster, and with the right code and image analysis, this could be used as a real, useful CT scanner.


The 2015 Hackaday Prize is sponsored by:

Improving A Homebrew CT Scanner With Barium

CTscanner

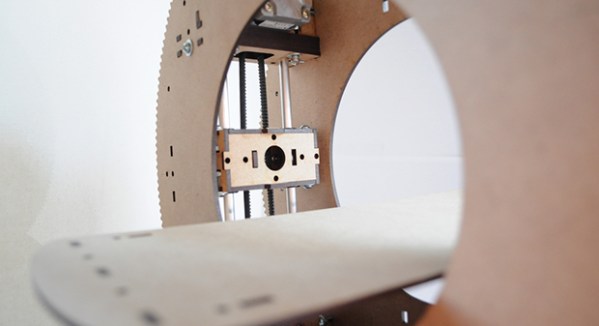
[Peter] has been working on his homebrew CT scanner for a while, and it’s finally become something more than a spinning torus of plywood. He’s managed to image the inside of a few pieces of produce using an off-the-shelf radiation detector and a radioactive barium source

When we last saw [Peter]’s CT scanner, he had finished the mechanical and electronic part of the Stargate-like device, but the radioactive source was still out of reach. He had initially planned on using either cadmium 109 or barium 133. Both of these presented a few problems for the CT scanner.

The sensor [Peter] is a silicon photodiode high energy particle detector from Radiation Watch this detector was calibrated for cesium with a detection threshold of around 80keV. This just wasn’t sensitive enough to detect 22keV emissions from Cd109, but a small add-on board to the sensor can recalibrate the threshold of the sensor down to the noise floor.

Still, cadmium 109 just wasn’t giving [Peter] the results he wanted, resulting in a switch to barium 133. This was a much hotter source (but still negligible in the grand scheme of radioactivity) that allowed for a much better signal to noise ratio and shorter scans.

With a good source, [Peter] started to acquire some data on the internals of some fruit around his house. It’s still a slow process with very low resolution – the avocado in the pic above has 5mm resolution with an acquisition time of over an hour – but the whole thing works, imaging the internal structure of a bell pepper surprisingly well.

Towards A Low Cost, Desktop CT Scanner

For [Peter Jansen], the most interesting course in grad school was Advanced Brain Imaging; each class was a lecture followed by a trip to the imaging lab where grad students would take turns being holed up in a MRI machine. A few years into his doctorate, [Peter] found himself in a very opportune situation – his local hackerspace just acquired a shiny new laser cutter, he had some free time on his hands, and the dream of creating a medical imaging device was still in the back of his mind. A few weeks later, the beginnings of an open source CT scanner began to take shape.

This isn’t an MRI machine that [Peter] so fondly remembered from grad school. A good thing, that, as superconducting magnets chilled with liquid helium is a little excessive for a desktop unit. Instead, [Peter] is building a CT scanner, a device that takes multiple x-ray ‘slices’ around an axis of rotation. These slices can then be recompiled into a 3D visualization of the inside of any object.

The mechanics of the build are a Stargate-like torus with stepper motor moving back and forth inside the disk. This, combined with the rotation of the disk and moving the bed back and forth allow the imager to position itself anywhere along an object.

For the radioactive detector, [Peter] is using a CCD marketed as a high-energy particle detector by Radiation Watch. Not only does this allow for an easy interface with a microcontroller, it’s also much smaller than big, heavy photomultiplier tubes found in old CT scanners. As for the source, [Peter] is going for very low intensity sources, most likely Barium or Cadmium that will take many minutes to capture a single slice.

The machine operates just above normal background radiation, so while being extremely safe for a desktop CT scanner, it is, however, very slow. This doesn’t bother [Peter], as ‘free’ time on a CT scanner allows for some very interesting, not seen before visualizations, such as a plant growing from a seed, spreading its roots, and breaking the surface as a seedling.

[Peter] still has some work to do on his desktop CT scanner, but once the stepper motor and sensor board are complete, he should be well on his way towards scanning carrots, apples, and just about everything else around his house.

Visualizing Water Droplets And Building A CT Scanner

Since his nerves were wracked by presenting his project to an absurdly large crowd at this year’s SIGGRAPH, [James] is finally ready to share his method of mixing fluids via optical tomography with a much larger audience: the readership of Hackaday.

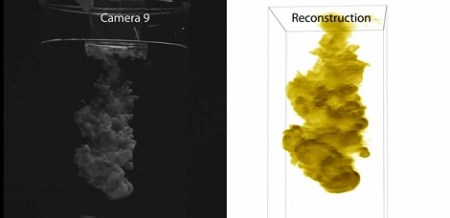
[James]’ project focuses on the problem of modeling mixing liquids from a multi-camera setup. The hardware is fairly basic, just 16 consumer-level video cameras arranged in a semicircle around a glass beaker full of water.

When [James] injects a little dye into the water, the diffusing cloud is captured by a handful of Sony camcorders. The images from these camcorders are sent through an algorithm that selects one point in the cloud and performs a random walk to find every other point in the cloud of liquid dye.

The result of all this computation is a literal volumetric cloud, allowing [James] to render, slice, and cut the cloud of dye any way he chooses. You can see the videos produced from this very cool build after the break.

Continue reading “Visualizing Water Droplets And Building A CT Scanner”