Enresoning An IPhone 8 Ring

The iPhone 8 was just released last week, and that means some people were standing in line in front of an Apple store for hours waiting to get their hands on the latest and greatest glowing rectangle. [Patrick Adair] had a better idea: he would stand in front of an Apple store for four hours, then do something productive with his new smartphone. With the help of a waterjet, some resin, a lathe, and some very fine grades of sandpaper, he created the Apple Ring.

Setting aside the whole process of actually acquiring an iPhone 8 on launch day, the process of turning an iPhone into a ring is more or less what you would expect. First, the iPhone was cut into ring-shaped pieces on a waterjet cutter. Special care was taken to avoid the battery, and in the end [Patrick] was able to get a nice chunk ‘o phone that included the camera lens.

This ring piece was then embedded in clear resin. For this, [Patrick] used Alumilite epoxy, a pressure pot, and a toaster oven to cure the resin. Once the phone parts were firmly encased for the rest of eternity, the ring blank moved over to the lathe. The center of the ring was bored out, and the process of sanding, polishing and gluing in all the tiny parts that fell out during the process commenced. The end result actually looks pretty great, and even though it’s probably a little too bulky, it is a remarkable demonstration of the craft of turning.

You can check out [Patrick]’s video below, along with a video from the Waterjet Channel showing the deconstruction of a glowing rectangle.

Continue reading “Enresoning An IPhone 8 Ring”

Making A Shifter Knob From Old Skateboards

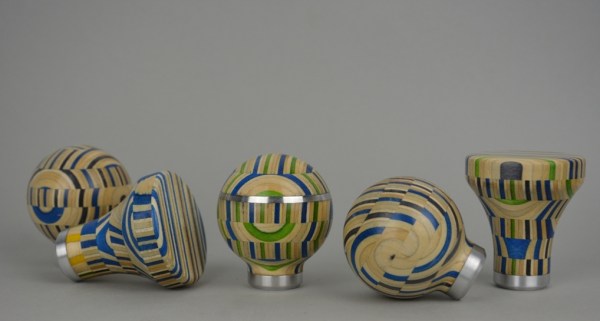
Do you have a car? Does that car have a manual transmission? Do you want to beautify your shifter knob, while simultaneously gaining mad street cred, yo? Well, you’re in luck, because all of that can be done for the low, low price of a couple old skateboard decks, a lathe, and a lot of glue.

This project, from [basiltab] illustrates how you can use old skateboard decks to create really cool looking custom shifter knobs. The process starts with cutting the decks up into uniform strips, which are then glued and clamped to form small planks. Sections of the decks were alternated, to create a visually interesting pattern. The planks are then sanded so that they’re smooth and flat, and then glued up in a jig to form blocks with a threaded aluminum insert in the center. Optionally, aluminum can be used for some of the layers to add a little flair (2-part epoxy was used in place of glue for the aluminum).

After the glue has dried, the blocks can then be turned on a lathe to create the desired shape of the knob. As you can see, the results are pretty darn nifty. And, they certainly have a little more artistic credibility than the giant acrylic shifter knobs you normally find at your local auto parts store. Don’t worry, if you thought this article was about shift registers, we’ve got you covered there too.

wood bowl cutting

Making A Wooden Bowl Without A Lathe

Typically, when creating a wooden bowl a crafts person would do so on a lathe. A chunk of wood would be bolted to the head stock and the bottom of the bowl turned to an appropriate shape. Then the half-bowl-shaped wood is flipped around on the lathe so that the material on the inside of the bowl can be removed. This traditional method of bowl turning requires a lathe, turning tools, and the serious technique and skill required for the task.

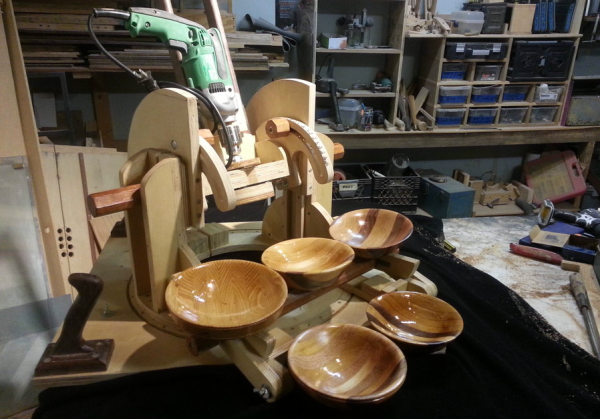
The master maker of weird wood working tools, [Izzy], decided to make a wooden bowl without the use of a lathe. He created a unique fixture to cut the shape of the bowl on a table saw, a piece of equipment that is a bit more common for the average DIYer to have. The fixture itself is made of wood and supports a standard hand drill in a vertical position. The soon-to-be bowl is bolted to the drill and hovers just above the table saw blade. The table saw is turned on and the fixture allows the work piece to rock back and forth creating the bowls outside shape. The drill rotates the piece so that the contours are consistent around the bowl.

The bowl is then flipped over and re-attached to the drill. This time to cut the inside of the bowl, the fixture is locked in the vertical position and the wood is dropped straight down on the spinning blade while being rotated. The saw blade cuts a perfectly hemispherical cavity in the wood. The final bowl looks great after a little sanding and an application of oil. Check out the video after the break.

This isn’t the first time [Izzy’s] projects have been here on Hackaday, check out his DIY Band Saw and Wooden Sphere Cutter.

Continue reading “Making A Wooden Bowl Without A Lathe”