A Multicore ZX Spectrum

From the blog of [telmomoya] we found his latest project: a hardware based multicore solution for a ZX Spectrum Emulator. It’s not the first time we feature one of his builds, last year we was working on a ARM Dual-Core Commodore C64. Luckily for Speccy fans, it seems a ZX Spectrum project was just unavoidable.

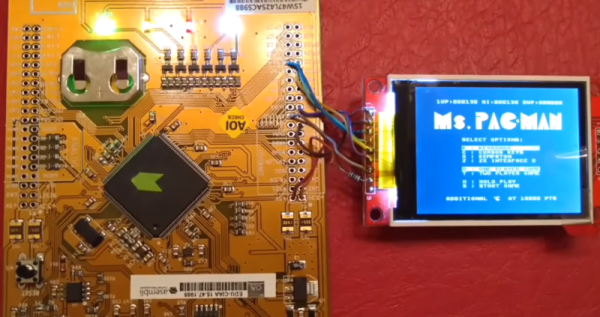
At its heart is the EduCIAA NXP Board, a Dual Core (M4 & M0) 32-bit microcontroller, based on the NXP LPC4337. It’s an Argentinan-designed microcontroller board, born from an Argentinian academic and industry joint venture. [telmomoya] took advantage of  the multicore architecture by running the ZX Spectrum emulator on M4 core and generating the VGA signals with M0 core. This guarantees that the VGA generation, which is rather time-sensitive, remains isolated from emulation and any task running on other core. The VGA sync is via polling and using DMA GPIO the RGB signals can be up to 256 colors. To store the 48 kb VGA frames one AHB32 and one AHB16 memory IC are used.

On the software side, [telmomoya] adopted Aspectrum, a ZX Spectrum Emulator fully written in C, modified to his needs. Overall, the project faced many challenges and issues, like COLOR VGA generation (with GPIO DMA), TFT SPI low fps, Inter Process Communications and bus sharing.

Can you try to name all the games in the demonstration video?

Continue reading “A Multicore ZX Spectrum”

This Vacuum Former Sucks

Vacuum formers are useful tools to have around the shop and also an incredibly simple technology. All you need is a plastic sheet, a heater of some kind, a table with a bunch of holes in it, and a vacuum. The simplicity and usefulness of a vacuum former mean they’re perfect for a homebrew build. That said, we haven’t seen many DIY vacuum formers around the Interwebs. Now, there’s a Kickstarter that brings vacuum forming to the desktop. If nothing else, it’s an inspiration to build your own vacuum forming machine.

The Vaquform is pretty much what you would expect from a desktop vacuum forming machine. A 9 x 12 inch forming area is equipped with ceramic heaters to soften the plastic sheet, and interestingly, an infrared probe (think a non-contact digital thermometer) to ensure you’re pulling molds when the plastic is ready, not before.

You can’t push a Kickstarter without some new and novel technology, and the highlight of this product pitch is the Vaquform hybrid system vacuum pump. This vacuum pump, “combines high airflow and high vacuum” and looks like someone slapped a brushless motor on a turbo.

This is a Kickstarter campaign, and so far it appears Vaquform, the company behind this vacuum former, appears to only have prototypes. There’s a big difference between building one of something and building a hundred. As with all Kickstarter campaigns, ‘caveat emptor’ doesn’t apply because ēmptor means ‘buyer’. If you contribute to this Kickstarter campaign, you are not buying anything.

Even though this is a Kickstarter campaign, it is an interesting tool to have around the workshop. Of course, there’s not much to a vacuum former, and we’d be very interested in seeing what kind of vacuum former builds the Hackaday community has already made. Send those in on the tip line.

Pint-Sized, Low-Cost CNC Machine

A little MDF, a little plywood, some bits of threaded rod – put it all together and you’ve got this low-cost desktop CNC build using very few parts you’d need to go farther afield than the local home center to procure.

We’ve seen lots of e-waste and dumpster diving CNC builds here before; what’s appealing here is not only the low price tag of the build but also its approachability. As the short videos below show, [Thimo Voorwinden] does an admirable job of using the tools and materials he has on hand. We also appreciate the modularity of the build – the X- and Y-axis carriages are nearly identical and could be interchanged to alter the dimensions of the work area, or even replaced with a larger carriage if needed. The Z-axis is a little different from the usual low-end CNC build in that it doesn’t use a Dremel or other small rotary tool but rather mounts the handpiece of a flexible shaft rotary tool. Keeping the motor off the machine allows for more torque, less vibration, and reduced dead load.

The end result is a desktop CNC for about €200 with a work area large enough to fabricate small wooden and plastic parts, or to mill foam blocks for use as casting molds. It looks like [Thimo] has more in store for his little CNC machine, and we’re looking forward to seeing what improvements he can come up with.

Continue reading “Pint-Sized, Low-Cost CNC Machine”

RFID Stethoscope Wheezes And Murmurs For Medical Training

You’d think that with as many sick people as there are in the world, it wouldn’t be too difficult for a doctor in training to get practice. It’s easy to get experience treating common complaints like colds and the flu, but it might take the young doctor a while to run across a dissecting abdominal aortic aneurysm, and that won’t be the time for on the job training.

Enter the SP, or standardized patient – people trained to deliver information to medical students to simulate a particular case. There’s a problem with SPs, though. While it’s easy enough to coach someone to deliver an oral history reflecting a medical condition, the student eventually needs to examine the SP, which will reveal none of the signs and symptoms associated with the simulated case. To remedy this, [Chris Sanders] and [J Scott Christianson] from the University of Missouri developed an open-source RFID stethoscope to simulate patient findings.

This is one of those “why didn’t I think of that?” ideas. A cheap stethoscope is fitted with an Arduino, and RFID reader, and a small audio board. RFID tags are placed at diagnostic points over an SP’s chest and abdomen. When the stethoscope is placed over a tag, a specific sound file is fetched from an SD card and played over earbuds. The student doesn’t have to ask, “What am I hearing?” anymore – the actual sound of bruits or borborygmi are heard.

We can easily see expanding this system – RFID tags that trigger a faux ultrasound machine to display diagnostic images, or tiny OLED screens displaying tagged images into an otoscope. A good place to start expanding this idea might be this digital stethoscope recorder and analyzer.

Continue reading “RFID Stethoscope Wheezes And Murmurs For Medical Training”

More Layoffs At MakerBot

MakerBot CEO [Nadav Goshen] announced that changes are needed to ensure product innovation and support long-term goals in a blog post published yesterday. To that end, MakerBot will reduce its staff by 30%. This follows a series of layoffs over a year ago that reduced the MakerBot workforce by 36%. With this latest series of layoffs, MakerBot has cut its workforce by over 50% in the span of two years.

In addition to these layoffs, the hardware and software teams will be combined. Interestingly, the current Director of Digital Products, [Lucas Levin], will be promoted to VP of Product. Many in the 3D printer community have speculated MakerBot is pivoting from a hardware company to a software company. [Levin]’s promotion could be the first sign of this transition.

When discussing MakerBot, many will cite the documentary Print the Legend. While it is a good introduction to the beginnings of the desktop 3D printer industry, it is by no means complete. The documentary came out too early, it really doesn’t mention the un-open sourceness of MakerBot, the lawsuit with Form Labs wasn’t covered, and there wasn’t a word on how literally every other 3D printer manufacturer is selling more printers than MakerBot right now.

Is this the end of MakerBot? No, but SYSS is back to the pre-3D-printer-hype levels. Stratasys’ yearly financial report should be out in a month or so. Last year, that report was the inspiration for the MakerBot obituary. It’s still relevant, and proving to be more and more correct, at least from where MakerBot’s Hardware business stands.

Hands On With Variable Layer Height

3D printers are an exercise in compromise. Generally, you don’t want a lot of mass on your tool head, as that can lead to ringing and other mechanical artifacts on your print. However, direct drive extruders are better for many filaments, and the decision on what printer to build ultimately comes down to a choice between speed, build area, and the ability to print in exotic filaments.

Even in slicing a 3D model, a 3D printing enthusiast must balance the quality of a print versus how long the print will take to squirt out of a nozzle. Now, just about any printer can produce fantastic models at a very high layer height, but no one wants to wait several days for the print to finish.

This balance between print time and print quality has, for the last few years, been completely ignored. One of the best solutions to this we’ve seen is variable layer height slicing. Basically, if you’re printing something without much detail, you don’t need small layers in your 3D print. Think of it as printing the neck of a bust at 0.3mm layer height, and the face at 0.1mm.

Yes, there were a few papers from a decade ago laying the conceptual foundations of variable layer height slicing. 3D printers weren’t exactly common back then, though. Recently, Autodesk’s Integrated Additive Manufacturing Team released Varislice for automatic generation of variable layer heights on a 3D printed object. So far, though, there’s no good automated solution for variable layer height slicing, and the tools for manual configuration of variable layer height slicing are terrible.

For the past few months, Prusa Research has been working on their own edition of Slic3r that includes an easy to use interface for variable layer height slicing. This version of Slic3r was just released, and now it’s time for the hands-on. Does variable layer height slicing work?

Continue reading “Hands On With Variable Layer Height”

Building Homebrew VTOL Rockets

No one can deny what SpaceX and Blue Origin are doing is a feat of technological wizardry. Building a rocket that takes off vertically, goes into space, and lands back on the pad is an astonishing technical achievement that is literally rocket science. However, both SpaceX and Blue Origin have a few things going for them. They have money, first of all. They’re building big rockets, so there’s a nice mass to thrust cube law efficiency bump. They’re using liquid fueled engines that can be throttled.

[Joe Barnard] isn’t working with the same constraints SpaceX and Blue Origin have. He’s still building a rocket that can take off and land vertically, but he’s doing it the hard way. He’s building VTOL model rockets. Most of the parts are 3D printed. And he’s using solid motors you can buy at a hobby shop. This is the hard way of doing things, and [Joe] is seeing some limited success with his designs.

While the rockets coming out of Barnard Propulsion Systems look like models of SpaceX’s test vehicles, there’s a lot more here than looks. [Joe] is using a thrust vectoring system — basically mounting the Estes motor in a gimbal attached to a pair of servos. This allows the rockets to fly straight up without fins or even the launch rod used to get the rocket up to speed in the first few millseconds of flight. This is active stabilization of a model rocket, with the inevitable comments of ITAR violations following soon afterward.

Taking off vertically is one thing, but [Joe] is also trying to land his rockets vertically. Each rocket he’s built has a second Estes motor used only for landing. During descent, the onboard microcontroller calculates the speed, altitude, and determines if it’s safe to attempt a vertical landing. If the second motor has sufficient impulse to make velocity and altitude equal zero at the same time, the landing legs deploy and the rocket hopefully makes a soft touchdown in the grass.

While [Joe] hasn’t quite managed to pull off a vertical takeoff and landing with black powder motors quite yet, he’s documenting and livestreaming all of his attempts. You can check out the latest one from a week ago below.

Continue reading “Building Homebrew VTOL Rockets”