What Parts Should You Desolder?

A rite of passage for a young electronics enthusiast used to be collecting an array of surplus boards from whatever could be found, and using them as sources of parts to desolder. It was possible with a bit of work and searching to build all manner of electronic projects without spending much at all.  Many hardware hackers know their way around consumer electronics from the decade before their teenage years as a result. Secondhand components can still be used, but the type of components to be found has changed, as well as those needed. [ElectricMonkeyBrain] takes a look, and asks “What should you desolder?”.

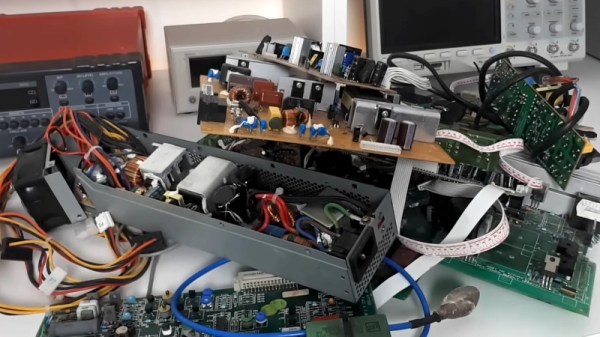
As a general rule, he lands on the premise that it’s worth hanging on to the expensive stuff rather than the cheap stuff. Large capacitors, power semiconductors, and inductors aren’t cheap at all, and in the case of the inductors they can yield both ferrite parts and enameled wire for rewinding to suit. We’re surprised that he advocates holding on to electrolytic capacitors as a kit of many values is now pretty cheap, but it’s understandable that if you lack the part and it’s there on a motherboard in front of you, it’s worth desoldering. Finally, he discusses cases, something we’ve been tempted by a few times more than we’d like to mention.

In a world of easy online ordering, it’s useful to be reminded that sometimes there’s still space for salvaged parts, after all, no delivery service is as quick as reaching under your bench for an old ATX power supply to raid. As always though, don’t amass too much of it.

Continue reading “What Parts Should You Desolder?”

Upcycling Flat Scraps With Open Source Tools

If you have any sort of device that cuts like a CNC mill or a laser cutter, you probably generate a lot of strange-looking scrap material. Most of us hate to throw anything away, but how do you plan to use all these odd shapes? [Caddzeus] has an answer.  Using a camera and some software he digitizes the shapes accurately into a form usable in his CAD package of choice.

The process involves setting up some targets with known dimensions that will appear in the photograph. This allows the picture to be taken without being overly concerned about the distance to the camera or the angle.

Using GIMP, he adjusts the images to remove the perspective. He then brings the image into Inkscape where he can accurately scale and trace the shape.

There are detailed instructions — including videos — but if you know how to use these tools, you can probably figure it out for yourself. This technique would be useful, too, if you wanted to get an outline of something you intend to mill or cut into your CAD program as a reference. We like to do this with a laser cutter so you can burn the outline of something you are engraving or cutting on a piece of paper before you start and easily align the workpiece to the laser.

Of course, a small part could surrender its image to a conventional scanner and you can use a similar technique to adjust the scale. If you start using Inkscape a lot, you’ll want more plugins. You never know what you might build from some scrap odds and ends.

Continue reading “Upcycling Flat Scraps With Open Source Tools”

Keep Scraps Around

When I’m building something, I like to have a decent-sized scrap pile on hand. Because when I’ve got to test something out — does this glue adhere to this fabric, how much force will this hold if I tap it and put a screw in, will it snap if reinforced with carbon fiber and epoxy — it’s nice to have some of the material in question on hand just for experimentation. So I pull a chunk out of the scrap pile!

But scrap piles can’t expand forever, and we all know that “too much of a good thing” is a thing, right? Scrap piles require constant pruning. You don’t really need more than a few aluminum extrusion cutoffs, so when you start building up excess inventory, it’s time to scrap it. I mean, throw it away.

A corollary of this, that I’ve only recently started to appreciate, is that if I limit the number of materials that I’m working with, it’s a lot more manageable to keep the scrap pile(s) under control. It’s simple math. If I’m working with twenty different materials, that’s twenty different heaps of scrap. But if I can get by with one weight of fiberglass for everything, that one pile of scraps can do double or triple duty. There is also the added benefit that I already know how the material works, and maybe even have old test samples on hand.

Indeed, I’m such a scrapaholic that it’s almost painful to start working with a new material and not have a scrap pile built up yet. I’m always loathe to cut into a nice square piece of stock just to test something out. But this too is part of the Great Circle of Life. By not testing things out beforehand, I’m almost guaranteed to screw up and create scrap out of what I had hoped was going to be a finished piece. See? No problem! Next version.

What do you think? Are scrap, offcuts, and their close cousins — test pieces and samples — worth keeping around in your shop? Do you have a disciplined approach, or do you just throw them in the corner? Purge per project, or only when the mountain of XPS foam gets as high as your head?

Vertical Mill Completes Scrapyard Lathe Build

One thing’s for sure: after seeing [Roland Van Roy] build a vertical mill from industrial scrap, we’ve got to find a better quality industrial scrapyard to hang around.

The story of this build started, as many good shop stories do, at the lathe, which in this case was also a scrapyard build that we somehow managed to miss when it first posted. This lathe is decidedly different from the common “Gingery method” we’ve seen a few times, which relies on aluminum castings. Instead, [Roland] built his machine from plate stock, linear slides, and various cast-off bits of industrial machines.

To make his lathe yet more useful, [Roland] undertook this build, which consists of a gantry mounted over the bed of the lathe. The carriage translates left and right along the bed while the spindle, whose axis lines up perfectly with the center axis of the lathe, moves up and down. [Roland] added a platform and a clever vise to the lathe carriage; the lathe tool post and the tailstock are removed to make room for these mods, but can be added back quickly when needed. Digital calipers stand in for digital read-outs (DROs), with custom software running on a Picaxe and a homebrew controller taking care of spindle speed control.

[Roland] reports that the machine, weighing in at about 100 kg, exhibits a fair amount of vibration, which limits him to lighter cuts and softer materials. But it’s still an impressive build, and what really grabbed us was the wealth of tips and tricks we picked up. [Roland] used a ton of interesting methods to make sure everything stayed neat and square, such as the special jig he built for drilling holes in the T-slot extrusions to the use of cyanoacrylate glue for temporary fixturing.

Continue reading “Vertical Mill Completes Scrapyard Lathe Build”

Scrapped Motors Don’t Care About Direction

Spinners built into games of chance like roulette or tabletop board games stop on a random number after being given a good spin. There is no trick, but they eventually rest because of friction, no matter how hard your siblings wind up for a game-winning turn. What if the spinning continued forever and there was no programming because there was no controller? [Ludic Science] shows us his method of making a perpetual spinner with nothing fancier than a scrapped hard disk drive motor and a transformer. His video can also be seen below the break.

Fair warning: this involves mains power. The brushless motor inside a hard disk drive relies on three-phase current of varying frequencies, but the power coming off a single transformer is going to be single-phase AC at fifty or sixty Hz. This simplifies things considerably, but we lose the self-starting ability of the motor and direction control, but we call those features in our perpetual spinner. With two missing phases, our brushless motor limps along in whatever direction we initiate, but the circuit couldn’t be much more straightforward.

This is just the latest skill on a scrapped HDD motor’s résumé (CV). They will run with a 9V battery, or work backwards and become an encoder. If you want to use it more like the manufacturer’s intent, consider this controller.

Continue reading “Scrapped Motors Don’t Care About Direction”

Robot Arm From Recyclables

A robot assistant would make the lives of many much easier. Luckily, it’s possible to make one of your own with few fancy materials. The [circuito.io] team demonstrates this by building a robot arm out of recyclables!

With the exception of the electronics — an Arduino, a trio of servo motors, and a joystick — the arm is made almost completely out of salvaged recyclables: scrap wood, a plastic bottle, bits of plastic string and a spring. Oh, and — demonstrating yet another use for those multi-talented tubers — a potato acts as a counterweight.

Instead of using screws or glue, these hackers used string made from a plastic bottle as a form of heat shrink wrap to bind the parts of the arm together. The gripper has only one pivoting claw for greater strength, and the spring snaps it open once released. Behold: your tea-bag dunking assistant.

Continue reading “Robot Arm From Recyclables”

Pint-Sized, Low-Cost CNC Machine

A little MDF, a little plywood, some bits of threaded rod – put it all together and you’ve got this low-cost desktop CNC build using very few parts you’d need to go farther afield than the local home center to procure.

We’ve seen lots of e-waste and dumpster diving CNC builds here before; what’s appealing here is not only the low price tag of the build but also its approachability. As the short videos below show, [Thimo Voorwinden] does an admirable job of using the tools and materials he has on hand. We also appreciate the modularity of the build – the X- and Y-axis carriages are nearly identical and could be interchanged to alter the dimensions of the work area, or even replaced with a larger carriage if needed. The Z-axis is a little different from the usual low-end CNC build in that it doesn’t use a Dremel or other small rotary tool but rather mounts the handpiece of a flexible shaft rotary tool. Keeping the motor off the machine allows for more torque, less vibration, and reduced dead load.

The end result is a desktop CNC for about €200 with a work area large enough to fabricate small wooden and plastic parts, or to mill foam blocks for use as casting molds. It looks like [Thimo] has more in store for his little CNC machine, and we’re looking forward to seeing what improvements he can come up with.

Continue reading “Pint-Sized, Low-Cost CNC Machine”