Instrumentation Amplifiers with Bil Herd

Instrumentation Amplifiers And How To Measure Miniscule Change

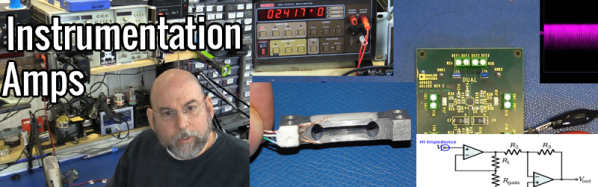
These days there a large number of sensors and analog circuits that are “controller friendly” meaning that their output signal is easily interfaced to the built-in Analog to Digital Convertors (ADCs) often found in today’s micro-controllers. This means that the signals typically are already amplified, often filtered, and corrected for offset and linearity. But when faced with very low level signals, or signals buried in a larger signal an Instrumentation Amplifier may be what’s needed. The qualities of an Instrumentation Amplifier include:

  • A differential amplifier with high impedance and low bias current on both inputs.
  • Low noise and low drift when amplifying very small signals.
  • The ability to reject a voltage that is present on both inputs, referred to as Common Mode Rejection Ratio (CMRR)

Continue reading “Instrumentation Amplifiers And How To Measure Miniscule Change”

Speaker Cabinet Boom Box Build

When you get that itch to build something, it’s difficult to stop unless you achieve a feeling of accomplishment. And that’s how it was with [Rohit’s] boombox build.

He started out with a failing stereo. He figured he could build a replacement himself that played digital media but his attempts at mating microcontrollers and SD cards was thwarted. His backup plan was to hit DX for a cheap player and he was not disappointed. The faceplate he found has slots for USB and SD card, 7-segment displays for feedback, and both buttons and a remote for control. But this little player is meant to feed an amplifier. Why buy one when you can build one?

[Rohit] chose ST Micro’s little AMP called the TDA2030 in a Pentawatt package (this name for a zig-zag in-line package is new to us). We couldn’t find stocked chips from the usual suspects but there are distributors with singles in the $3.50-5 range. [Rohit] tried running it without a heat sink and it gets hot fast! If anyone has opinions on this choice of chip (or alternatives) we’d love to hear them.

But we digress. With an amp taken care of he moved onto sourcing speakers. A bit of repair work on an upright set got them working again. The bulky speaker box has more than enough room for the amp and front-end, both of which are pretty tiny. The result is a standalone music player that he can be proud of having hacked it together himself.

Keep Those Filaments Lit, Design Your Own Vacuum Tube Audio Equipment

It was a cold January Saturday night in Chicago and we had big plans. Buddy Guy’s Legends bar was packed. We setup directly under one of the PA speakers less than 15′ from the stage. Time to celebrate. Skip the glass, one pitcher each and keep them coming. We’re about to make bootleg recording history. Conversation evolved into bloviation on what our cover art would look like, certainly it would be a photo of our battery powered tube mic pre-amp recently created in my basement lab. We had four hours to kill before Buddy’s appearance. Our rate of Goose Island and Guinness consumption would put us at three-sheets to the wind by 11. Must focus. It’s time, Buddy was on. Much fumbling about and forgetting how to turn on the Japanese-made 24 bit digital recorder with its nested LCD menus, cryptic buttons, and late 90’s firmware. Make it work. We did, just in time for the bouncers to notice the boom mike and battery packs. Wait, wait… maybe we should talk about why tube amps are worth this kind of trouble first.

Yes, vacuum tubes do sound better than transistors (before you hate in the comments check out this scholarly article on the topic). The difficulty is cost; tube gear is very expensive because it uses lots of copper, iron, often point-to-point wired by hand, and requires a heavy metal chassis to support all of these parts. But with this high cost comes good economic justification for building your own gear.

This is one of the last frontiers of do-it-yourself that is actually worth doing.

Continue reading “Keep Those Filaments Lit, Design Your Own Vacuum Tube Audio Equipment”

Build A Simple Audio Amp

[Ynze] has built an audio amplifier that looks and sounds great. His amplifier uses a National Instruments (now TI) LM3886 Overture series 68 Watt power amp. The LM3886 places [Ynze’s] amp squarely in the “Gainclone” catagory. Gainclone or Chipamp are terms long used by the DIY community to describe audio amps based upon highly integrated semiconductor amplifiers. The Gainclone name stems from the original Gaincard audio amplifier sold by 47 labs. The Gaincard used less than $100 USD of parts when it was introduced in 1999. It sounded good enough to command a $3300 USD price tag on the audiophile market. The low parts count and simple construction spawned the audio DIY community to build their own versions of the Gaincard. Hundreds of variants exist now, and wading through the different versions can be a bit of a daunting task. [Ynze] found a basic design that works, and built from there.

One of the interesting things about [Ynze’s] amp, as well as many of the Gainclones, is the fact that they use no circuit board. All wiring is done point to point. resistors are soldered directly to the pins of the amplifier chip. This can be some tricky soldering for beginners, but several PCB kits are available. [Ynze] built his amp in two cases. One case holds the power supply, and the other contains the amplifier itself. [Ynze] is using a large toroid transformer to drop his local 230V mains down to +25V and -25V. The amplifier circuit itself is simple – a few discrete components surround the LM3886 and it’s heat sink. [Ynze] also did some very nice carpentry work on his wood chassis. The resulting amp looks like it’s right out of the 1960’s – but hides 1990’s electronics inside.

Continue reading “Build A Simple Audio Amp”

Bluetooth Audio Adapter Hacked To Switch Off Amplified Speakers

bluetooth-audio-amp-auto-switch

This Bluetooth Audio Adapter is meant to connect a Bluetooth audio source (like a smartphone or tablet) to a speaker system with a plain old line-in connection. It has the ability to automatically connection when the Bluetooth device comes into range. Sounds convenient until [Andreas Pösch] points out that he still has to switch the speakers on and off manually. This hack automates the entire thing using a bit of additional hardware.

If you look closely you’ll see that the black cables have barrel jacks. This is a power pass-through rig that he whipped up. The protoboard includes a 7805 linear regulator which feeds power to the green circuit board in lieu of it’s original power adapter. A MOSFET switches outbound power headed for the speakers. All of it fits inside of the original enclosure, and he only had to add one port for the AC adapter.

This would be absolutely perfect for an antique radio retrofit. One of these adapters can be had for just over thirty bucks!

Cheap Guitar Amp Repaired By Replacing The Distortion Circuit

cheap-amp-distortion-repair

It’s an understatement that [Troy] is not impressed with the distortion circuitry built into this guitar amp. He picked it up for $40 on Kijiji (basically local classified ads run by eBay) so he wasn’t afraid to get elbow deep in its inner workings to see what was going on. It only took him a few minutes to solder together the distortion circuitry that fixed it. Figuring out what needed fixing is another story.

[Troy] uses some colorful language and metaphors to illustrate his disdain for the sound of the overdrive option. He hooked it up to an oscilloscope and his trained eye immediately tells him that it’s not working as it should. After studying the PCB and working out a schematic he reworked the circuit with this pair of diodes and a resistor. It still uses a bit of filtering on the board, but does away with all of the other cruft. What remains is a cheap amp, but one that actually functions.


AM Tube Radio Restored And Given MP3 Playback Too

mp3-antique-radio

This AM radio looks a bit like it did coming out of the factory. But there are a lot of changes under the hood and that faceplate is a completely new addition. The project really is a restoration with some augmentation and [Michael Ross] did a great job of documenting the project.

The Kenyon radio was built in 1946 and uses vacuum tubes for the amplifier. Considering its age this was in relatively good shape and the first thing that [Michael] set out to do was to get the electronics working again. It involved replacing the messy collection of capacitors inside. He then cleaned up the tubes, checking for any problems, and put the electronics back together to find they work great!

He cleaned up the chassis and gave it a new coat of finish. The original dial plate was missing so he built a wood frame to match a dial scale he ordered. The bell-shaped brass cover hides the light that illuminates the dial.

He could have stopped there but how much do people really listen to AM radio these days? To make sure he would actually use the thing he added an Arduino with an MP3 shield. It patches into the antenna port via a relay, injecting modern tunes into the old amplifier circuit. Catch a glimpse of the final project in the video after the break.

Continue reading “AM Tube Radio Restored And Given MP3 Playback Too”