Cheap-Thermocam Gets An Impressive Rehaul

[Max Ritter] is a 21 year old student of information technology at the University of Applied Science at Weingarten, Germany. Three years ago he brought us the DIY Cheap-Thermocam, a tool for thermal imaging that cost <$100. Since then he’s made a few upgrades.

The original Cheap-Thermocam made use of an Arduino, the sensor from a thermometer gun and a few XY servos. In about 2 minutes the XY servos can scan and measure 1344 points using the thermometer’s sensor, creating a heat-vision map of 42 x 32 pixels — not amazing, but it worked — and it was cheap!

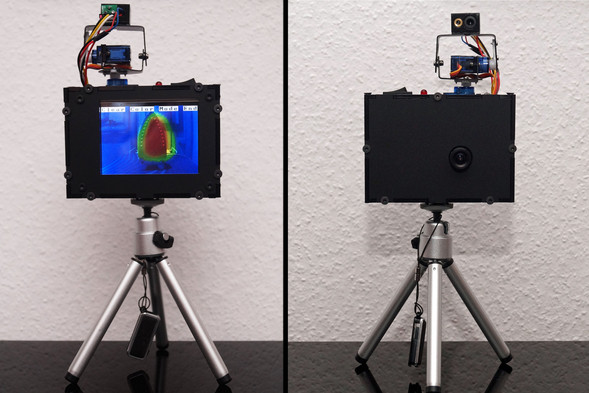
The new version (V3) has its own ARM Cortex M3 processor, it measures 3072 points in 2 minutes from -70°C to 380°C with an accuracy of 0.5°C, and it exports its images at a resolution of 640 x 480 –close to commercial offerings! It’s not capable of real-time scanning, but for the majority of purposes you need one of these for — it’s really not that necessary.

Continue reading “Cheap-Thermocam Gets An Impressive Rehaul”

The Autopilot Shield For The Raspberry Pi

Navio

In the world of drones, quadcopters, and unmanned aerial vehicles, the community has pretty much settled on AVR microcontrollers for the low end, and ARM for the high performance boards. If the FAA doesn’t screw things up, there will soon be another market that requires even more computational power, and Navio, the autopilot shield for the Pi, is just the thing for it.

Where high end multicopter and autopilot boards like the OpenPilot Revolution use ARM micros, there’s a small but demanding segment of the hobby that needs even more processing power. Think of something like the Outback Challenge, where fixed-wing drones search the desert for a lost mannequin autonomously. You’re going to need OpenCV for that, and that means Linux.

Navio is a shield for the Raspberry Pi, complete with a barometric pressure sensor, gyros, accelerometer, and compass, and GPS. It’s designed to run a more real-time version of Linux, and has the ability to do some interesting telemetry configurations – putting a 3G modem on the Navio isn’t much of a problem, and since it’s a Raspi, doing image processing of a downward facing camera is just a matter of writing the code.

The Navio team is currently running an Indiegogo campaign, with the baseline version available for $145. That’s pretty close to the price of the OpenPilot Revolution. There’s also a version upgraded with the U-blox NEO-6T that allows for on-board processing of raw GPS data.

Helix Turning Tool Born From Necessity

helix turning tool

Sometimes while working on a project there comes a point where a specialized tool is needed. That necessary tool may or may not even exist. While [Fabien] was working on his DNA Lamp project he needed to bend a copper wire into a helical shape. Every one of us has wrapped a wire around a pencil and made a little springy thing at some point. While the diameter may have been constant, the turn spacing certainly was not. [Fabien] came up with a simple gizmo to solve that problem.

The tool utilizes an 8mm rod that will ensure the ID of the helix is indeed 8mm. We’ve already discussed that was the easy part. To make certain the turn spacing is not only consistent but also of the correct amount, a wooden frame is used. The frame has holes in it to allow the 8mm rod to pass through. Adjacent to those rod holes are much smaller holes just a bit larger than the copper wire that will become the helix. These holes are drilled at an angle to produce the correct turn spacing. [Fabien] figured out the correct angle by taking the desired turn spacing distance, helix diameter and wire diameter and plopping it in this formula:

Continue reading “Helix Turning Tool Born From Necessity”

THP Entry: A $300 Pick & Place 3D Printer

pnp

With the advent of cheap PCB fabrication, (relatively) easy to use layout tools, and a whole host of prototypes for nearly any device imaginable, the age of custom circuits is upon us. The tools to make these custom circuits, though, are usually hilariously expensive or simply unavailable to all but the most resourceful hackerspace. It would be great if every workshop in the country had a pick and place machine, and the $300 Pick and Place / 3D printer would be a great way to introduce this tech to millions of electronic tinkerers around the world. It also makes for a great entry to The Hackaday Prize.

The basic design of this machine is a delta bot. This is a wonderful choice over a Cartesian bot; deltas are faster and can have higher acceleration, a great thing to have if you want to throw together a few boards quickly. Although the configuration looks a little inverted as compared to other 3D printer delta bots, there’s a reason for this: the design was simulated with evolutionary algorithms and statistical tests to find the best geometry for the machine. The completed machine should be able to place 0201 components; anything smaller would be called dust.

The software hits all the marks, using OpenCV for image processing, ARM boards for motor control and computational tasks, and a good bit of mechanical and pneumatic work to suck up the parts. They’re even working on a 3D printed tape feeders. Now a component often overlooked when looking at the total cost of pick and place equipment is essentially free.

It’s awesome work, and even if they don’t win The Hackaday Prize, it’s still something every hackerspace should have. Now if someone would only crack the through-hole plating problem…


SpaceWrencherThe project featured in this post is an entry in The Hackaday Prize. Build something awesome and win a trip to space or hundreds of other prizes.

Entry Is Easy: The Hackaday Prize

[youtube=https://www.youtube.com/watch?v=L1N5oM4hmw8&w=580]


Failing to submit an entry for The Hackaday Prize is a big mistake. The worst you can do is make an awesome contribution to Open Hardware, but you could win a trip to space or hundreds of other prizes. It’s simple to get started:

  1. Sign up for an account on Hackaday.io
  2. Start documenting your project with the tag #TheHackadayPrize
  3. Click the “Submit project to…” button to make it official

Not simple enough? We even made some screenshots to prove how easy it is. Check them out after the break.

Make it connected, make it open, make it awesome, and you could win!

Continue reading “Entry Is Easy: The Hackaday Prize”

Keep Those Filaments Lit, Design Your Own Vacuum Tube Audio Equipment

It was a cold January Saturday night in Chicago and we had big plans. Buddy Guy’s Legends bar was packed. We setup directly under one of the PA speakers less than 15′ from the stage. Time to celebrate. Skip the glass, one pitcher each and keep them coming. We’re about to make bootleg recording history. Conversation evolved into bloviation on what our cover art would look like, certainly it would be a photo of our battery powered tube mic pre-amp recently created in my basement lab. We had four hours to kill before Buddy’s appearance. Our rate of Goose Island and Guinness consumption would put us at three-sheets to the wind by 11. Must focus. It’s time, Buddy was on. Much fumbling about and forgetting how to turn on the Japanese-made 24 bit digital recorder with its nested LCD menus, cryptic buttons, and late 90’s firmware. Make it work. We did, just in time for the bouncers to notice the boom mike and battery packs. Wait, wait… maybe we should talk about why tube amps are worth this kind of trouble first.

Yes, vacuum tubes do sound better than transistors (before you hate in the comments check out this scholarly article on the topic). The difficulty is cost; tube gear is very expensive because it uses lots of copper, iron, often point-to-point wired by hand, and requires a heavy metal chassis to support all of these parts. But with this high cost comes good economic justification for building your own gear.

This is one of the last frontiers of do-it-yourself that is actually worth doing.

Continue reading “Keep Those Filaments Lit, Design Your Own Vacuum Tube Audio Equipment”

Jeep Power Wheels Upgrade Only Reuses Body

Power Wheels Racing Jeep

It is debatable whether [Jamie] upgraded his Power Wheels Jeep or built a beast of a mini vehicle and only added a Power Wheels Jeep body. Either way, this Racing Power Wheels Jeep is awesome. The goal of the project is to race in the Power Racing Series races held at Maker Faires.

This vehicle is no joke. It is still electric but runs on 24volts DC. It has pneumatic rubber tires for traction and disk brakes for stopping. The ‘gas’ gauge is a volt meter mounted into the dash next to the motor temperature gauge. As if that was not enough, the headlights and tail lights work. Take note of that sweet custom frame, it was mostly made from an old bed frame.

Continue reading “Jeep Power Wheels Upgrade Only Reuses Body”