Hacklet 36 – Oscilloscope Projects

Oscilloscopes are one of the most often used tools of the engineer, hacker, or maker. Voltmeters can do a lot, but when you really need to get a good look at a signal, a good scope is invaluable. This week’s hacklet is triggered by the rising slope of some of the best Oscilloscope projects on Hackaday.io!

rigol500We start with [DainBramage’s] recent project Stretching the Limits of a Rigol DS-1102E Scope. The new Rigol ds1054z may be getting all the press lately, but the older DS-1102E (100 MHz) model is still a very capable scope. [DainBramage] broke out his vintage Singer CSM-1 service monitor to generate frequencies all the way up to 500 MHz. The Rigol did admirably well, detecting a sine wave all the way up to 500 MHz. This is in part due to the scope’s 1 gigasample-per-second sampling rate. Once things got beyond the specified limit of 100 MHz though, the signal began to attenuate.  Not bad for pushing a low-end scope way beyond its limits!


cornel-scope
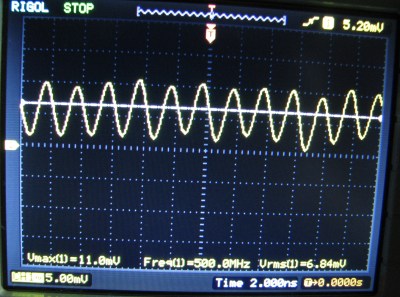
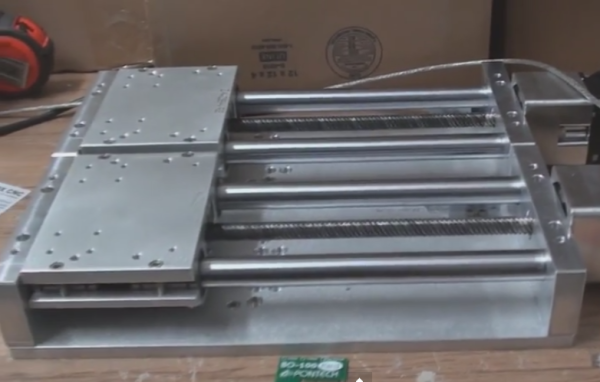
Next up is [Bruce Land] with his PIC32 oscilloscope. Microcontroller scope projects are nothing new, but one that runs at nearly 1 MHz sampling rate while generating NTSC composite video is nothing to sneeze at. [Bruce] pulled this off by using Direct Memory Access (DMA) to move the data from the ADC to memory, and to get the video data from memory to the I/O pins used to generate video. The video itself is created by a resistor tree DAC. All you need to make black and white video is three resistors and two I/O pins. [Bruce] says the entire scope cost about $4.00 us in parts!

scope-hand
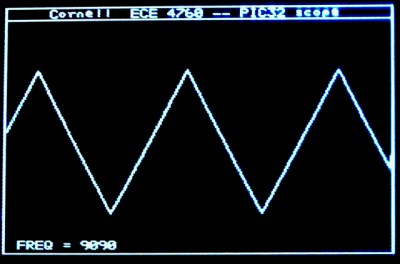
[Jacob Christ] mixed art and science with his chipKIT Oscilloscope Plotter. [Jacob] used a Microchip PIC32 based Fubarino to draw patterns on his scope. To do this the scope must be set to X-Y mode. [Jacob] paired his Fubarino with a MCP4902 Digital to Analog Converter (DAC). Using a dedicated DAC is a great way to do this. [Jacob’s] images are a testament to that, as they’re some of the cleanest “scope art” drawings we’ve seen. Much like [Bruce Land], [Jacob] used his project as the basis for a college class. In fact, the image to the left was created by one of his students!

Want more scope goodness? Check out our new Oscilloscope Projects List!

Hackaday.io Update!

Hackaday.io is getting new features every day. Our dev team has just rolled out a new gallery view. Just click on a project’s featured image, or the “View Gallery” button, and you will be taken to a gallery view of every image used in the project – including log images. YouTube videos will render in the gallery as well. It’s a great way to view a timeline of progress for some of the projects on hackaday.io. For a great example of this, check out OpenMV’s gallery.

In other Hackaday.io news, check out the Caption CERN Contest! Every week we put up a new image from CERN’s archives. The Hackaday.io user who comes up with the funniest caption wins a T-Shirt from The Hackaday Store!

Looks like we’ve hit the end of the trace for this Hacklet. Same hack time, same hack channel, bringing you the best of Hackaday.io!

ChipKIT Powered Electronic Dice

Electronic Dice Replaces Human Influence

[Will] likes his board games but can’t seem to keep from loosing the dice. He’s been using a dice-rolling smartphone app for a while now and decided that it was time to make a dedicated microcontroller dice roller.

The brain behind the dice roller is a chipKIT uC32 microcontroller. Seven output pins are connected to 7 appropriately-arragned LEDs in the top of the dice. There is only one more electrical component, a momentary switch, that is used to re-roll. When the button is pushed, a random number between 1 and 6 is generated and then displayed via the LEDs in true dice fashion. [Will] wrote his own code for this project and makes it available for anyone to download. The case is 3D printed and was designed in Tinkercad, the files of which are also available. The chipKIT is attached to the 3D printed base by a pair of zUNO clips. Find a short video of this thing in action after the break….

Digging the randomness of the roll but miss the realness of the dice? Check out this real dice roller. Need two electronic dice? Check these.

Continue reading “Electronic Dice Replaces Human Influence”

800IPM Linear Slide Control

800 Inches Per Minute At 0.00025″ Resolution

The folks over at PONTECH have just released a pretty impressive opensource PIC32 library for controlling a linear slide at speeds of 800 inches per minute!

PONTECH makes the Quick240 (Quick Universal Industrial Control Kard) which is based on the open source chipKIT platform. It was designed for industrial automation systems, where typically a ladder logic PLC might be used. The benefits to using a system like this is that because it is open, you are no longer stuck with proprietary hardware, and it is much more flexible to allow you to “do your own thing”. Did we mention it is also Arduino compatible?

Using this system they’ve successfully controlled two 8″ Velox slides at a whopping 800 inches per minute with a resolution of 0.00025″ — just take a look at the following video to appreciate how freaking fast that is.

Continue reading “800 Inches Per Minute At 0.00025″ Resolution”

Measuring Light With ChipKIT

light meter showing LUX value

How does one go about measuring the amount of light in a given area? With a Light Meter of course! Maintaining proper lighting levels can be very important in places like schools, hospitals and even your own workbench.

[Raj] over at Embedded Labs has put together an excellent tutorial on how to construct your very own light meter based upon the chipKIT platform. The chipKIT Uno32 is similar to Arduino, but boasts a much more powerful PIC32MX320F128 microcontroller.  We’ve seen projects that feature the chipKIT Uno (pdf warning) here before. From playing pong to hosting several temperature sensors, it’s certainly a versatile platform.

The light meter uses an I/O shield and communicates to a BH1750FVI digital light sensor via I2C. The firmware divides the raw data coming off the sensor by a constant, and displays the light intensity data on an OLED display in Lux, foot-candles, and Watts/m^2 units. Be sure to check out the tutorial for full schematics and source.

CAN Hacking: The Hardware

So far we have discussed the basics of CAN, in-vehicle networks, and protocols used over CAN. We’re going to wrap up with a discussion of CAN tools, and parts to build your own CAN hardware.

Wiring

Unfortunately, there’s no set standard for CAN connections. The most common connector for high-speed CAN is a DE-9, with CAN high on pin 7 and CAN low on pin 2. However cables will differ, and many are incompatible.

CAN needs to be terminated, preferably by a 120 ohm resistance on either end of the bus. In practice, you can stick a single 120 ohm resistor across the bus to deal with termination.

Tools

A good CAN tool will let you transmit and receive CAN messages, interpret live data using CAN databases, and talk CAN protocols. The tools with this feature set are proprietary and expensive, but some hacker friendly options exist.

GoodThopter

The GoodThopter12

Based on [Travis Goodspeed’s] GoodFET, the GoodThopter by [Q] uses the Microchip MCP2515 CAN to SPI controller to access the bus. The open hardware tool lets you send and receive messages using Python scripts.

CAN Bus Triple

CAN Bus Triple

The CAN Bus Triple device provides an interface to three CAN buses, and can be programmed in an environment similar to Arduino. The open source code provided lets you muck with the second generation Mazda 3. Unfortunately, the hardware does not appear to be open source.

Saleae Logic

Saleae Logic

It’s not open source, but the Saleae Logic is a very handy and cheap tool for looking at CAN buses. It can capture, decode, and display CAN traffic. This is most useful when you’re building your own CAN hardware.

DIY

The Parts

If you want to design your own hardware for CAN, you’ll need two things: a CAN controller, and a CAN transceiver.

The CAN controller generates and interprets CAN messages. There’s many microcontrollers on the market with built-in CAN controllers, such as the Atmel ATmega32M1, Freescale S08D, and the TI Tiva C Series. When using a built-in CAN controller, you’ll have to use an external oscillator, internal oscillators are not sufficiently accurate for high-speed CAN. If you want to add CAN to an existing microcontroller, the MCP2515 is an option. It’s a standalone CAN controller that communicates over SPI.

The transceiver translates signals from the controller to the bus, and from the bus to the transceiver. Different transceivers are needed for high-speed and low-speed CAN networks. The NXP TJA1050 works with high-speed buses, and the ON Semi NCV7356 works with low-speed, single wire buses.

Dev Boards

There’s a ton of development boards out there featuring microcontrollers with a CAN controller. The Arduino Due‘s SAM3 processor has a controller, but there’s no transceiver on the board. You can pick up a CAN bus shield, and the Due CAN Library to get started.

The ChipKIT Max32 is similar to the Due. It has two CAN controllers, but you’ll need to provide external transceivers to actually get on a bus. Fortunately there’s a shield for that. The ChipKIT is officially supported by Ford’s OpenXC Platform, so you can grab their firmware.

That concludes our discussion of CAN Hacking. Hopefully you’re now ready to go out and experiment with the protocol. If you have questions, send them along to our tip line with “CAN Hacking” in the subject, and we’ll compile some answers. If you liked this series and want to suggest a topic for the next set of posts we’d love to hear that as well!

CAN Hacking

Put Your Dev Board To Work As A Demoscene Display

If you’re looking for a way to push your comfort zone with that slick new microcontroller you’ve been working with we think [Morgan Gangwere] has the answer. He took his chipKit development board and used it as a demoscene platform.

Demoscene refers to audio and visual demos written to squeeze as much entertainment out of a given platform as possible. We’ve seen demos for a lot of different platforms; for instance, here’s a Propeller chip demo. But this use of the onboard OLED screen brings a smile to our faces. With well under 100 lines of code [Morgan] implemented several different video effects (the music heard in the clip after the break is not being produced by the board). There is a star field which serves as the background. Over the top of it a scrolling message is displayed following a sine wave shape. The speed at which it scrolls is set by the trimpot, which you can see adjusted about 50 seconds into the clip.

Continue reading “Put Your Dev Board To Work As A Demoscene Display”

Taking A Dump From Some Old Hardware

NYC Resistor shows you how to have some fun with electronics from the junk bin. Their post called The Joy of Dumping encourages you to look around for older memory chips and see what they’ve been hiding away for all these years.

The targets of their hunt are EPROM chips. Note the single ‘E’. These are Erasable Programmable Read-Only Memory chips, and predate EEPROM which adds “Electrically” to the beginning of the acronym.  You used to use a UV light source to erase the older types of memory. In fact we’ve seen some EPROM erasers as projects from time to time. These shouldn’t be too hard to find as they were prevalent as cheap storage back in the 1980’s.

If the quartz window on the top of the chips has been shielded from ambient UV light, you should still be able to read them and it’s as easy as hooking up your Arduino. Is it useful? Not really, but it still can be neat to interface with what might otherwise never make its way back out of the junk box.