A Bluetooth Trackpad From A Resistive Touchscreen

touch

If you’ve checked out your favorite online retailer of absurdly inexpensive Chinese electronics, you’ll find a whole bunch of replacement parts. Phone parts are especially common, with high-resolution LCDs available for just a few dollars. There are also a few touchscreen kits – resistive touchscreen digitizers that can easily be read with a microcontroller. [Vinod] got his hands on one of these touchscreen digitizers, and with the help of an 8-pin micocontroller turned it into a Bluetooth trackpad.

The clear plastic touchpad is a relatively simple device. By reading a pair of analog values, it’s easy to find the coordinates of a finger or stylus on the touchpad. [Vinod] programmed an ATtiny13 to read these values and turn them in to x y coordinates, but he needed something useful to do with this data.

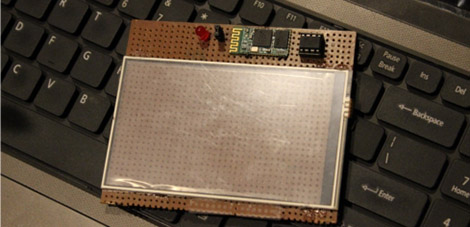
By connecting a small bluetooth module to his microcontroller, [Vinod] could send these coordinates to his computer. The result is a homebrew touchpad, able to move a cursor around, left and right click, and emulate a scroll wheel.

Continue reading “A Bluetooth Trackpad From A Resistive Touchscreen”

Laptop Touchpad As A Standalone Peripheral

[Viktor] is working on salvaging parts from a dead laptop. In his eyes the biggest gem to be had is the touchpad, so he set out to see if he could make the touchpad a standalone device. You might be envisioning the many hells of interfacing this with a microcontroller and writing firmware to measure and translate the input to HID compatible commands. The good news is it’s quite a bit simpler than that, with just one gotcha.

He looked around to see what he could find about the chip that drives the touchpad. He couldn’t locate an exact match, but a datasheet from a similar family of controllers make him think that there should be a PS/2 data and clock output from the chip. After probing the test points on the board he found them, as well as the voltage and ground rails. Above you can see he soldered an old mouse cable to the board and it works when plugged in.

But we did mention the gotcha. There doesn’t seem to be any support for the right and left buttons. Those were housed on a flexible PCB which attached to the white connector seen above. That PCB also connected to the computer so we don’t know if they will work with this hack or not.

Machine Learning Lets Micro Decode Your Handwriting

This rig will take the letters you write on the touchpad using a stylus and turn them into digital characters. The system is very fast and displays near-perfect recognition. This is all thanks to a large data set that was gathered through machine learning.

The ATmega644 that powers the system just doesn’t have the speed and horsepower necessary to reliably recognize handwriting on its own. But provide it with a dataset to compare against and you’re in business. [Justin] and [Stephen] designed a neural network algorithm that took a large volume of character handwriting samples, and boiled them down into a set of correlations that can be referenced when encountering a new entry. This set is about 88 kilobytes, too much to store in the microprocessor, but easy to reference from an external flash memory device.

There’s plenty of gritty details in the write up linked above, but you may want to start with the video overview found after the break.

Continue reading “Machine Learning Lets Micro Decode Your Handwriting”

Capacitive Sensing Tutorial

[Bertho]’s submission for the 74xx logic contest is really impressive. He designed a capacitive sensing touchpad using only 74xx and 40xx logic chips. We’re impressed with the build and his writeup is one of the best resources we’ve ever seen for capacitive sensing.

There are two ways to go about designing a capacitive touchpad. The first option is put a voltage through an RC circuit. Measure the voltage-time curve, and you have a measure of the capacitance of the circuit. The second method is setting up an RC circuit to change polarity after a threshold for C has been reached. Microprocessors only use one of these methods (AVR uses the first, PIC uses the second), but [Bertho] decided to implement both methods for unknown reasons we still respect.

The circuit [Bertho] designed has a 30MHz clock using only 74xx logic chips, an amazing feat in itself. An 8×8 channel panel was fabricated and the whole build connects to a computer over RS-232.

The finished build is good enough has 64 points of resolution and is able to detect proximity very well. The touchpad is even able to recognize when a pen is placed on the panel. Check out the video after the break for the walk through and demo of this amazing build.

Continue reading “Capacitive Sensing Tutorial”

Installing OpenSSH On The HP TouchPad

hptouchpad_openssh

[Russ] was lucky enough to get his hands on a deeply discounted HP TouchPad, and after hearing about the huge bounty being offered for getting Android up and running on the device, he decided to poke around and see if he could make some headway.

He started off by making a full backup copy of his file system using a tool HP has on their WebOS site, just in case anything unfortunate happened to his device in the process. He grabbed a copy of the ARM cross-compiler and set off to build a copy of OpenSSH for the TouchPad. Once he had the binaries in hand, he started what he thought would be the arduous process of getting SSH onto the TouchPad, but it turned out that it was a simple drag and drop operation.

After remounting the file system to allow write operations, he fired up the SSH daemon and hoped for the best. It worked like a charm, and while it’s a relatively small part of getting Android running on the TouchPad, every bit helps.

Keypad Uses A PIC’s Built In Capacitance Functionality

[Giorgos Lazaridis’] most recent project was to build a capacitive touch pad. Since he’s using a PIC 16F1937 it will be relatively easy. That’s because it has a 16 channel capacitance sensing module built right in. But there are still some design considerations that make the development a bit touching.

This isn’t the first time he’s worked with capacitance sensing. Through past experience he has found that it is very important to position the microcontroller as close to the button pads as possible. Because of this, the chip is soldered on the back of the PCB used for the keypad itself. Because he’s hand soldering vias, he also used some foam tape to raise the button pads just a bit. This way they will be flush with the acrylic overlay, which cannot sit flat on the board due the via solder joints.

Check out the video after the break to hear [Giorgos] walk us through the project.

Continue reading “Keypad Uses A PIC’s Built In Capacitance Functionality”

Laptop Touchpad-based LED Lighting Control

touchpad_lighting

[Dave] needed some extra light above his desk/workbench area and decided to wire up some RGB LED light strips to brighten the place up a bit. He wasn’t content with using a standard switch to toggle them on and off, and after some brainstorming, he decided to build a capacitive touch circuit using a pair of copper tubes mounted in a project box. Just as he was putting the finishing touches on his switch, he saw a project online where a Synaptics touchpad was used in conjunction with an Arduino for lighting control. The copper tube switch was pitched, and he got busy working with his Arduino.

When connected to an Arduino, the touchpads can be used in two modes – relative and absolute. Relative mode is familiar to most people because it is used to guide the mouse cursor around on a laptop’s screen. Absolute mode however, relays coordinate information back to the Arduino, allowing the user to map specific areas of the pad to specific functions. [Dave] enabled his touchpad to use absolute mode, and mapped a handful of different functions on the Arduino. He can now fade his lights on and off or light the room on a timer, as well as use a sliding function to tweak the LEDs’ brightness.

It’s a neat, yet simple hack and a great way to repurpose old laptop touchpads.

Continue reading for a quick demo video he put together, and swing by his site if you want to take a look at the source code he used to get this working.

Continue reading “Laptop Touchpad-based LED Lighting Control”