Low-voltage Wind Turbine Lighting

led_wind_turbine

Instructables user [Dustyn] recently constructed a wind-based lantern to provide a bit of free, renewable light in urban settings. The project is based around a vertical-axis wind turbine, which she says are better suited to these environments since wind often comes from all different directions. Despite their lower efficiency compared their horizontal-axis brethren, this style of turbine seems to fit her needs quite well.

She provided a complete bill of materials, down to the last screw and washer you would need to replicate her work. The wind sails were constructed from thin aluminum flashing, and inserted between two acrylic sheets. These were then mounted to the central aluminum shaft of the turbine, which drives the stepper motor built into the base.

The current from the stepper motor is rectified and run through a pair of capacitors before being used to light the attached LED. This allows the bipolar motor to provide current regardless of the direction the turbine is turning, and the caps smooth things out so that the LEDs don’t flicker wildly under varying wind conditions. The turbine is not going to light up a full city block, but it is definitely a nice alternative to sun jars.

Stick around to see a video of the turbine mechanism in action.

Continue reading “Low-voltage Wind Turbine Lighting”

Lower Cost Arduino Cell Shield

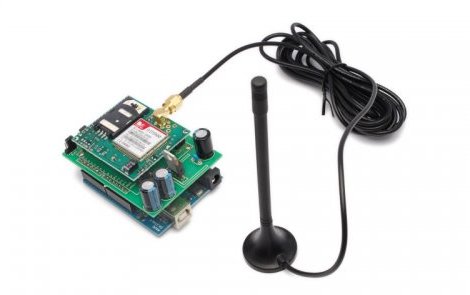
People love putting their Arduinos in interesting and remote places. while it may be possible, it may not be practical to run out and collect data from the devices. That is where this GSM / GPRS shield comes in handy.

Based around the SIMCom SIM900 that puts this device on the lower end of the price scale, (49 Euro for the module, ~60 Euro for the module mounted on a breakout board, or around 85 greenbacks) makes this module an interesting target for anyone wanting to add cell phone connectivity to a project.

To take this a step further [Boris] whipped up a nice shield PCB for the Arduino and Arduino like footprint users to make connections between the 900’s breakout board and the Arduino layout a snap. Electrically its just wires, and a LM317.

Laptop Touchpad-based LED Lighting Control

touchpad_lighting

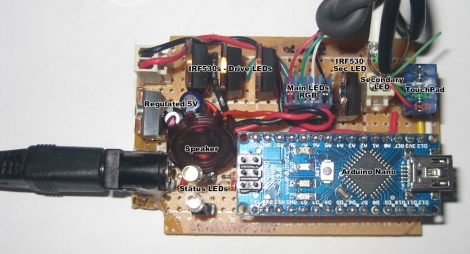
[Dave] needed some extra light above his desk/workbench area and decided to wire up some RGB LED light strips to brighten the place up a bit. He wasn’t content with using a standard switch to toggle them on and off, and after some brainstorming, he decided to build a capacitive touch circuit using a pair of copper tubes mounted in a project box. Just as he was putting the finishing touches on his switch, he saw a project online where a Synaptics touchpad was used in conjunction with an Arduino for lighting control. The copper tube switch was pitched, and he got busy working with his Arduino.

When connected to an Arduino, the touchpads can be used in two modes – relative and absolute. Relative mode is familiar to most people because it is used to guide the mouse cursor around on a laptop’s screen. Absolute mode however, relays coordinate information back to the Arduino, allowing the user to map specific areas of the pad to specific functions. [Dave] enabled his touchpad to use absolute mode, and mapped a handful of different functions on the Arduino. He can now fade his lights on and off or light the room on a timer, as well as use a sliding function to tweak the LEDs’ brightness.

It’s a neat, yet simple hack and a great way to repurpose old laptop touchpads.

Continue reading for a quick demo video he put together, and swing by his site if you want to take a look at the source code he used to get this working.

Continue reading “Laptop Touchpad-based LED Lighting Control”

More High Voltage Experimentation With A Flyback Inverter

[Electorials] actually makes working with a flyback inverter sound rather easy. This comes hot on the heals of the huge high voltage collection we saw the other day, but slows way down in the presentation of information. This makes the project very approachable for the newbie, especially considering that the majority of the testing is done with low voltages.

He’s using a flyback transform for this project, which can be pulled from an old CRT monitor. Once you have one in hand, all that’s required to figure out how to use it is a voltometer, a 9V battery, a MOSFET (also salvaged in this case), and miscellaneous components. Once he establishes what each external connection does electronically, [Electorials] builds his circuit on a breadboard, then uses it to create plasma in the bulb above as well as to light up a CCFL.

Redbull Sends Marketing Doodad To Hackerspace Using An Open Source Product

Posts

Looks like Redbull is harnessing the power of open source hardware to market their product to hackers everywhere. We’d say that it worked because here we are, posting up some free advertising for them. It seems that a rep for the company dropped off a package at a hackerspace in LA called Null Space Labs. It came in what is obviously a laser cut wooden box, a material that tends to make hackers salivate. Inside they found the board you see above. It took a bit of time to look over the hardware was eventually identified as an Uzebox. Sure enough, then plugged in an original NES controller to the controller port on the back of the board and were playing a version of  Pac-man in no time.

Marketing and advertising have their place in our lives which can be annoying and intrusive at times. But we have no problem with it when done creatively and targeted to our interests. Good job Redbull, and might we add, that’s a heck of a routing path for your PCB outline!

Hackaday Is Looking For A Full Time Project Builder/ Video Host!

Hackaday.com is looking for an experienced hacker/writer to join our team doing original hacking and modding projects on video. Are you energetic, outgoing, and passionate about hacking/modding? Can you solder AND explain what you’re doing and why? Come join our team and modify/hack/create things daily with a professional film crew to be aired on HackADay, then post a writeup detailing how you did your hack. Let your mind run wild, combine Mythbusters with Ben Heck, can you do it?

To be able to do this job successfully you need to be energetic, passionate and knowledgeable about hacking. The person who is perfect for this job will have experience with computer modding, hobby robotics, basic electronics, microcontroller programming, as well as some larger manufacturing skills like running a CNC mill and welding. Take a look at Hackaday.com to see the kinds of projects we would like to see created. Writing/blogging experience is a plus.

Job duties will include:
-following trends to see what the latest awesome hack would be
-brainstorming your own original hacks and mods
-executing those hacks
-breaking down the hacks to educate the viewers

This is a full-time, in-house position at our Santa Monica office. Pay is $30-$40k a year based on experience and includes benefits. To apply, please submit a cover letter and resume to our online job board (http://mhlo.co/ed886g). In your cover letter tell us why you’d be the best fit for the job, and please feel free to include any links to personal hacks/projects, or any future hack ideas you’d bring to HackADay.

Video Experimenter Shield

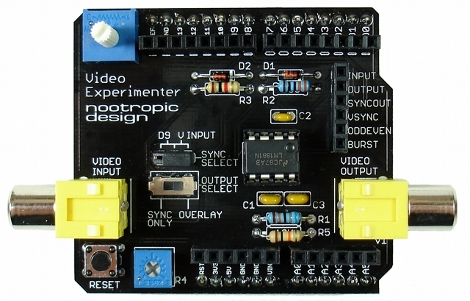
People always want to do more with less and the Video Experimenter Shield is no exception. Consisting of an LM1881 video sync separator, a handful of passive components, and a stylish PCB in the standard Arduino shield footprint.

The board features simple but useful controls and features, a removable jumper allows you to select a sync source, either from incoming video or the Arduino, a potentiometer to adjust the analog threshold, and there is a convenient signal breakout header.

Software is an enhanced version of the popular TV out library and allows you to start off with video graphics overlay, closed caption decoding, a simple gun game, and basic, but still effective frame capture, and computer vision. Of course, there are all sorts of other fun and amusing experiments that start to pop in mind once you check out a quick demo video after the break.

Continue reading “Video Experimenter Shield”