3G Connected Hotspot Hangs Out At Your House

[Drug123] made the most out of this inconspicuous gray box on the gable end of his father’s home. It serves up a 3G Internet connection that was otherwise unavailable..

The project idea was sparked by the absence of wired or fiber optic broadband in the community where his dad lives. He knew some neighbors were using 3G connections, but he couldn’t get it to work inside the house. So he set about developing an external installation that would both communicate with the cellular network, and provide a WiFi connect to it. Hardware for that is relatively expensive; a USB 3G modem and a WiFi router with a USB port.

The box itself is made of plastic, but even without the Faraday cage effect that would have been formed by using a metal housing, the 3G modem’s internal antenna just doesn’t do the job. You can see that [Drug123’s] solution was an external antenna which is mounted at the peak of the roofline. Inside the box there’s an exhaust fan to cool things off when they get too hot, as well as some power resistors which provide a heat source on the coldest nights. The low-cost build certainly fits the bill, and it’s not too hard on the eyes either.

Insanely Kludgy Pen Plotter Actually Works

This pen plotter, held together with structural epoxy, is an amazing piece of engineering, and almost as impressive as a bridge made entirely out of Bondo.

[Brian] at the Rochester, NY hackerspace Interlock needed to build something for the BarCamp geek “unconference.” To lure BarCamp attendees over to the Interlock table, they needed a small tabletop device with whirring motors that was able to make some decent swag. Hacking together a pen plotter sounded like the perfect project.

The mechanics of the build were scavenged from old printers and scanners. [Brian] decided to use pin-feed card stock, so the take-up wheels from an old dot matrix printer was sacrificed as well. This paper feed mechanism serves as the Y axis, and the X axis rides above the paper on precision rods. The pen holder is supported by a tiny solenoid.

Things start getting crazy at the software level. grbl was loaded onto an Arduino with a stepper driver shield, and vector text drawings were printed. After a bit of live-action hackery, [Brian] figured out how to plot captured webcam images. OpenCV captures and does a trace outline. This is converted to vectors with autotrace, and from EPS to HPGL by pstoedit. A Python script then cleans up the HPGL and converts it to G code and sends it to the printer. Confused? So are we, so just check out the video of the plotter in action after the break.

Continue reading “Insanely Kludgy Pen Plotter Actually Works”

Automated CD Ripper Build From Lego And Other Parts

[Paul Rea] decided it was finally time to get rid his CD and DVD library by ripping the data onto a hard drive. He has a rather extensive collection of discs and didn’t relish the thought of ripping them one at a time. So he set to work building his own automatic CD ripper/duplicator.

Right off the bat he had several specifications for the build. He wanted it to be platform independent, reliable, and cheap to build. We think he really hit the mark, but he does mention that he’s got a second duplicator build in mind already. This version makes heavy use of Lego parts for the arm and gearing. The base has a stepper motor which swings the arm in an arc which reaches the input pile, the optical drive try, and the output bin. The arm itself has a two-part wooden gripper that is positioned over a CD and uses a limiting switch to sense when the vertical orientation is at the proper point for gripping a disc. We enjoyed reading his log as he discusses the various building challenges he encountered and how each was overcome.

We’ve seen a few other builds like this before. One of our favorites is from way back.

Continue reading “Automated CD Ripper Build From Lego And Other Parts”

Preparing For The Zombie Apocalypse

Every reasonable person prepares for the future. Whether it’s matching your employer’s 401k contributions, making sure you have bread and milk before a snow storm, or saving for your kid’s college fund, planning for the future gives you a comfortable life. [Gord] has exceptional foresight; he build an awesome Louisville Decapitron for the upcoming zombie apocalypse.

It’s an urban legend that a bullet to the brain will stop a zombie. Instantaneous trepanation is devastating in the living, but we’re talking about the undead here. A melee weapon is what you’re after, and you’ve got to cut off the head. [Gord] based his project around a Louisville Slugger. The blade is a 20 inch long piece of plasma cut mild steel. It’s just a prototype to get the balance figured out; the final version will be done in carbon steel.

The tang of the blade fits into two notches in the bat. The blade is secured with two custom fabricated spacers that are perpendicular to the blade. We’re not quite sure of the nomenclature of the resulting weapon (it’s some type of battle axe, we’re sure), but we couldn’t think of a better way to decapitate the undead.

Old-school Projector Turned Digital

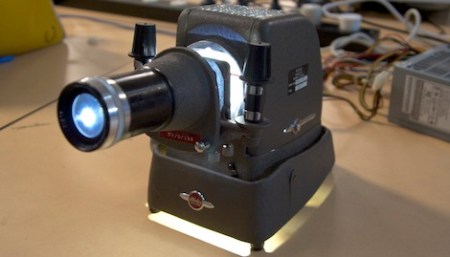
Who hasn’t thought about turning a 1950s slide projector into a digital projector? [Matt] did, but unlike most of us, he actually did it.

[Matt]’s friend [Angus] found an old, single-slide, sans-carousel slide projector in the trash. It’s a wonderful piece of ancient technology with a fabric insulated power cord and bakelite lamp socket. This projector was upcycled to the 21st century by adding a 10 Watt LED and a Nokia 1200 LCD.

For the electronics, [Matt] used an ATmega88 microcontroller. There’s an infrared receiver so the remote from an in-car CD player can be used to advance the slides and turn the projector on and off. The LCD is controlled by a bit of bit-banging from the Mega88, using hard-coded images of Che Guevara, Hendrix, Space Invaders and some old-school Macintosh/Lisa icons. Unlike the screen printed t-shirts at American Apparel, Che is the only authentic image in this project; this projector might have been made after Guevara came to prominence.

With a 10 Watt LED, it’s not the brightest projector on the planet and the picture is a little washed out in a bright room. With dim lighting, it’s a very good project even if the images are static.

Color Organ Tiki-o’-lantern

The Halloween parties this weekend are over, but that doesn’t mean there’s not time for a few more to finish a build before children start knocking on doors tonight. [formori] at Lakehead University wanted to do something spectacular for a pumpkin carving contest, so he and a few other EE students came up with a tiki-o’-lantern with music.

The guys at Lakehead figured a color organ flashing LEDs in the eyes and mouth of the tiki would be a very good and easy project. The circuit they used is a simple Op-amp setup like one we’ve seen earlier. The entire pumpkin is powered by a 9 V battery and the music is played with an iPod. There are two colors of LEDs – high frequencies flash a blue LED in the eyes and low frequencies flash a red LED in the mouth.

Aside from the added A/V stuff, [formori]’s pumpkin is one of the best we’ve seen on Hack a Day this year. Check out the Youtube of 1st place winner of the Lakehead pumpkin carving contest after the break.

Continue reading “Color Organ Tiki-o’-lantern”

Arduino Controlled Four Socket Outlet

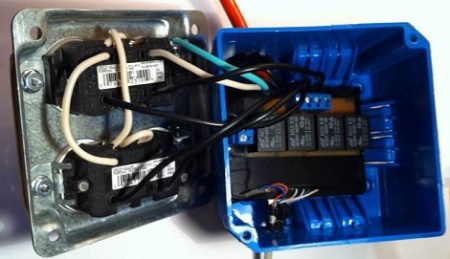
Never get between a man and his salami. [Mike] needed a way to control temperature, humidity and airflow with his meat curing setup. Of course he could modify a refrigerator and humidifier to be controlled separately, but [Mike] decided the best course of action would be to control line voltage with an Arduino.

[Mike] started his build with a four socket wall housing he picked up at Home Depot for a few dollars. After wiring up each outlet so it can be controlled independently, he set out designing a four port relay board. This was a pretty simple build – four 10 Amp relays and a few terminal blocks. The PCB was designed in Eagle as a single-side board for ease of manufacturing.

The relay board is meant to fit inside the blue box along with the four sockets, so a few holes were drilled for the power and control wires. The entire assemblage was put together and tested out. [Mike] posted a video of his controllable outlet flashing a light bulb at 10 Hz. Check out that light switch rave after the break.

Continue reading “Arduino Controlled Four Socket Outlet”