Reverse Engineering A Futaba SBUS Remote Control

In the world of model aircraft, Futaba’s SBUS system is a big deal. Instead of having one servo per channel, the SBUS system allows for 16 proportional controls and two digital channels for each receiver. Basically, if you’re building an awesome plane with retracts on the landing gear and bomb bay doors, this is what you want to use. [Michael] wanted to use a few SBUS servos for a project he’s working on, so of course he had to reverse engineer this proprietary protocol.

Each SBUS servo operates over a single 100kbps serial connection with a few interesting twists: the signal is transmitted as big endian, but the individual bytes are little endian, something [Michael] figured out after stumbling across this month old mbed post. [Michael] used a serial library written by [fat16lib] and was able to change the parity and stop bits along with a simple hex inverter. Everything worked perfectly when the servo was connected to a an Arduino Mini.

Even though the SBUS system requires special Futaba servos, we can easily see how useful [Michael]’s work would be to outrageously complex robots or cnc machines. Check out the video after the break for a quick demo of [Michael]’s breadboard controlling one of these SBUS servos.

Continue reading “Reverse Engineering A Futaba SBUS Remote Control”

Quick And Easy Arduino-powered Theremin

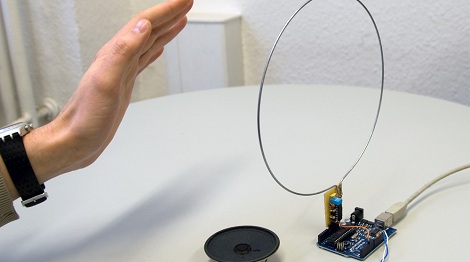
[Martin] sent in a great guide to a simple Arduino based theremin. It’s a very small build – just a single common IC and some passive components – and easy enough to build in an afternoon.

The theremin is based on a simple LC oscillator built around a 7400 quad NAND gate IC, a wire antenna, and a few caps and resistors. When a hand moves closer to the antenna, the frequency of the oscillator increases; when a hand moves away, the frequency decreases. On the software side, the oscillator is connected to the internal hardware counter of the Arduino. Every time there’s a change in the voltage output by the oscillator (all the time, varying slightly with the distance from a hand to the antenna), the counter increases by one. This counter is tallied up over 1/10th of a second, and the distance from the instrumentalist to the theremin can be determined. From there, it’s just outputting a frequency to a speaker.

All the code, schematics, and board layouts are available on [Martin]’s guide, and most of our readers probably have the parts to build this lying around their workbench. You can check out a video of [Martin]’s theremin in action on his guide.

3D Printer With Insane Accuracy Uses A DLP Projector

After years of work, [Junior Veloso] is finally getting his 3D printer project out to the public. Unlike the Makerbots and repraps we usually see, [Junior]’s printer uses light-curing resin and a DLP projector to build objects with incredibly fine detail.

One highlight of [Junior]’s project is the development of low-cost resins. Normally, light curing resins are extremely expensive, but [Junior] is actively trying to get the price of resin down to $150 USD per kilogram. A quick back-of-the-wolfram calculation tells us you should be able to print about 7-800 cubic centimeters with a kilogram of resin. It’s much more expensive than plastic filament used in other 3D printers, but that’s the price you pay for quality.

There’s a very popular Indiegogo campaign that is trying to raise money to mass produce the resin and some components of this kit. We’re not impressed with the rewards for this campaign – $59 for a .PDF description of the printer without any dimensions, $159 for a BOM, dimensions and the formula to make your own resin, and $400 for the closed-source software [Junior] devleoped – but hopefully this Indiegogo gets cheap resin out onto the market. There’s a short FAQ about this printer, so we’ll leave our readers to tactfully discuss the merits of this printer in the comments below.

You can check out the process of printing a remarkably detailed alien skull in the video after the break.

Continue reading “3D Printer With Insane Accuracy Uses A DLP Projector”

Hackaday Links April 5, 2012

A Remote Sphero-Control Trackball

sphero drives car

Sphero is a cool little ball that can roll around under the control of a smartphone.  Although super-cool by itself, in this application it’s been hacked into a sort of trackball to drive a remote control car!

Arduino Voice Control

Arduino voice control

[Sebastian] Wrote in to tell us about this article about using the Arduino EasyVR shield to add voice control to your project. Worth a look if it your application calls for voice-control.

OpenBeam Tiny 80/20-Like Extrusion

openbeam extrusion

Openbeam is a Kickstarter project designed to produce an aluminium extrusion for building stuff.  Although we’ve seen lots of this kind of thing, the small 15mm profile is quite interesting, and it’s designed to use off-the-shelf hardware, which should save on costs!

Hexapod + iPad = Fun for All

hexapod-ipad

There’s not a lot of information on this hack, and the price or this hexapod device isn’t even listed, so we’ll assume it’s quite expensive.  On the other hand, it’s got a cool video of it being controlled by an iPad, so maybe it will give you some hacking inspiration!

USB Sound Card Write-Up

usb sound card

[George] wrote in to tell us about his USB sound card write-up. Before you think that this is a dupe of this post, he freely admits to building it nearly identically to the one previously posted. Imitation may be the sincerest form of flattery, but [George] is also requesting some feedback on his blog and the aforementioned post. feel free to let him know what you think in the comments.  Please be polite!

Custom Heaters For A DIY BBQ Smoker

Spring is in the air, and with that comes savory meals cooked over the course of dozens of hours. While preparing for your yearly allotment of pork and beef, check out [Brett Beauregard]’s custom heater elements he built for a DIY wood smoker.

This build follows the very successful smoker [Brett] built last year. This year, he’s using the same toaster oven heating elements, only cut down to make the heater smaller and more efficient. Basically, [Brett] is making a small cartridge heater out of the equipment he already has.

After cutting the toaster oven heating elements to length, [Brett] reamed out the ends to expose the nichrome wire. A short hit with a TIG welder bonded the lead to the heating element. Insulated with furnace cement, [Brett] had a custom heater perfect for charring chunks of mesquite or hickory.

Meat smokers aren’t very complicated – they can be built with a flowerpot and a hotplate, and will still cook up a delicious dinner. We might have to borrow [Brett]’s technique when we build this year’s smoker.

Make Your RC Car Drive Itself With This Simple Brain Swap

arduino-rc-conversion

If the kids have lost interest in that RC car or truck you bought them over the holidays, [Randy Sarafan] from Instructables has a few ideas that might help make the toys fun again, while teaching your kids a bit about electronics in the process. In his writeup, he shows how to swap out the brains of your run of the mill RC truck, enabling it to do far more than was originally intended. The procedure is pretty simple, and something that you can easily involve your kids in, if you’d like.

He uses an Arduino and a motor shield to keep the conversion simple, but this can be done with just about any capable microcontroller you might have on hand. [Randy] added a Parallax Ping sensor to the front of the truck enabling it to avoid objects as it drives itself, but since he cut out the truck’s original control board we’re assuming that there’s no way to override the truck’s actions at present.

[Randy] calls the conversion a “robot” though it seems like more of a semi-autonomous rover if you ask us. Regardless, revamping an old RC car is certainly far better than letting it collect dust on a shelf, or worse, tossing it out during spring cleaning.

Continue reading to see a short video of [Randy’s] RC truck in action.

[via HackedGadgets]

Continue reading “Make Your RC Car Drive Itself With This Simple Brain Swap”

Facial Recognition Software Can Tell When You’re Frustrated With Xbox Live

Most of us have been faced with the anguish of being shot in the head repeatedly by 12-year-olds. There are also the times when we’re overjoyed by defeating the Mother Brain and making it out of the caverns of Zebes. If we wanted to scientifically quantify how happy, sad, or angry we are while playing video games, we wouldn’t know what to do. [Dale] came up with a very interesting way to gauge someone’s state of mind while either playing Xbox, or watching TV.

To get a measure of how happy or sad he is, [Dale] put a webcam underneath his TV and pointed it towards his couch. Every 15 seconds or so, the webcam snaps a picture and sends if off to the face.com API. After face.com sends a blob of JSON containing information about all the faces detected in the photo, a short Python script plots it on a graph.

[Dale] admits he’s not entirely scientific with this project; the low resolution of the webcam, coupled with images being captured every 15 seconds means he runs into the limitations of his hardware very quickly. Also, there’s the confound of [Dale] paying attention to something else in the room – like his kids – rather than the TV. Still, it’s an interesting use of hardware and software that would be loved by a market researcher or QA designer.