MakerFaire K.C. Kansas City Hackerspace Delivers


The Kansas City Hammerspace crowd really brought an amazing amount of stuff this year. Some stuff you’ve already seen, some stuff that is totally new. I’ll be sharing details on some of them individually as they really deserve the attention.  Their booth, or booths were huge, taking up roughly 1/3 of the main hall. It was packed with a plethora of individual projects that really were all over the place. There were enthusiastic people at every turn happy to show off what they had built.Their presence really boosted the awesome level of the MakerFaire through the stratosphere.

Not only did they bring tons of awesome to the MakerFaire, they were gracious enough to invite people back to the hackerspace after the show for an after party. They stuffed food in my entire family and made us feel at home. It was really cool seeing everyone gathered discussing various projects. The ArcAttack crew was even troubleshooting a small tesla coil cit that wasn’t working right.

Watch the Hackerspace tour and check out some pictures after the break. Posts highlighting some of the individual projects will be coming soon.

Continue reading “MakerFaire K.C. Kansas City Hackerspace Delivers”

Building Better Cases With A Laser Cutter

[Ryan] just got his Raspberry Pi, and what better way to add a new toy to your workbench than by building a case for it? Using a laser cutter and 3D printer, [Ryan] managed to make a case that is sure to be the envy of all the other tinkerers at his hackerspace.

The build started off with a piece of dark red acrylic in a laser cutter. After cutting the Raspberry Pi logo out of this acrylic, [Ryan] cut the same logo – a little bit larger – out of plywood. Because he was very careful to measure the kerf (or the width of the laser beam/saw blade/what have you), the wooded version of the Raspi logo fit snugly inside the acrylic cut out.

The sides of the enclosure are a single piece of plywood with a kerf bend, making for a very attractive rounded case. Finally, the Raspberry Pi is mounted on a Pi plate printed on a Ultimaker.

For as many builds we see using a laser cutter here on Hackaday, there’s surprisingly little information on exploiting the true potential of these machines with marquetry, intarsia, or fretwork. Enclosures are always cool, so if you have a very elegant laser cut box, send it in and we’ll put it up.

HackaDay Is Entering In The Redbull Creation Contest

When I returned from MakerFaire Kansas City I was very pleased to find a Bullduino waiting on my doorstep! Hackaday has been accepted into the first round of the Redbull Creation Contest. I’m doing the physical building while the other writers are consulting for this round. I’m also pulling people from around me here at SquidFoo (my local hackerspace) that can help.

Today, I got lucky enough to run into [Tony Sherwood] from MakerBot. I told him my idea and he eagerly volunteered to lend his brains and his brawn… as well as his Makerbot Replicator. He’s been extremely helpful so far offering very good ideas on how we can get this thing operational as fast as possible.

I’m not going to share exactly what we’re building yet. I can tell you it will not be the most complex project, but it will be really fun, and most likely dangerous. We’re starting today, which means we have very little time to build. Lets hope we can make something interesting enough to go to round two!

Bicycle Quadcopter Flies For Dozens Of Seconds

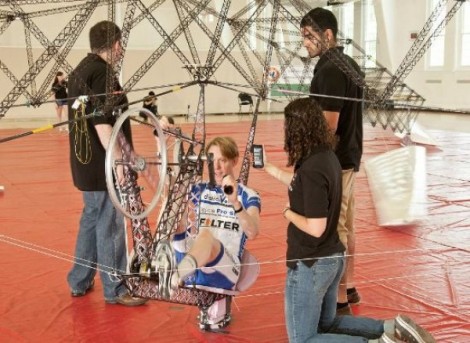
If you decide to fly into town on this bicycle-powered quadcopter your arms and legs really will be tired. That’s because this athlete had to give it his all to power the rotors through the foot pedals and the hand cranks. You can see just one of the rotors on the right side of the background. Yeah, this thing is big!

You’re looking at the Gamera II, a craft developed by students at the University of Maryland. About a year ago they were showing off the first version of the aircraft. With the passing of the year comes the breaking of world records as a different rider manages to keep it up for 50 seconds in the video after the break. Although the structure is huge (over 100 feet across) the building materials and techniques let it weigh in at only 71 pounds.

It still looks like way to much physical work for us. We’re sticking to the pedal-powered hydrofoil as our dream transport.

Continue reading “Bicycle Quadcopter Flies For Dozens Of Seconds”

Taking A Dump From Some Old Hardware

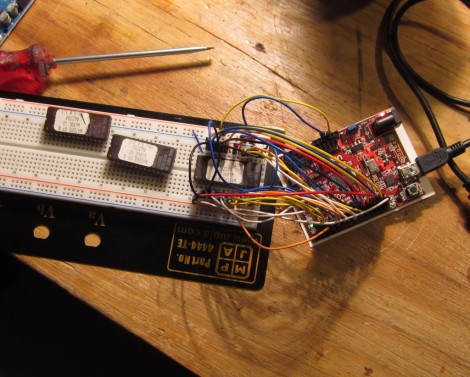
NYC Resistor shows you how to have some fun with electronics from the junk bin. Their post called The Joy of Dumping encourages you to look around for older memory chips and see what they’ve been hiding away for all these years.

The targets of their hunt are EPROM chips. Note the single ‘E’. These are Erasable Programmable Read-Only Memory chips, and predate EEPROM which adds “Electrically” to the beginning of the acronym.  You used to use a UV light source to erase the older types of memory. In fact we’ve seen some EPROM erasers as projects from time to time. These shouldn’t be too hard to find as they were prevalent as cheap storage back in the 1980’s.

If the quartz window on the top of the chips has been shielded from ambient UV light, you should still be able to read them and it’s as easy as hooking up your Arduino. Is it useful? Not really, but it still can be neat to interface with what might otherwise never make its way back out of the junk box.

Offloading VGA Generation Onto A Coprocessor

[Alessandro] sent us a link to his post about a PRU software VGA rasterizer. It’s not the easiest read, but we think it’s worth your time.

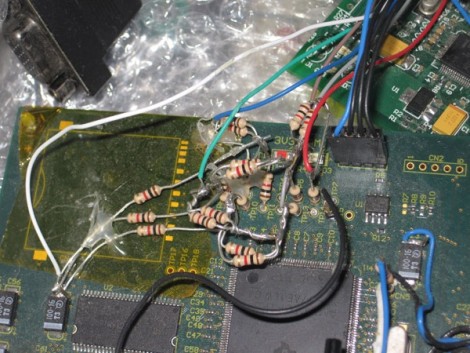
The gist of his background information is that back when his company was developing for an ARM9 processor he wanted to test his mettle with the coprocessor chips. The first iteration was to write a character LCD driver that pulled data from the main processor’s memory and displayed it on the screen. This makes for a low-overhead debugger display, it’s also very limited (32 characters over two lines doesn’t tell you much). And thus began his work on a VGA generator for the Programmable Realtime Unit (PRU is what TI calls this coprocessor) that grabs data in memory just like the original version. But with a much larger display area this becomes quite useful for debugging. That resistor mess is the R2R ladder he soldered together to perform the Digital to Analog Conversions. There’s a quick demo clip after the jump.

This work could end up being useful to you. [Alessandro] reports that the BeagleBone has similar hardware. A bit of porting could get his generator working on that board as well.

Continue reading “Offloading VGA Generation Onto A Coprocessor”

Tricking The BeagleBone Into Outputting Video

[FlorianH] wanted to get video out working with his BeagleBone but he just couldn’t figure out how to make the kernel play ball. Then a bit of inspiration struck. He knew that if you plug in the official DVI cape (that’s the BeagleBone word for what you may know as a shield) the kernel automatically starts pumping out the signals he needs. So he figured out a way to spoof the cape and output video.

At boot time the kernel polls the I2C bus to see what’s connected. The DVI cape has an EEPROM which identifies it. Since the data from the EEPROM is available for download [FlorianH] grabbed the data he needed, then used an ATmega32 to stand in for the memory chip. When he got the chip talking to the BeagleBone he was able to detect the video sync signals on his scope and he knew he was in business.

Look closely at the breadboard on the right. We love that SIL breakout board for the ATmega32. Very prototype friendly!