Scripting To Automate Your Mindless Android Games

There’s a silly little Android game making some noise on the Interwebs. It’s called Curiosity which is a 3D cube with something inside. The thing is, every single pixel on the cube must be clicked in order to get through a layer. There are of course multiple layers, and… well, you get the point. [Stephen] figures this is a perfect thing for a bit of scripting and set out to find a way to automatically play the Android game.

As you can see above he’s got a pretty good start. To use the script in its current form he finds a part of the cube that is mostly solid green. The Android device is plugged into a computer using the USB cable, and the Android Debug Bridge runs the script. It’s amazingly simple, as it uses the monkeyrunner package which comes with the SDK. The proof is there, and it’s just a matter of whether or not he wants to spend his time to fully automate the playing of the game. You can see a demo of the script embedded after the break.

[Stephen’s] not new to automating things that he doesn’t want to do himself. Here’s an example of his code beating the PlayThru CAPTCHA.

Continue reading “Scripting To Automate Your Mindless Android Games”

Adding Charging Back To Old Apple Accessories

From time-to-time we’ve been frustrated by the lack of backwards compatibility for Apple accessories. We have a great Monster FM transmitter that used the screen of the original iPod to select a channel. That was a feature we just loved which it never worked with any future hardware. We may not be able to get that back, but perhaps this hack can help us implement the ability to charge newer Apple devices using older accessories.

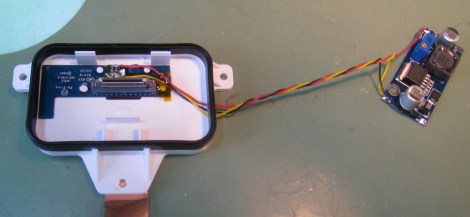
Seen above is the mounting dock from the iPod Hi-Fi speakers released back in 2006. Apparently the sound out of this set of speakers is just great, but you won’t be able to charge your modern device while it’s playing music. That is unless you’re not afraid to solder on a few simple components and roll in a switching regulator which can source at least one Amp of current. As we’ve seen in the past, Apple uses a couple of voltage dividers to identify modern chargers. These are installed on the D+ and D- lines of the USB connector and are pretty easy to recreate if you know the voltage levels the device is looking for. In this case a 39K, two 51k, and one 75k surface mount resistors are free-formed right next to the connector on the Hi-Fi’s dock PCB. The regulator on the right supplies the juice for charging. It’ll charge modern devices now, and even work with the iPhone five if you use a simple dock connector adapter.

Laser Charged Glowing Display

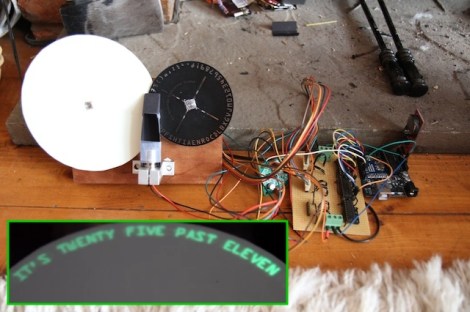
Here’s one of the best takes on a glowing display that we’ve ever seen. Currently [H] is using his creation as a fuzzy clock, but it is certainly capable of displaying just about any messages.

The project uses a wheel of luminous paper as the display surface. This has a glow-in-the-dark quality to it which can be charged up using a bright light source. In this case a UV laser diode was used. This is perhaps the best possible source as its intensity will allow for very quick charging. The innovation here is the use of a second disk as a stencil. Look closely in the image above and you will see that the laser diode is mounted perpendicular to the display surface itself. A mirror reflects — and we believe slightly spreads — the laser dot. It then passes through a cut-out on the black wheel which is shaped as the desired character. As you can see in the video after the break, this results in a crisp and clear glowing letter.

Compare this project to the one that moves the diode itself like a plotter and we think you’ll agree this is a simpler implementation which still looks great!

Continue reading “Laser Charged Glowing Display”

Camera Gantry Rides On Garage Door Tracks

For as many garage and workshop videos we feature here on Hackaday, we’re surprised we haven’t seen this sooner.

[Todd] makes a bunch of videos in his garage shop, but using a tripod is a pain; he’s always tripping over his camera setup and it is just generally in the way all the time. His solution was to mount his camera to an overhead gantry, using the unused tracks for his garage door to move the camera around his workshop.

The build started with [Todd] taking his tripod and fabbing a mounting plate for it to be suspended in mid-air. This would leave the camera upside-down, so [Todd] also made a 90 degree bracket with a 1/4-20 bolt to hold the camera in position.

The actual gantry part of the build is fairly clever. First, [Todd] got a piece of square tubing the same length as the distance between his two garage door tracks. He made a truck that rides on six casters for this tube, then mounted this tube on garage door wheels.

The result allow [Todd] to move his camera anywhere within the footprint of his garage door tracks, including over his workbench and welding area. An ingeniously useful build that’s sure to provide a stable platform for his vlog-type thingies.

Vidia after the break.

Continue reading “Camera Gantry Rides On Garage Door Tracks”

Adafruit’s Got A New Board, An Official Arduino

There’s a new Arduino in town, this time designed in conjunction with Adafruit. It’s the Arduino Micro, a very neat little board designed for breadboard use.

Ostensibly an upgrade of the long in the tooth Arduino Nano, the new Micro takes all the best features of the new Arduino Leonardo and shrinks them down to a convenient stick of gum-sized package. It’s powered by the ATmega32u4 microcontroller, and with a MicroUSB port is able to emulate keyboards, mice and other USB input devices.

Of course with any microcontroller dev board, comparisons must be drawn between the Arduino Micro and the very popular Teensy USB dev board. Like the Teensy boards (and the new Arduino Leonardo), the Micro is able to function as a USB keyboard or mouse. The Teensys, though, is loaded with LUFA making it able to emulate just about anything from mice, USB audio devices, and MIDI synths.

Hackaday Links: November 9, 2012

Yeah, it’s like Twitter but actually cool

Thingiverse – still the best place on the Internet to find cool 3D models to print out – has gone all Web 3.0 with their new Dashboard feature. Basically, you can think of this as Thingiverse’s version of Twitter. The dashboard allows you to see the latest updates from people you like, follow people, categories, and tags, and check out your all-important ‘who’s following me’ stats. Yes, to the Hackaday crowd it may sound a little lame, but it’s a great way to winnow the (awesome) wheat from the (slightly less awesome) chaff.

Hey, we goofed. And not by using the same image twice

Remember when we jumped on the Occupy Thingiverse bandwagon? Well, there were questions about the Thingiverse Terms of Service and confusion that Makerbot actually owns everything uploaded to Thingiverse. That’s completely wrong according to Makerbot’s lawyer [Rich McCarthy]. The whole issue dealt with “Moral Rights or attribution” – a French legal doctrine that isn’t part of US law (or the law of any English-derived legal system as far as we can tell). Yeah, we goofed.

Now u cn snd SMS msgs wit n ‘ino & cell sheld

[Meir] sent in a cellular library for microcontroller projects that allows for simple sending and receiving of SMS messages. Yes, it’s been done before, but [Meir] hid all the hardware interaction with the cellular shield – a good design practice – to make the code nice and tidy.

And you thought PVC was bad…

Just in time for Thanksgiving, [Lou] shows us the fastest way to make mashed potatoes: an oxygen and propane powered potato gun. The build uses oxy and propane tanks you can pick up for a few bucks at any hardware store, steel pipe for the barrel, a grill igniter, and a few pipe fittings. It’s awesome, and we’ve got to hand it to [Lou] for this one. Now to build one and test it out on our indestructible test dummy.

It’s just like the Raspberry Pi! They’re that backordered!

Remember the Stellaris Launchpad, the very cool (and very inexpensive) ARM dev board put out by TI? Yeah, they’re shipping now. News of this comes from [Ryan Holtz] at Autodesk after the FedEx guy came knocking a few days ago. The good news is they’re shipping, the bad news is the price increased slightly to $13.


Double-kettle Boiling Rig For And Easier Brew Day

[Dave] built a controller that lets him boil two kettles at once when brewing beer. The setup uses electric heating elements in each of the kettles. We prefer to use gas as it’s a bit easier to control temperature. But an electric system like this can be used inside during the winter months while propane is relegated to the outdoors. The other thing that immediately comes to mind is partial mash recipes that require steeping in one kettle, then sparging (rinsing off the grains) with water of a different temperature. That kind of thing is a snap since the two are controlled individually by the trimpots on the front of the control box.

Inside you’ll find two 220V solid state relays. The box itself plugs into the 220V outlet in his basement which is normally occupied by his clothes dryer cord. So as not to blow a fuse, the MSP430 chip driving the relays switches back and forth between them rather than turning both on at once. The system uses entirely manual control, but it should be an easy modification to add a thermocouple and PID algorithms if so desired.

After the break [Dave] shows off the system in a video clip.

Continue reading “Double-kettle Boiling Rig For And Easier Brew Day”