Build The Baddest Keypad On The Block With LEGO

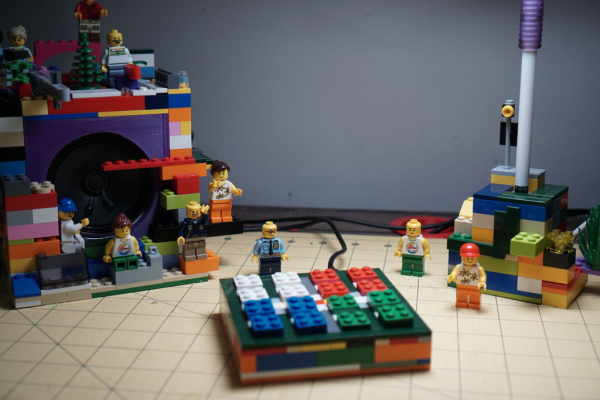
Like so many of us, [EducatedAce] has been quelling the quarantine blues by resurrecting old projects and finding new challenges to fill the days. He’s just finished building this blocky macro keypad to hold a bunch of shortcuts for Photoshop, thus continuing and compounding the creative spree.

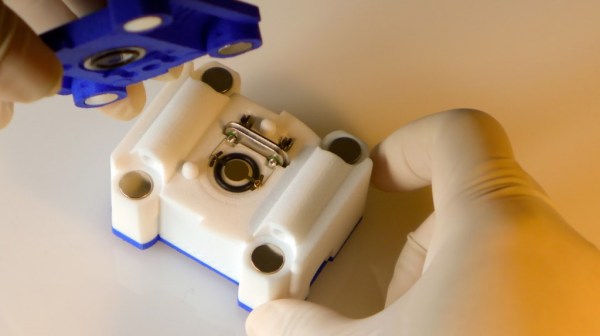
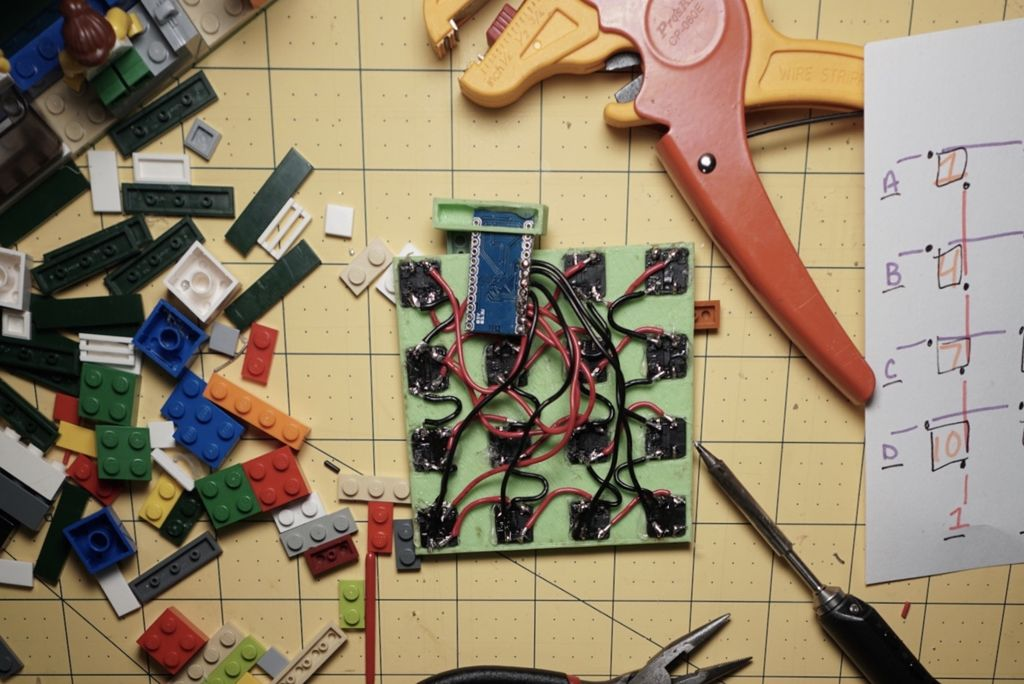
[EducatedAce] already had everything on hand except the Arduino Micro. Instead of standard key switches, this macro block uses 16 of the loudest, crunchiest tactile buttons out there — those big ones with the yellow stems that sound like small staplers.

And don’t worry — no LEGO or LEGO accessories were harmed in the making of this macro pad — the base plate and switch plate are 3D printed. [EducatedAce] has the STL files posted along with great build instructions if you want to wire one up for yourself.

This is a great project because it’s sturdy, it gets the job done without a lot of expense, and still looks like something you’d want on your desk. [EducatedAce] plans to rebuild it with uniformly colored bricks, but we think it looks great as-is, especially with those vented 1×2 pieces. If it were ours, we might use a different color for each row or column to help keep the shortcuts straight.

What? You’ve never printed your own interlocking building blocks before? Well, don’t limit yourself to 1:1 scale, otherwise the minifigs have won. Build a go-kart big enough for humans!

Insecure Surveillance Cameras Provide Dystopian Peep Show

It probably doesn’t surprise you to hear there are tens of thousands of web-connected cameras all over the world that are set to take the default credentials. Actually, there are probably more than that out there, but we can assure you that at least 70,000 or so are only a click away. With this project, [carolinebuttet] proves that it’s quite possible to make art from our rickety, ridiculous surveillance state — and it begins with a peephole perspective.

The peephole in your own front door grants you the inalienable right to police your porch, stoop, or patch of carpet in the apartment building’s hallway while going mostly undetected. In Virtual Peephole, the peephole becomes a voyeuristic virtual view of various corners of the world.

Slide aside the cover, and an LDR connected to an Arduino Micro detects the change in light level. This change makes the Micro send a key press to a Raspberry Pi, which fetches a new camera at random and displays it on a screen inside the box. You can peep a brief demo after the break, followed by a couple of short build/walk-through videos.

If you’re a peephole people watcher, put a camera in there and watch from anywhere.

Continue reading “Insecure Surveillance Cameras Provide Dystopian Peep Show”

Salty? Tip Canister To Rage Quit Games

Do you long for a more pronounced way to rage quit video games? Smashing buttons comes naturally, of course, but this hurts the controller or keyboard. You can quit your longing, because [Insert Controller Here] has an elegant solution that’s worth its salt.

The Salty Rage Quit Controller is simple. The cup is filled with distilled water. When you pour salt in it, the two bolt terminals tell the Arduino Micro that the resistance in the water has decreased. The Micro sends whatever keystrokes you want, so you could call out your deadbeat medic before quitting, or just plain leave. [Insert Controller Here] has example code on his site to get you started. Click calmly past the break to watch the demo and build videos, or we’ll have to ban you for aggro.

With the right tools, you can turn anything into a game controller. Check out this car controller that uses Python and CAN bus sniffing.

Continue reading “Salty? Tip Canister To Rage Quit Games”

Trackpad with Arduino PS/2-to-USB converter

Raspberry Pi Trackpad From Salvaged Trackpad Plus Arduino

Old laptops are easy to find and many have a trackpad with a PS/2 interface hardwired into the guts of the laptop. [Build It] wanted one of those trackpads for use in the DIY Raspberry Pi laptop he’s working on. But the Raspberry Pi has no PS/2 input, and he read that a PS/2 to USB adapter wouldn’t be reliable enough. His solution? Wire the trackpad to an Arduino and have the Arduino convert the trackpad’s PS/2 to USB.

After removing a few screws, he had the trackpad free of the laptop. Looking up the trackpad’s part number online he found the solder pads for data, clock and five volts. He soldered his own wires to them, as well as to the trackpad’s ground plane, and from there to his Arduino Pro Micro. After installing the Arduino PS/2 mouse and the Mouse and Keyboard libraries he wrote some code (see his Instructables page). The finishing touch was to use generous helpings of hot glue to secure all the wires, as well as the Arduino, to the back to the trackpad. By plugging a USB cable into the Arduino, he now had a trackpad that could plug in anywhere as a USB trackpad. Watch [Build It] put it all together step-by-step in the video below.

Continue reading “Raspberry Pi Trackpad From Salvaged Trackpad Plus Arduino”

Strike A Chord With This Pocket Keyboard

[Brian] managed to resist the draw of the Left Shark costume and went as a cyberpunk for Halloween this year. Among his costume’s props was a small, one-handed chording keyboard that fit easily into one of his pockets. Now he could have just glued a couple of key caps to something small and called it a day. Instead, [Brian] made a fully functional and modular chording keyboard that can communicate over Bluetooth or USB.

What is a chording keyboard, you ask? Instead of entering keystrokes one at a time, a much smaller set of keys are mashed in meaningful combinations called chords. Once you know what you’re doing, it’s much faster than a standard keyboard. If you’ve ever seen a court reporter hammering away on a tiny machine, you have seen a chording keyboard in action. Our own [Elliott Williams] covered the topic in detail over the summer.

[Brian]’s keyboard has seven keys, one for each finger and three for the thumb. Any key found on a standard 104-key can be made by pressing a combination of keys with the fingers in relation to the center, near, or far thumb keys. We’re pretty impressed that he was able to stuff all of that hardware in such a small 3D-printed package. It’s based on an Arduino micro and uses an Adafruit EZ Key for Bluetooth communication with a phone or tablet.

The ultimate plan is to make this into a wrist-mounted chording keyboard that extends or retracts with the flick of your wrist. [Brian] has made some progress on this, having developed and printed the mechanism. But as you can see in the video after the break, adding the keyboard to it is just too much for the hobby servos he chose to move. Still, if he can dial it in this is going to be awesome!

The keyboard also has an ADXL335 accelerometer breakout, which means it can function as a tilt mouse. Neither the Bluetooth nor the tilt mouse functionality are imperative, though—if you want to make your own and leave either of these out, there is no need to alter the code.

Continue reading “Strike A Chord With This Pocket Keyboard”

Automated Bubble Gun Just Because

After a recent trip to Disney Land, [Thomas] came home with an electric bubble gun. [Thomas] is a full-grown man. But since when did that stop us having fun blowing bubbles?? Obviously, a project was to be had using this fun little toy. So he decided to automate it.

So after taking some measurements with his trusty calipers, [Thomas] got on the computer and started designing an enclosure for the bubble gun using SolidWorks. It’s pretty simple. He designed it to hold the bubble gun in place, and allow him to attach a small RC servo motor in order to trigger the switch. Hooking that up to an Arduino Micro and he was now able to trigger it remotely.

Continue reading “Automated Bubble Gun Just Because”

Measure As Little As You Want With OpenQCM

The clever folks over at [Novaetech SRL] have unveiled openQCM, their open-source quartz crystal microbalance. A QCM measures very minute amounts of mass or mass variation using the piezoelectric properties of quartz crystal. When an object is placed on the surface of this sensor, the changes in the crystal’s resonant frequency can be detected and used to determine its mass in a variety of experimental conditions (air, vacuum, liquid). However, most QCM technology is proprietary and pricey – at least US$3000 for the microbalance itself. Any consumables, such as additional crystals, cost several hundred dollars more.

The openQCM has a sensitivity of 700 picograms. At its core is an Arduino Micro with a custom PCB. The board contains a 10K thermistor for temperature offset readings and the driver for a Pierce oscillator circuit. The quartz crystal frequency is determined by hacking the timer interrupts of the Arduino’s ATmega32u4. An external library called FreqCount uses the clock to count the number of pulses of the TTL signal in a 1 second time frame. This yields quartz crystal frequency resolution of 1Hz. The user interface is built in Java so that data can be read, plotted, and stored on your computer. The entire casing is 3D-printed, and it appears that the sensors are standard oscillator crystals without their cases.

Simplistic design makes assembly and maintenance a breeze. It only weighs 55 grams. Replacing the quartz crystal requires no special tools due to the clip system. The openQCM can be used as a single unit, or in multiples to form a network for all of your precise measurement needs. While they have kits available that will set you back US$500, all of the files and schematics for 3D-printing, assembly, and the PCB are available on the openQCM site for free.

Continue reading “Measure As Little As You Want With OpenQCM”