Repair Your Ice Maker Motor Without Buying A Whole New Assembly

ice-maker-repair

There are a number of things that can go wrong with an automatic ice maker. But one of the more common problems is that the motor which scoops the ice out of the integrated trays can burn out after years of use. [Dave] recently repaired a common ice maker motor and shows us how cheap and easy it can be. See how he did it in the video after the break.

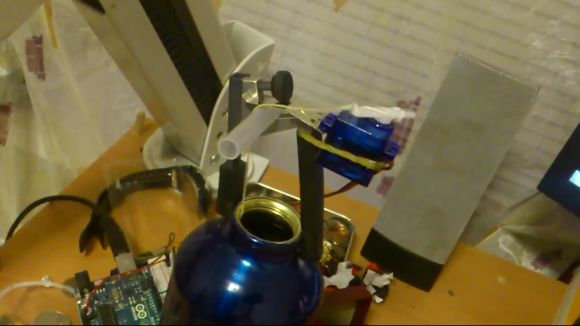
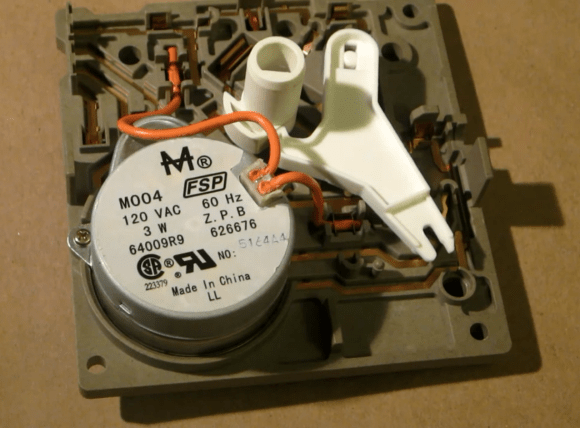
Pictured above is the motor and gear box from the ice maker. Before disassembly he verified that the problem is with the motor by placing a piece of paper in the path of the fingers that move the newly formed ice. After removing the sensor arm and three screws he was able to pull this front portion from the unit. The two wires are clipped as near to the motor as possible and the motor itself comes out with just a twist. After verifying that the gears are not broken he sourced a $2.50 motor replacement by Googling the part number (M004 3W in this case). Once the new unit arrived the motor wires are connect in much the same way that a punch down Ethernet jack makes a connecting with insulated wires.

This is something worth looking into if your ice maker is not working. The manufacturer may suggest replacing the entire unit which can be well north of a hundred bucks… this is a worthwhile gambit to save some cash. Well, we guess you could always build your own non-electrical ice maker.

Continue reading “Repair Your Ice Maker Motor Without Buying A Whole New Assembly”

Tea-bagging An Arduino

tea-bagging-arduino

[Dmitry Narkevich] likes a strong cup of tea and his method of getting there is to oscillate the tea bag as it steeps. But why take the time to do this when you can make an Arduino brew your tea for you. As you can see, he rigged up a system to move the tea bag as it steeps in his metal bottle.

The motion is provided by a hobby servo connected to an Arduino. This makes timing the process very simple and we’d imaging it’s only a matter of time before he adds an alarm so he’ll know when it’s ready. But the real hack comes in the apparatus that connects the servo to the bottle. Since he’ll be drinking out of it the assembly needs to be easy to remove and should be able to stand up to the abuse of being clamped on and taken off a few times each day.

The base of the device is a guitar capo. This is meant to gently clamp to the finger board of a guitar using spring tension so it is already covered in rubber which gives it a firm grip on the bottle’s opening. The servo is connected to a metal part from a stapler, and the string drapes over the body of a disposable pen. Don’t miss this in action in the clip after the break.

If you don’t have a servo on hand you could try using the sled from an optical drive.

Continue reading “Tea-bagging An Arduino”

Automated PCB Panelization

panel

Some PCB production houses – Seeed Studio and itead studio, especially – allow you to upload a gerber file and receive a printed circuit board very inexpensively. The pricing structure for these board houses is based on predesignated board sizes – 5cm square or 5×10 cm – and sometimes a project is just too small to justify buying a full 25 square centimeters of board. This is where panelizing comes in: by putting multiple copies of a circuit board on one of the available sizes you can get more boards for the same amount of money. But how to panelize your boards without the (sometimes) hassle of cutting and pasting?

[Martin] came up with a way of panelizing PCBs with just a Python script. By creating one copy of a circuit board in KiCAD, he can fire up his script and tell the computer exactly how to duplicate his circuit to fit any size board.

By his own admission, [Martin]’s script is still a little clunky, but it does allow him to edit the panelized board in KiCAD and also copies the nets so the ratsnest doesn’t go between boards.

Custom Desk Is A Custom Computer Case

desk

[Paul] had been kicking around his idea of a perfect computer desk for some time, and when given the opportunity to remodel his office decided it was time to build his dream computer case.

The desk itself is made of hickory with a formica top to match the other workbenches in [Paul]’s workspace, The two largest drawers house an ATX motherboard, power supply, disk drives, and a pair of CD drives. On top of the desk are two 24″ monitors – one for each computer – and a built-in powered USB hub that allows [Paul] to charge his phone or use an external drive.

As a computer tech, [Paul] needed a way to connect customer’s drives. He did this by putting two Startech UniDock2U USB to SATA and IDE converters in the top right drawer. It’s one of his most used features and very handy for duplicating bare drives.

Also included in [Paul]’s desk is a large UPC, and a pair of 120mm case fans venting to the front of the desk. It’s a wonderful piece of workmanship, and the removable computer cases make cleaning and upgrading a breeze.

Using Arcade Monitors With The Raspberry Pi

mame

Along with the growing popularity of the Raspberry Pi, we’ve also seen a related uptick in MAME arcade cabinet builds. Putting this $35 computer in an arcade cabinet makes a lot of sense, but connecting it to one of the monitors found in old arcade cabinets is a bit of a pain. Luckily, [Celso] figured out how to connect a Raspi to one of these 15kHz RGB monitors, making for a much more accurate emulation of old arcade classics.

The Raspi only has two video outputs – an HDMI port and an RCA composite jack. The old arcade CRTs have an RGB input, so directly connecting a Raspi to one of these CRTs is a no-go.

The solution comes from two converters: one to convert the HDMI output to VGA, and another video downscaler that takes the 31kHz VGA signal and translates it into a 15kHz RGB signal. [Celso] settled on the GBS-8100 video converter, a rather uncommon piece of kit that can fortunately be found on a few Chinese eBay auctions.

After connecting the old arcade cabinet power supply to the Pi, hooking up an audio amp, and converting the controls to USB, [Celso] has a very accurate MAME machine.

Electronically Controlled NFC Tag

P1010393

[Per] is replacing his car stereo with a Nexus 7 tablet. It’s a great modification to add GPS, navigation, and a good music player, but [Per] wanted to pause his tunes and tell the tablet to go to sleep with an NFC tag. This means building a an NFC tag he can turn on and off, an interesting problem to say the least.

The easiest way to do this is with a CMOS switch, but a chip like a 74HC4066 is overkill for a project this simple. What [Per] needed was a single CMOS switch, something he found and fabbed a board for.

Now, with a press of a button, [Per] can activate his NFC tag and pause the music in his new stereo. Check out the video of this electronically controllable tag after the break.

Continue reading “Electronically Controlled NFC Tag”

ATTannenbaum

attiny

It’s that special time of year again where the smell of baking cookies fill the house and shopping mall parking lots are filled with idiots and very angry people. [Kevin] thought it would be a good idea to build an LED Christmas tree and ended up building a great looking tree that’s also very simple.

In the video, the imgur album, and the github, [Kevin] shows us the simplest way to make a color-changing LED Christmas tree. The circuit uses LEDs to drop the voltage and to provide a nice glow around the base of the tree. After that, it’s just an ATtiny13 and some LEDs in a very nice freeform circuit.

Of course, if LED Christmas trees aren’t your thing, [hb94] over on reddit created an LED menorah. Pretty nifty he used an 8-position DIP switch for the circuit. Let’s just hope someone gave him a soldering iron for the last night of Hanukkah.