20 Pounds And A Gut Feeling Yields A Configurable Rubidium Atomic Clock Source

rubidium-source-for-twenty-pounds

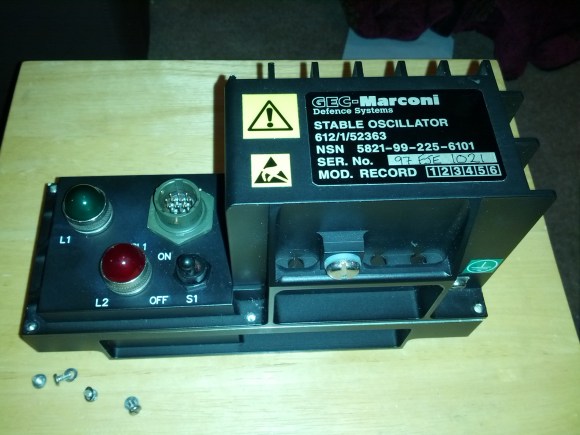
So you see an image like this and the description “Aircraft stable oscillator” on an eBay listing for twenty pounds (about thirty bucks), what do you do? If you’re [Alecjw] you buy the thing and crack it open to find an atomic clock source inside. But he really went the distance with this one and figured out how to reconfigure the source from the way it was set up in the factory.

First off, the fact that it’s made for the aerospace industry means that the craftsmanship on it is simply fantastic. The enclosure is machined aluminum and all of the components are glued or otherwise attached to the boards to help them stand up to the high-vibrations often experienced on a plane. After quite a bit of disassembly [Alec] gets down to a black box which is labeled “Rubidium Frequency Standard”… jackpot! He had been hoping for a 10 MHz signal to use with his test equipment but when he hooked it up the source was putting out 800 kHz. With a bit more investigation he figured out how to reconfigure the support electronics to get that 10 Mhz source. We think you’re going to love reading about how he used a test crystal during the reconfiguration step.

Once he knew what he had he returned to the eBay seller and cleared out the rest of his stock.

[Thanks DIY DSP]

Connect A Retina Display To A Regular Computer

You don’t have to search very long before you find someone raving about the Retina display used in Apple iPads. We’re not going to disagree. These 9.7″ panels pack in a whopping 2048×1536 resolution and the color is fantastic. But we were surprised to hear you can get one of these for a meager $55. That’s how [Andrzej] sourced the part when he set out to connect a Retina display to a regular PC.

It turns out this isn’t all that hard. The display uses the eDisplayPort protocol. This is an extension of DisplayPort which is an alternative to LVDS that is gaining a foothold in the industry. An external DisplayPort adapter can already be found on higher-end laptops, which means this should be a snap to use as an external display if the signals can be routed correctly.

To do this, [Andrzej] figured out how to order the PCB connector for the panel’s ribbon cable. He then etched and populated his own board which serves as an adapter for a DisplayPort cable. It even powers the panel, but an external 20V supply is necessary for the backlight.

[Thanks Adam]

Automatic Tubular Bells Given A MIDI Interface Too

automatic-tubular-bells

We’ve got to say it… these tubular bells sound awful! They don’t really have a tight pitch center so they sound really out of tune to us. But we think that’s the failing of the instrument itself and not the work which [Tolaemon] did to automate the instrument.

There are three main parts to his project. The first, which is shown above, adds a hammer for each bell. The hammers are hinged, with one side being pulled by a solenoid in order to strike the bell. The second part of the hack also uses solenoids, dampening the bell’s ability to ring by pressing a felt pad up against the bottom of the tube. The final portion of the project brings it all home by adding MIDI control to the hardware.

The clip after the break gives a good overview of the different features including some preprogrammed playback as well as direct control of the instrument using an electric keyboard. This reminds us of that scratch-built solenoid xylophone.

Continue reading “Automatic Tubular Bells Given A MIDI Interface Too”