This Piggy Bank Is Our Stock Broker

piggy-bank-stock-buy

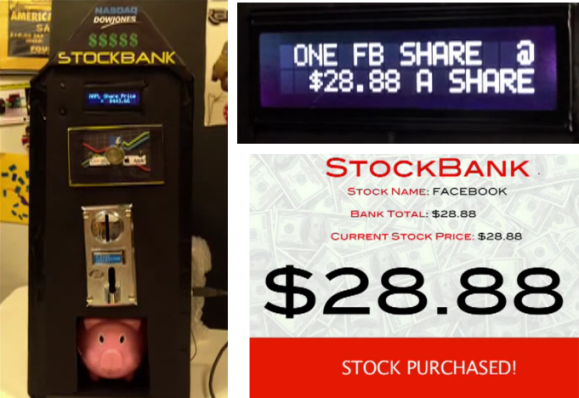
[Johna and Justin] are working to take the emotion out of playing the market. They built this piggy bank which automatically purchases stock when your coinage totals the cost of a single share. That’s right, just turn the selector to one of your three chosen stocks (Google, Facebook, and Apple are used in this example) and plug in some coins. The bank counts your money, compares it to the current online stock price, and pulls the trigger if you have enough dough. You can check out a demo clip after the jump.

The hardware is rather simple thanks to Adafruit’s programmable multi-coin acceptor. It handles the cash and it’s pretty easy to interface with the Arduino which handles the rest of the work. It connects to a computer via USB, depending on a PHP script to poll the current price. We dug through the code repository just a bit but didn’t find the snippet that does the actual stock purchase. Whether or not they actually implemented that, it’s certainly an interesting concept.

Continue reading “This Piggy Bank Is Our Stock Broker”

Asynchronous Fireflies Use Few Parts

led-firefly

[Karl Lunt] wrote in to share his LED firefly project. His goals for the project were to develop a low-power, low parts count module that can sense when it’s dark and then mimic the blinking patterns you’d associate with its biological namesake.

We like his design which uses a coin cell battery holder as the chassis for the project. The ATtiny13 driving the hardware is held in place by the two power wires. This lets him flash new firmware by rotating the chip and plugging in a little adapter he build. The LED connection might look a bit peculiar to you. It has a resistor in parallel, which doesn’t satisfy the normal role of a current limiting resistor. That’s by design. [Karl] is driving the LED without any current limiting, which should be just fine with the 3V battery and short illumination time of the diode. The resistor comes into play when he uses the LED as a light sensor. Past firefly projects included light dependent resistors to detect light and synchronize multiple units. [Karl] is foregoing the LDR, using the LED with a resistor in parallel to combat the capacitive qualities of the diode. As we mentioned, this senses ambient light, but we’d love to see an update that also uses the LED to synchronize a set of the devices.

Replace Your Project Power Supplies With Recycled Li-Ion Cells And A Switching Regulator

buck-regulator

[Dr. Iguana’s] experience moving from projects powered by disposable Alkaline cells and linear regulators to recycled Lithium Ion cells using the buck regulators seen above might serve as an inspiration to make the transition in your own projects.

The recycled cells he’s talking about are pulled out of larger battery packs. As we’ve seen in the past, dead battery packs for rechargeable tools, laptops, etc., are often plagued by a few bad apples. A small number of dead cells can bork the entire battery even though many perfectly usable cells remain. Once he decided to make the switch it was time to consider power regulation. He first looked at whether to use the cells in parallel or series. Parallel are easier to charge, but boosting the voltage to the desired level ends up costing more. He decided to go with cells in series, which can be regulated with the a less expensive buck converter. In this case he made a board for the RT8289 chip. The drawback of this method requires that you monitor each cell individually during charging to ensure you don’t have the same problem that killed the battery from which you pulled these good cells.

Measuring The Lifespan Of LEGO

lifespan-of-LEGO

How many times can you put two LEGO pieces together and take them apart again before they wear out? The answer is 37,112. At least that’s the number established by one test case. [Phillipe Cantin] was interested in this peculiar question so he built the test rig above to measure a LEGO’s lifespan.

The hacked together apparatus is pretty ingenious. It uses two servo motors for testing, each driven by the Arduino which is logging the count on an SD card. One of the two white LEGO parts has been screwed onto an arm of the upper servo. That servo presses down onto the mating piece which is sitting inside that yellow band. Look close and you’ll realize the yellow is the handle end of an IC puller. When the post on the lower servo is moved toward one arm of the puller it grips the lower LEGO piece tightly so that the upper servo can pull the two apart. In addition to the assembly and disassembly step there’s a verification step which raises the mated parts so that a reflectance sensor can verify that they’re holding together. [Phillipe] let the rig run for ten days straight before the pieces failed.

Don’t miss his video description of the project after the break.

Continue reading “Measuring The Lifespan Of LEGO”

Pulse Oximeter From LM324, LED, And Photodiode

This pulse oximeter is so simple and cheap to build it’s almost criminal. The most obvious way to monitor the output of the sensor is to use an oscilloscope. The poor-man’s stand-in for that is a sound card, which is what [Scott Harden] demonstrates in his write-up.

It uses a concept we’ve seen a few times before. The light from an LED shines through your finger and is measured on the other side by a phototransistor. It’s that light grey plastic thing you see on a patient’s finger when they’re in the hospital. [Scott] went with a common wooden clothes pin as a way to mount and align the sensor with your finger. It is monitored by the simplest of circuits which uses just one chip: an LM324 op-amp. There are three basic stages which he explains well in the video after the jump. The incoming signal is decoupled before being fed to the first amplifier stage. From there it is fed to an adjustable low-pass filter to help eliminate 60Hz noise from AC power in the room. The last stage amplifies the signal again while using another low-pass filter in parallel.

Continue reading “Pulse Oximeter From LM324, LED, And Photodiode”

Living Night Light With Glowing Algae

I may sound like I’m being over enthusiastic in this video. I’m not. Everyone who has seen this thinks it is simply amazing.

My father, an ex navy man, has told me stories of glowing water since I was little.  Being a person who was obsessed with all things that light up, this always stuck with me. I saw a headline one day that someone was making an algae-light. Sadly when I clicked on it, the algae was just there to create oxygen. It was a cool idea, but not what I was hoping for.

That slight disappointment drove me to create a night light using glowing algae. The process could be extremely simple.

1. Buy Algae.

2. set up light for algae (it needs a 12 hour light cycle and putting it in a window sill would kill it due to heat). It needs bulbs labelled 6500k or higher.

3. shake algae at night (it only lights up when agitated, and when it is on its “night” cycle).

I really wanted to add more to this project though, so I decided to put the algae in a klein bottle and build a custom base for it that would allow me to move a BB around inside the bottle using magnets. This would in turn, hopefully, agitate the algae and make it light up.

Continue reading “Living Night Light With Glowing Algae”

Semi-automatic Pick And Place Machine

semi-automatic-pick-and-place

This is a fascinating take on building your own pick and place machine. It does an amazing job of automating the hardest parts of hand assembly, while relying on human dexterity to achieve the hardest parts of automation. It’s a semiautomatic pick and place machine driven by an Arduino and controlled by an Android tablet.

The machine is built in two parts. The portion in the upper left feeds components from reels and is fully automated. The portion on the lower right consists of a padded arm-rest which slides smoothly along two axes. A mechanical arm with multiple articulations is attached to the end, culminating in a tip connector for some vacuum tweezers. Right handers are the only ones who will find this convenient, but oh well. The clip after the break shows it in action. The assembly technician first selects the component from an icon on the Android tablet. The reel machine then dispenses that part, which is picked up by the vacuum tweezers using the left hand to switch the vacuum on and off again. If the part orientation needs to be rotated it can done using the jog wheel on the Android app. It smooth, quick, and best of all, clever!

Continue reading “Semi-automatic Pick And Place Machine”