Automated Cat Feeder And Large Plastic Screws

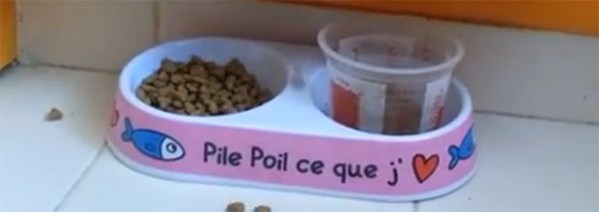
We’ve seen automated food dispensers for pets, but none that go so far as to build large plastic screws for dispensing kibble.

This isn’t [Mathieu]’s first automatic cat feeder; an earlier version used a wheel to dispense cat food in excessively large version. To improve upon his first build, [Mathiu] decided to use an Archimedean screw to dispense food in 5 gram increments. There was a problem, though: a proper industrial screw cost about $1500 and the ‘consumer’ versions of what he wanted were trash. He though about casting one in epoxy but didn’t want to poison his cat with strange chemicals. He ended up using PolyMorph for his screw, a plastic that melts at 60º C and is also used in medical devices.

The electronics of the build are an Arduino, a  DS1307 real-time clock, LCD display, and a relay board powering an electric screwdriver motor. From the video demo below, we’re going to say [Mathieu] put together a pretty nice automated cat feeder.

Continue reading “Automated Cat Feeder And Large Plastic Screws”

Trimethyl Borate Lantern Built From Garbage

scratch-build-lantern

This lantern was built from recyclable goods. It’s a bit dangerous when used like the image above, but [The Green Gentleman] does give you a few other options in his build instructions which make for much safer operation.

The lantern enclosure is made from old cans and a glass jar. He screwed a couple of boards together at a right angle to act as a jig for cutting the glass. The V-shape created by the boards holds the jar on its side, giving his glass cutting tool something to rest upon. He then turns the jar to score it around the top, and then bottom. He alternated pouring boiling and chilled water on the score mark to shock the glass into breaking along the line.

This makes up the clear part of the enclosure which is later mated with metal top and bottom pieces. From there he adds either an LED, an alcohol lamp, or the Trimethyl Borate lamp seen above. The first two are relatively safe, but the latter burns at around 1500 degrees F. We have reservations about using a plain old glass jar as the enclosure for something burning this hot. It really should be heat resistant glass.

Camera-based Touchscreen Input Via An FPGA

piano-hero-uses-camera-based-touch-input

[Chonggang Li] wrote in to share a link to the final project he and [Ran Hu] built for their embedded systems class. It’s called Piano Hero and uses an FPGA to implement a camera-based touch screen system.

All of the hardware used in the project is shown above. The monitor acts as the keyboard, using an image produced by the FPGA board to mark the locations of each virtual key. It uses a regular VGA monitor so they needed to find some way to monitor touch inputs. The solution uses a camera mounted above the screen at an obtuse angle. That is to say, the screen is tilted back just a bit which allows the images on it to be seen by the camera. The FPGA board processes the incoming image, registering a key press when your finger passes between the monitor and the camera. This technique limits the input to just a single row of keys.

This should be much simpler than using a CCD scanner sensor, but that one can track two-dimensions of touch input.

Continue reading “Camera-based Touchscreen Input Via An FPGA”

Turning A Phone Into A Media Center Remote

IMG_2061

[Kees] wanted a remote for an XBMC audio system. He had a classic T65 Dutch telephone in one of his project boxes and thought this phone with the addition of a Raspberry Pi he could have a functional media remote with classic lines and 70s styling.

Each of the digits on the phone were wired up to a small solderless breadboard. With a handful of resistors, [Kees] set up a simple pull up/pull down circuit feeding in to his Raspi’s GPIO input.

With a short Python script, [Kees] managed to map the buttons to XMBC’s play/pause, volume up/down, next, and previous commands. There were a few buttons left over, so those were mapped to online radio stations, playlists, and a strange setting known only as ‘moo’. We’re not sure what that button does, but you can see the other functions of this XMBC phone remote in action in the video below.

Continue reading “Turning A Phone Into A Media Center Remote”

Adding LEDs To An Engagement Ring

ring

Once upon a time, a nerd met a girl. Things happen as they do, and eventually [Ben] wanted to create the be-all, end-all engagement ring. (here’s a cache) It’s a simple titanium affair with 23 stones around the perimeter. What makes this ring so cool, though, is that it lights up whenever [Ben] and his girl are holding hands.

The metalworking portion of the build was about as easy as you would expect machining titanium to be. After the ring was cut off its bar stock, [Ben] brought it over to a mill where 23 holes for each of the stones were drilled. The stones were affixed to the ring with  jewelers epoxy and the entire ring was buffed to an amazing shine.

The electronics are where this project really shines. Putting a battery of capacitor inside a ring is nigh impossible, so [Ben] decided to power the LEDs with an inductive charging circuit. A coil of wire wound around kapton tape serves as the inductor and a small SMD capacitor powers three very bright and very tiny LEDs.

The inductive charging unit itself is a masterpiece of hackery; [Ben] wanted the ring to light up whenever he and his ladyfriend were holding hands. To do this, [Ben]’s inductive charger is also a wearable device: a large coil of wire is the charger’s transformer and was would to fit around [Ben]’s wrist. The entire charging circuit can be easily hidden under a jacket sleeve, making for a nearly magical light-up ring.

An awesome piece of work, and one of the best jewelry builds we’ve seen in a long time. You can see the inductive coupling and shining LEDs in the video below.

Continue reading “Adding LEDs To An Engagement Ring”

UK Hackerspace Builds Mobile Spaceship Disaster Simulator

mobile-space-ship-simulator

A spaceship simulator sounds fun. But a spaceship disaster simulator is pure win. Members of the London Hack Space poured their hearts and souls into this build which they call the LHS Bikeshed. Now they’re taking the show on the road, letting attendees of Maker Faires all over the UK try their hand at beating the Kobayashi Maru disaster simulation.

The real question is how do you take your simulator on the road with you? You build it in an old camper (or caravan as the Brits call it). The towable sleeping quarters were gutted to make room for the well-crafted command center seen above. The demonstration video also shows off some bulkhead doors which open to reveal a wiring mess that must be fixed to prevent a disaster. Not only does the physical build really sell the concept, but the audio and video produced for the simulator look fantastic too. The link above is a recent post, but you should dig through their archives see multiple steps during the project build.

It makes us thing we should keep going with our VW Bus hacking.

Continue reading “UK Hackerspace Builds Mobile Spaceship Disaster Simulator”