Is An LED Bow Tie Ironic Or Awesome?

led-bowtie

We’re not exactly trend setters when it comes to wardrobe. And so the recent revival of the bow tie as an accepted dress item confounds us. We’re even more confused by [Arichter’s] LED bow tie. Sure, the hobby electronics part of it is a win… but when it comes to fashion is he making fun of the bow tie wearers, or setting a new standard?

The tie is made of three PCBs, which lets the wings sit on a bit different plane than the center. He populated the boards with about 100 RGB LED modules which he desoldered from a couple of meters of LED strip. They draw a lot of juice and to supply that he uses a boost converter. A standard Arduino UNO board controls the lights.

If you’re still sold on the bow tie form factor we’d like to direct your attention to this long-tie version. It doesn’t just show patterns, but plays a wicked game of Tetris with you as the game board.

[via Reddit]

Showing Off A High-performance Brushless Motor Camera Gimbal

gopro-brushless-motor-gimbal

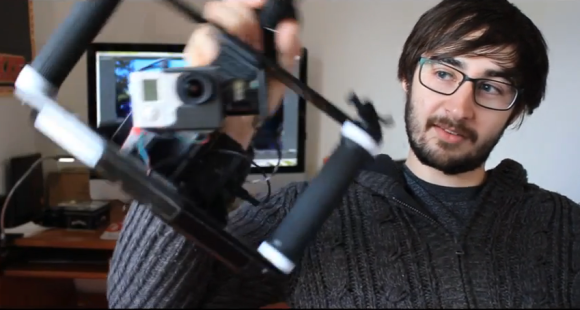
Here’s [Tom Parker] showing off a brushless motor gimbal stabilizer for his GoPro camera. We saw a similar project a couple of weeks back that featured a 3d printed quadcopter mount. This offering is meant to be held in your hands. It keeps the subject in frame even if the cameraman’s hands pitch and roll (we figured aeronautical terms were best here). This image shows him demonstrating a level camera as he quickly rolls the frame from one side to the other. It doesn’t compensate for yaw, which is something he may change in the next iteration. We already like the results he’s getting with it.

About 3:15 into the video demo below we get a very quick description of the build itself. He started it as a project at University. Fabrication included work on a 3D printer, laser cutter, and vacuum forming machine. The grips are bicycle handlebar components. To overcome the stabilization system the operator has access to a joystick. Without this you’d never be able to aim the camera up or down because of auto-leveling.

Continue reading “Showing Off A High-performance Brushless Motor Camera Gimbal”

A Rifle, Handmade Circa 1700

rifle

Today, rifles are made with exacting precision and very complex machine tools for milling, grinding, and boring out the barrel. Long rifles have been around much longer than these modern machine tools, so how exactly did gunsmiths create such exacting works of art in an age before Bridgeport mills and Sherline lathes?

In an amazing 10-part video series, [Wallace Gustler] of colonial Williamsburg takes us through the process of crafting a flintlock long rifle circa 1700. All the videos are embedded after the break, by the way.

The first step of making the rifle is fabricating the barrel. This is made from a bar of wrought iron, hammered into a tube around a mandrel, and welded together in the forge. With the help of a primitive hand-cranked lathe, the barrel is then bored out and eventually rifled with the help of a cutting tool that is constructed more out of hickory than tool steel.

With the barrel complete, [Wallace] moves on to the lock. Again, everything is fabricated by hand nearly entirely from materials that could be sourced locally at a new world colony in 1700. Spring steel is one of the exceptions of to this desire for local materials, along with a few bits of brass that were recycled from imported sources.

A gunsmith must be a master of metalwork, of course, but he must also be an excellent wood-carver. The stock of the gun iw made from a huge sugar maple board, carefully carved to accept the barrel, lock, and the custom cast brass pieces.

The result is a masterfully crafted flintlock rifle, capable of picking off a target at a few hundred yards. [Wallace Gustler] manufactured nearly everything in this gun by hand, an impressive display of skill for a master, but an inspiration to anyone who would want to work with their hands.

Continue reading “A Rifle, Handmade Circa 1700”

DIP Switch Adjusted Voltage Regulator

dip-settable-variable-supply

It couldn’t be simpler but you have to admit that a small adjustable portable power supply like this one will be really handy.

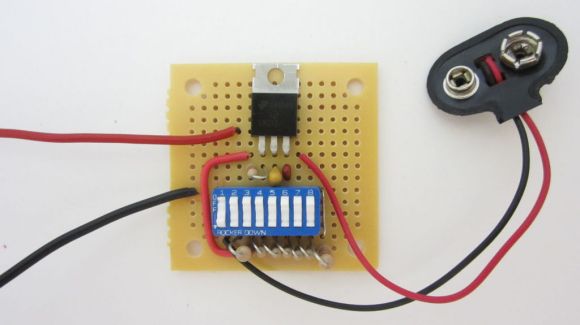
The main part of the PSU is an LM317 linear voltage regulator which we’re already familiar with. The output voltage is adjustable based on a voltage divider between two of the pins. The set of eight DIP switches allows you to tweak that voltage divider. Switch number one connects the 9-volt battery connector to the regulator, serving as a power switch. Each of the other seven switches adjusts the output voltage by 1.5 volts. The output of the regulator connects to your target device using alligator clips which are not in frame above.

[Jason] says he takes this with him when thrift store hunting for cheap electronics. It can mimic most combinations of Alkaline cells letting you power up electronic toys to ensure they work. But we would find it equally useful for getting that early prototype away from the bench supply for testing before finalizing a dedicated portable supply.

Continue reading “DIP Switch Adjusted Voltage Regulator”