3D Printed Dispenser Flings Treats At Your Pets

internet-connected-dog-treat-dispenser

If you’re stuck in the virtual world like [Kevin Flynn] you can still make sure your pup is rewarded for good behavior. Just follow [Jwarp’s] design for this Internet connect dog treat dispenser.

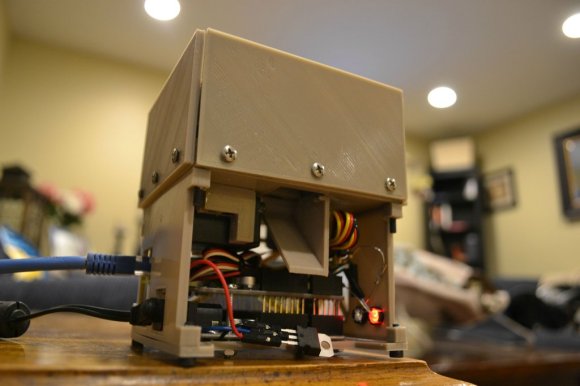
We were actually a bit surprised by the demo video. It shows that the compact unit is more than capable of reliably dispensing one treat at a time. It started as a wood prototype which allowed him to tweak how the servo motors worked before laying out all of the 3D parts in Sketch Up. Two motors cooperate to get the job done. The first allows one treat to exit that shoot coming from the center of the hopper. The other stirs the remaining inventory to both position the next treat and loosen any jams.

Continue reading “3D Printed Dispenser Flings Treats At Your Pets”

Teardrop Camper Combines Simplicity, Style, And Function

teardrop-camper

They needed a place to stay on road trips and at music festivals. This teardrop camper certainly fits the bill. And it’s got a look that will make you proud to unfold yourself into the parking lot every morning.

Starting from a flat frame the camper skeleton was built up using plywood sides and cross pieces to help support the sweeping roof. It was then covered with 1/4″ Birch plywood which has enough flexibility to follow the contour. Inside you won’t find much in the way of frills, but the entire floor is a 4″ thick foam mattress which is a lot better that camping out. There’s a dome on top which can opens for ventilation and a hatch on the rear to carry some extras along on your adventure.

[via Reddit]


Build A Bare Bones Arduino Clone Which Maximizes Its Use Of Real Estate

barebones-arduino-clone-at-home

Check out all the stuff crammed into a small swath of strip board. It’s got that characteristic look of a roll-your-own Arduino board, which is exactly what it is. [S. Erisman] shows you how to build your own copy of his YABBS; Yet Another Bare Bones Arduino (on Stripboard).

The strips of copper on the bottom of the substrate run perpendicular to the DIP chip and have been sliced in the middle. This greatly reduces the amount of jumpering that would have been necessary if using protoboard. A few wires make the necessary connections between the two tooled SIL headers that make up the chip socket. On the right hand side there a voltage regulator with smoothing caps. The left side hosts the obligatory pin 13 LED, and the crystal oscillator can be glimpsed on the far side of the ATmega328.

Pin headers along either side of the board have been altered to allow for soldering from the wrong side of the plastic frames. Note that there’s a three-pin hunk that breaks out the voltage regulator, and an ISP programming header sticking out the top to which those female jumper wires are connected.

Ringing in at as little as $2-$4.75 a piece you’ll have no problem leaving this in a project for the long hall. We can’t say the same for a $30+ brand name unit.

Ambilight Clone Uses Video Pass-through; Needs No Computer

To the best of our knowledge all of the Ambilight clones we’ve covered over the years have one thing in common. They need a computer to do the image processing. This one is different. The PCB seen on the left right is all you need for the video processing. The project is called SCIMO and is the handiwork of a hacker named [Keiang].

There are only few times that the DRM built into the HDMI standard has pissed us off. This is one of them. Because of HDCP and licensing issued revolving around HDMI [Keiang] didn’t use HDMI pass through. Instead he uses an HDMI to S-Video converter. This board acts as an S-Video pass through, analyzing the signal using an STM32 ARM chip before the video signal continues on to the television. It still produces a respectable picture, but wouldn’t it have been cleaner if he could have gone with the HDMI standard?

UPDATE: Thanks for the comments on this. It looks like the TV is getting an HDMI signal. The board is fed by the HDMI to S-Video converter which itself is getting HDMI in parallel with the television thanks to a splitter.

Where other examples use Boblight on a PC for processing this manages to do so as a standalone embedded system. It also offers quite a bit of flexibility when it comes to choosing the LEDs, supporting pixels that use DMX512, WS28xx, or TM18xx protocols.

Continue reading “Ambilight Clone Uses Video Pass-through; Needs No Computer”

A Custom Cooler, Sewing Not Required

soduh

When you go to the beach or on a camping trip this summer, notice how you pack your cooler. Your beverages already come in a box, yet you remove them and put them in a larger, insulated box. [Jason] thought it would be a great idea to just add insulation to a case of soda (or other beverages, we assume) and ended up making a custom soda cooler.

The fabrication of this cooler is actually pretty simple. A layer of flexible foam is sandwiched between two layers of waterproof vinyl with spray glue. After tracing out a pattern, [Jason] then cut this fabric into panels and glued them together into a soda box-sized cooler. Simple, elegant, and something even hackers that didn’t take home ec can put together in a few hours.

As an aside, we at Hackaday seem to forget the ‘softer’ builds of fabric, foam, and paper far too often. That doesn’t mean we eschew these projects; I have a barely post-war Singer 15 sewing machine right above my workbench. Send us a tip if you have one of these soft hacks. We’d love to see it.

Video of the build below.

Continue reading “A Custom Cooler, Sewing Not Required”

24-hour Hackathon Project Adds Object-based Automation To Hackerspace

hackerspace-automation

[Jeremy Blum], [Jason Wright], and [Sam Sinensky] combined forces for twenty-four hours to automate how the entertainment and lighting works at their hackerspace. They commandeered the whiteboard and used an already present webcam as part of their project. You can see the black tokens which can be moved around the blue tape outline to actuate the controls.

MATLAB is fed an image from the webcam which monitors the space. Frames are received once every second and parsed for changes in the tokens. There are small black squares which either skip to the next track of music or affect pause/play. Simply move them off of their designated spot and the image processing does the rest. This goes for the volume slider as well. We think the huge token for the lights is to ensure that the camera can sense a change in a darkened room.

If image processing isn’t your thing you can still control your audio entertainment with a frickin’ laser.

Continue reading “24-hour Hackathon Project Adds Object-based Automation To Hackerspace”

737 Autopilot, Courtesy Of An Arduino

737

To start this off, no, we’re not looking at a piece of actual flight hardware. This is [Andrea Giudici]’s project to tie real-world hardware into Flight Simulator X. It’s an autopilot for simulated aircraft, so those of you looking at flying a 737 sometime in the near future need not worry about computers flying your plane. Airbus passengers, though…

[Andrea] didn’t want to dig around with the clunky point-and-click interface in FSX, so he created a virtual autopilot with a 2×16 LCD display and an Arduino to interact and set the most common autopilot settings such as altitude, speed, heading, and engagement. The physical interface is just three tact switches and a pot, while the interface to FSX is a custom driver that turns the USB out of the Arduino into actual flight commands.

It’s not a 737 cockpit in a garage, but it’s still a wonderful alternative to poking around in a completely computer-bound interface.

Video of the ‘duino in action after the break.

Continue reading “737 Autopilot, Courtesy Of An Arduino”