Fine Furniture Kegerator Serves A Lot Of Beer; Smokes A Lot Of Cigars

diy-kegerator

This kegerator looks like a piece of fine furniture but closer examination of the build shows that it is at least partially hacked together. As with most of the multi-keg variants on the idea this starts with a chest freezer, but it doesn’t utilize a custom collar as is often the case.

After cutting the holes in the lid of the freezer for these beer towers [Lorglath] began building a wooden frame around it using pocket hole screws. Despite his efforts to keep things plumb and square, there was some… creative… shimming done when it came time to wrap it in oak veneer boards and add the trim pieces. But knowing where to hide the flaws got him through this part of the project and onto the surface finish. Look closely at the image above, all of those scraps are cigar rings. That represents a lot of smoke!

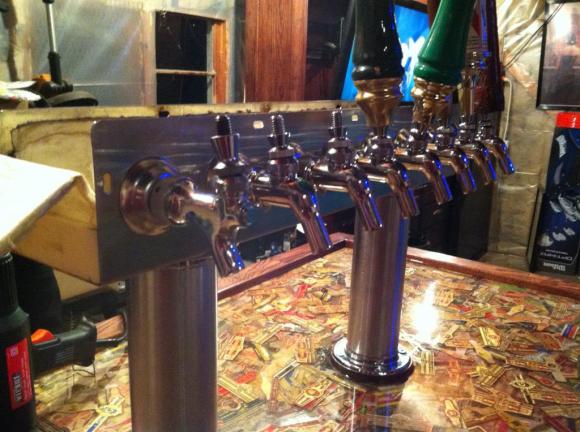
The rings were laid down in layers, with thin resin pours between each. To achieve a smooth and clear finish a heat gun was used to level the surface and pop any bubbles that made their way into the goo. The finished version has room to store eight kegs which are connected to the octet of taps above. That’s a lot of beer to brew, and a lot to drink!

More Drive Bays, Cooling, And Power For A DIY Raid Box

We’ve actually been on the look-out for a Network Attached Storage solution for home use. We want an embedded option just for power saving, but have you seen what a commercially available embedded RAID systems costs? It might be better to find an energy friendly PSU and use it in a PC case RAID conversion like this one that [Samimy] pulled off. He started with an old computer case and modded it to house more hard drives.

The image above shows his mounting scheme. Most of us have defunct optical drives in the junk bin. Many times they end up as a way to play with CNC, but in this case [Samimy] got rid of the guts and used a couple of angle brackets to mount a hard disk inside of the enclosure. Now that he can bolt more drives to the case he needed to power them, as the PSU didn’t have enough SATA power connectors. He clipped off a daisy-chain of connectors from a broken supply and spliced it into this one. Finally he cut a hole in the top of the case to add a bit more cooling to the system.

He’s using Windows 7 to power a RAID0 and RAID1 array using four drives. To help increase performance of the system he also used USB thumb drives as cache. This is something we’re not familiar with and we’re glad he provided a link to ReadyBoost, the software which makes it possible.

Continue reading “More Drive Bays, Cooling, And Power For A DIY Raid Box”

Galaga Mini-Cabinet Using A Nintendo DS

galaga-cabinet-from-nintendo-ds

We’re not showing you the finished version of this tiny Galaga arcade cabinet because it doesn’t really testify to the awesome that was packet into this hack. In regards to the features the build is just nuts!. The user controls were customized to look like the real thing, and the attention to detail would make craftsmen from the gilded age of dollhouses proud.

Update: [eLRIC] left a link to an even better forum thread build log as a comment. Among other thing it fully details the joystick modifications.

The machine is driven by a Nintendo DS, which donates its upper screen as the cabinet display. In the image to the right you can see that the lower display is still accessible through an opening in the back of the cabinet. The joystick is a small multi-directional switch which was altered by adding the red ball. It was also housed in a custom metal bracket that includes a washer to limit the movement of the stick. Also shown on the right are the lights for the marquee as well as the two coin-slots.

Check out the video after the break to see the game play. Despite its size it still seems really playable, but if you need something larger you could model your own build off of this project.

Continue reading “Galaga Mini-Cabinet Using A Nintendo DS”

BlenderDefender: Automating Pavlovian Conditioning

blenderDefender

This isn’t your typical home automation project; who turns a blender on remotely? [Brian Gaut] did, when he rigged his blender and a strobe light to scare his cat off the kitchen counter. To be fair, we’ve linked to this project before on Hackaday—twice actually—but neither the article about relays or the related cat waterwall article actually talk about the BlenderDefender, and that’s a shame, because it’s pretty clever.

[Brian] began by installing a DCS-900 network camera on the wall near his kitchen sink. The camera monitors any motion on the counter, and once it detects something, a networked computer starts recording individual frames. This security camera setup isn’t looking for criminals: [Brian] needed to keep his cat away from a particularly tasty plant. The motion detection signals an X10 Firecracker module to turn on both a nearby blender and a strobe light, provoking some hilarious reactions from the cat, all of which are captured by the camera.

Check out some other ways to work with the X10 firecracker, and feel free to jump into the home automation discussion from last week.

[Thanks Joy]

6-axis 3D Printer

We just stumbled upon this video by Professor [Yong Chen] and his students [Xuan Song] and [Yayue Pan] on a 6-axis 3D printer. The group is from the University of Southern California and their project is called the “Development of a Low-cost Parallel Kinematic Machine for Multi-direction Additive Manufacturing”.

That’s right. 6-axes of 3D printing. It uses six linear actuators to move the tool head in almost any direction. The whole thing is powered by a KFLOP board by Dynomotion, a company dedicated to premium motion control for CNC manufacturing and robotics and automation.

In the video they give examples of printing on angled surfaces and cylindrical surfaces — but that’s just the tip of the iceberg. With 6-axes, parts could be designed with completely different characteristics, you could build up the base of a part, and then build off of it in different angles, no more horizontal layers throughout!

Unfortunately we haven’t been able to find any published information on their research, only this video — so stick around after the break and watch it in awe!

Continue reading “6-axis 3D Printer”

Adventures In Hackerspacing: Freeside Atlanta, Part I

advInHSLayout00

The internet is littered with how-to step-by-step guides for starting and maintaining your very own hackerspace. Don’t worry, we’re not adding to the pile. If you want a checklist, Eric Michaud’s got that covered. Adventures in Hackerspacing is different: epic re-tellings, anecdotes, and behind-the-scene stories that fill in the gaps for those fragmented, laundry-list requirements. Here you’ll find nightmare scenarios come to life, clever legal loopholes to save the day, and overhauls that helped a space “click”. Adventures in Hackerspacing has plenty of advice to share, but like every good adventure, it’s about the journey, not the destination.

First up, Freeside Atlanta Part I: Philosophy and Culture.

I sat down with directors [Alan Fay] and [Steven Sutton] on a quiet summer evening to discuss how the space found redemption and success with its philosophy of promoting diversity and embracing humility.

Continue reading “Adventures In Hackerspacing: Freeside Atlanta, Part I”

Build A DIY Plate Reverb

PlateReverb

[Telegraphy] needed a reverb for his recording studio. There are hundreds of computer-based and standalone digital reverb systems out there, but he decided to build his own plate reverb. Reverb is an effect used in many professional audio and music recordings. Reverb adds thousands of echos to an audio signal. These echos decrease in amplitude over time. When used correctly, the effect is generally very pleasing to the ear.

A plate reverb uses a plate of sheet metal to generate the reverb. An audio driver is placed in contact with the metal plate. Audio is fed into the driver, which vibrates the plate. The vibrations travel along the surface of the plate, bouncing off the edges and reflecting back. These reflections are captured by a pickup, which then converts them to a voltage signal. The final reverb effect is actually created in the sound engineer’s mixing board when the “dry” source signal is mixed with the signal returned by the plate.

[Telegraphy’s] plate reverb was built almost entirely from found, Radio Shack, and hardware store parts. The plate and frame are from Lowes. The audio driver is a cut up speaker from an old car stereo. The pickup is a modified piezo transducer from Radio Shack. As [Telegraphy] states several times, there are a lot of differing opinions on exactly how and where to mount the various parts of the reverb. Any placement will generate some reverb. The question is where and how to mount things for the best effect. Much like beauty and the eye of the beholder, the answer to that question is in the ear of the listener.

Jump past the break for a tour of a slightly more involved plate reverb at Gallery Acoustics Studio.

Continue reading “Build A DIY Plate Reverb”