3kW Electric Scooter

IMG_20131228_012222

[Exco] had been playing around with the idea of building an electric scooter for a while now, and over the holidays he decided to just do it.

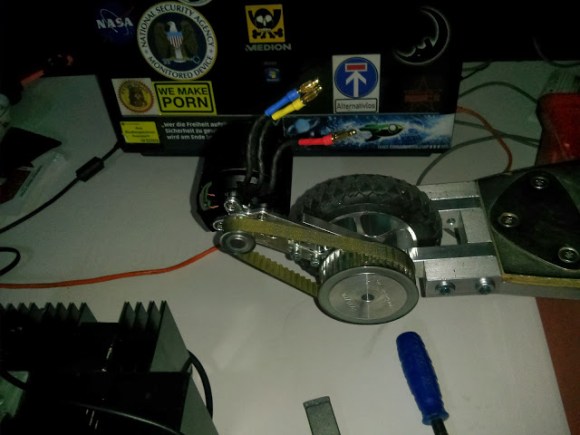
Similar to the motorized long board we shared last month, this scooter makes use of an RC hobby motor — in this case, a 63mm 3kW brushless outrunner (for a RC plane), coupled with a 100A ESC. He bought the scooter (“kick board”) off eBay for cheap, and spent a few days in the machine shop modifying it. It has better wheels now, and custom milled aluminum brackets for mounting the motor. The drive system uses a belt and pulley with a sliding rail to provide tensioning.

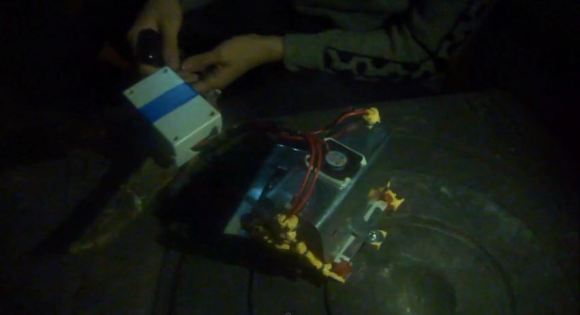
To power it, he bought a bunch of 2.5Ah, 18V LiPo packs on eBay originally from a Makita drill set. He then sorted out the cells, removed the dead ones, and soldered everything together for his own Frankenstein pack to balance them. The final configuration features twenty-one 18650 lithium cells. He even shrink wrapped it, which makes it look relatively professional!

It’s controlled by a push-button potentiometer hooked up to the ESC. Theoretical top speed is about 27km/h @ 1285RPM, and they managed to get it up to 25km/h in a real test. There’s more info over at the Endless Sphere forum, and we’ve got two test videos for you after the break.

Continue reading “3kW Electric Scooter”

Custom Workbench Computer

IMG_20140105_154013_152

[Michael Solar] recently bought a house with his wife, and now with his first garage he’s started building his workshop man-cave. First order of business was a workbench — second, a computer built into it.

He started with an old Dell tower, but found it took too much space underneath the work bench — so he set to downsizing it. Using pine boards he created a stepped wooden enclosure that utilizes the space under the front lip of the work bench. He’s mounted the motherboard using standoff pins and created cutouts in the back for the power supply and outputs. It features three intake and two exhaust fans — currently without filters, although he plans on adding them soon, otherwise he’ll end up with a sawdust filled computer!

It’s a rather simple project, but it gives a great introduction into making your own custom computer case, and provides some handy lessons learned near the end. It might not be a flashy case mod like this heavy metal computer desk, but it is certainly functional and robust!

Giving A Roomba Internet Connectivity

roombahack01_09

What was supposed to be a fun 1-day build ended up turning into a 3-day journey full of close calls when [Arthur] decided to give his Roomba Internet Connectivity.

The Roomba, whom [Arthur] calls Colin, has been in service for a couple of years, and once he got his hands on the Electric Imp, he had just the project in mind.  With embedded Wi-Fi and a 32-bit processor all in an SD Card form factor, the Electric Imp makes it very easy to add the “Internet of Things” to just about anything you can think of.  [Arthur] wanted to gain control of the Roomba, so he tapped into the SCI (Serial Command Interface).  Now he can read out the Roomba’s on-board sensor data including battery voltage, current draw, and even the temperature.

These are the kind of walk-through’s we love to see, because he did it in real-time, so you get to experience all of the “surprises” along the way.  For example, he removed an external charging port to make room for the added components, but that ended up disabling the dock charger.  Then he discovered that when the Roomba was charging, the input voltage to the Electric Imp breakout board was too high, so he had to introduce an intermediate voltage regulator.  But perhaps the biggest bump in the road was when he accidentally brushed the Electric Imp breakout board along the Roomba’s control board while power was on.  Luckily the damage was isolated to just one smoked — a simple FET.  The project turned out great, and (today) Colin’s data is actually visible through a public Xively feed.

Continue reading “Giving A Roomba Internet Connectivity”

USB Charger Solves Mongolia Electricity Problem

thermoelectric

People living in remote areas of Mongolia do not have access to electricity or gas, and rely on traditional wood stoves for their homes, which are used almost all the time. Many use solar panels to generate some electricity for small tools, but unfortunately there are often times when it is cloudy for days on end. [Chingun Has] saw this problem and created his own clever solution — a small thermoelectric USB charger.

[Chingun’s] device features an array of peltier plates inside of an aluminum shroud. The device is designed to sit on top of a stove, or to be strapped onto a stove pipe. When there is a large enough temperature differential between the two sides of a peltier plate, a charge is induced. He’s using a small fan to help cool the other side of the peltier plates. A small control box houses a voltage regulator circuit that provides 5V over USB.

The cool thing about this project is that it is partially the result of [Tony Kim], an MIT professor who traveled to Mongolia to teach students an edX circuits course about a year ago. [Chingun] was one of his students, and this is a great example of a solution to a real-world problem.

An excellent video after the break gives a complete explanation of the project, as detailed by [Chingun] himself — it’s well worth the watch!

Continue reading “USB Charger Solves Mongolia Electricity Problem”

I Am The Midnight Message Board What Messages At Midnight

Photoluminescent stars on your bedroom wall or ceiling are pretty cool, though the stationary shapes can become boring. [Adi] felt this way, too. While doodling with a bright white light on some glow in the dark vinyl, it occurred to him that this could make for an interesting display. He set about making GLO, the midnight message board and RSS display.

[Adi]’s light writer uses 12 UV LEDs on a linear axis powered by a stepper motor to write RSS headlines, Twitter trends, or custom text on his wall. He finds the slow fade of the text very soothing to fall asleep by, and it’s easy to see why. The LED array imprints a section of a character consisting of a 6×5 bit pattern. The 12 LEDs are split into two groups, so it can write two lines at 45-50 characters each. [Adi] designed his own pixel font for this project, and advises that only upper case letter forms be used.

[Adi]’s write-up is quite admirable and comprehensive. In the circuit build section, he advises that the LEDs must be very close to the vinyl for optimum results, but that they should protrude farther than the shift registers so the chips don’t rub the vinyl. Of course you could opt for more intense light sources, like laser. See it in action after the break.

Continue reading “I Am The Midnight Message Board What Messages At Midnight”

Extremely Slick Game Of Life Based Clock

[Matthews] needed a good present to give to his brother-in-law, who just so happens to be a mathematician and programmer. He wanted something functional but equally geeky at the same time, so he decided to try his hand at making a Game of Life style clock.

He was originally inspired by a Game of Life Clock we shared a few months ago, but with a few improvements. First, he wanted a much bigger playing field, so he found a 16×32 RGB LED matrix. Second, he wanted the time to always be visible so it actually works as a functional clock.

At the heart of the device is an Arduino UNO which utilizes a Chronodot RTC module for accurate time keeping. The entire clock is encased in acrylic sheets and it looks extremely good for a home-made project. He designed the case using a site called MakerCase, which is a super handy application for designing boxes.

At the beginning of every minute starts a new Game of Life which plays over top of the time displayed. Three buttons on the top allow for many adjustments including brightness, timezone, speed, colors, and even edge behavior! To see it in action, stick around after the break.

Continue reading “Extremely Slick Game Of Life Based Clock”

Rex, The ARM-Powered Robot Board

REX

There are a million tutorials out there for building a robot with an Arduino or Raspberry Pi, but they all suffer from the same problem: neither the ‘duino nor the Raspi are fully integrated solutions that put all the hardware – battery connectors, I/O ports, and everything else on the same board. That’s the problem Rex, an ARM-powered robot controller, solves.

The specs for Rex include a 1GHz ARM Cortex-A8 with a Video SoC and DSP core, 512 MB of RAM, USB host port, support for a camera module, and 3.5mm jacks for stereo in and out. On top of that, there’s I2C expansion ports for a servo adapter and an input and output for a 6-12 V battery. Basically, the Rex is something akin to the Beaglebone Black with the hardware optimized for a robotic control system.

Because shipping an ARM board without any software would be rather dull, the guys behind Rex came up with Alphalem OS, a Linux distro that includes scripts, sample programs, and an API for interaction with I2C devices. Of course Rex will also run other robotics operating systems and the usual Debian/Ubuntu/Whathaveu distros.

It’s an impressive bit of hardware, capable of speech recognition, and machine vision tasks with OpenCV. Combine this with a whole bunch of servos, and Rex can easily become the brains of a nightmarish hexapod robot that responds to your voice and follows you around the room.

You can pick up a Rex over on the Kickstarter with delivery due sometime this summer.