Electrolytic Rust Removal Leaves Your Parts Shiny As New

If you’re tired of removing rust by hand, you’d be surprised how easy it is to build your very own electrolytic rust removal system!

[James Taylor] is in the process of restoring a very old lathe. Most parts were small enough to simply remove the rust, paint, and grease via chemical stripping and bead blasting, but he ran into a problem with the 40kg lathe bed. It’s painted and if he chemically strips it, he needs to rinse it — which might result in even more flash rusting.

He looked up electrolytic rust removal, and was a bit suspicious of how simple and effective it claimed to be, but he decided to give it a shot anyway. He picked up a big 160L rain barrel, 6 pieces of rebar, some copper wire, and a computer power supply.

Continue reading “Electrolytic Rust Removal Leaves Your Parts Shiny As New”

MicroModem, For Data Transmission Explorations

modemThem kids with those Arduinos don’t know what they’re missing. A serial connection is just too easy, and there’s so much fun to be had with low bandwidth modems. [Mark] made the MicroModem with this in mind. It’s a 1200 baud AFSK modem, capable of APRS, TCP/IP over SLIP, mesh network experimentations, and even long-range radio communication.

As the MicroModem is designed to be an introduction to digital wireless communication, it’s an extremely simple build using only 17 components on a board compatible with the Microduino. The software is built around something called MinimalProtocol1, a protocol that will be received by all other listening stations, features error correction, and automatic data compression. There’s also the ability to send TCP/IP over the link, which allowed [Mark] to load up our retro site at a blistering 1200 bps.

The code is extremely well documented, as seen on the Github for this project, with board files and even breadboard layouts included. [Mark] has three PCBs of his prototype left over, and he’s willing to give those out to other Hackaday readers who would like to give his modem a shot.

Find The Giant Jolly Wrencher At Maker Faire This Weekend

scaled_DSC_0038

Check it out, I made something really geeky for Maker Faire. If you’re going to be in San Mateo this weekend for Maker Faire Bay Area, watch for the floating Skull and Wrenches. I won’t be alone, and my compatriots and I will be loaded down with stuff to give away to those who ask for it. If you are hell-bent on finding us, just check this Twitter list as we’ll frequently be tweeting our locations and exploits.

Want to grab a beer with some other Hackaday folk? Even if you’re not attending the Faire, you can take part in the festivities. We’re descending on O’Neil’s Irish Pub on Saturday night. You might want to let us know you’re coming. You can show up unannounced, but we can’t guarantee that you’ll be able to squeeze into the 80-person-pub. If we have way too many hackers overflowing into the street we’ll probably split the party up and go bar hopping. The place is apparently right next to a train stop for your traveling convenience. We just hope to keep things tame enough to make it to Maker Faire again on Sunday morning, but we can’t guarantee that either ;-)

1980’s Ingenuity Yields Mechanical Intervalometer

DIY Intervalometer

Let’s go back in time to the 1980’s, when shoulder pads were in vogue and the flux capacitor was first invented. New apartment housing was being built in [Vince’s] neighborhood, and he wanted some time-lapse footage of the construction. He had recently inherited an Elmo Super-8mm film camera that featured a remote control port and a speed selector. [Vince] figured he might be able to build his own intervalometer get some time-lapse footage of the construction. He was right.

An intervalometer is a device which counts intervals of time. These are commonly used in photography for taking time-lapse photos. You can configure the intervalometer to take a photo every few seconds, minutes, hours, etc. This photographic technique is great when you want see changes in a process that would normally be very subtle to the human eye. In this case, construction.

[Vince] started out by building his own remote control switch for the camera. A simple paddle-style momentary micro switch worked perfectly. After configuring the camera speed setting to “1”, he found that by pressing the remote button he could capture one single frame. Now all he needed was a way to press the button automatically every so often.

Being mechanically minded, [Vince] opted to build a mechanical solution rather than an electronic circuit. He first purchased a grandfather clock mechanism that had the biggest motor he could find. He then purchased a flange that allowed him to mount a custom-made wooden disk to the end of the minute hand’s axle. This resulted in a wheel that would spin exactly once per hour.

He then screwed 15 wood screws around the edge of the wheel, placed exactly 24 degrees apart. The custom paddle switch and motor assembly were mounted to each other in such a way that the wood screws would press the micro switch as they went by. The end result was a device that would automatically press the micro switch 15 times per hour. Continue reading “1980’s Ingenuity Yields Mechanical Intervalometer”

Fail Of The Week: Projector LED Retrofit

fotw-projector-repair

That’s a deal for a project, how hard could it be to fix it up?

If you’re a real hacker we’d wager you’ve fallen for this type of thought process before. [Luft] bought this used Sharp XR-10X-L projector about a year back and planned to retrofit it with an LED bulb. He gathered all the parts and got to work, successfully testing and installing the modifications. But as luck would have it, the project is stuck in some type of boot loop.

This fail is certainly not for lack of preparation. The first post documenting his adventure shows that the hack has been done before, he acquired the service manual for this particular hardware, and he did his homework when ordering the parts. Success requires circumventing some sensors which ensure the case and internals are in place, and making sure the electronic status of the ballast is reported correctly event though it’s not needed for the LED source. Power-on gets as far as illuminating all the indicator lights in green as it should, but is then followed closely by a reboot sequence.

He tried watching the serial port to see if he can get any status info there but no dice. In keeping with the nature of this column, let’s see if we can provide any constructive troubleshooting advice in the comments.


2013-09-05-Hackaday-Fail-tips-tileFail of the Week is a Hackaday column which runs every Wednesday. Help keep the fun rolling by writing about your past failures and sending us a link to the story — or sending in links to fail write ups you find in your Internet travels.

Introducing The Arduino Zero

The Arduino Uno is the old standby of the Arduino world, with the Arduino Due picking up where the Mega left off. The Arduino Tre is a pretty cool piece of kit combining a Linux system with the Arduino pinout. Care to take a guess at what the next Arduino board will be called? The Arduino Zero, obviously.

The Arduino Zero uses an Atmel ARM Cortex-M0+ for 256kB of Flash and 32k of RAM. The board supports Atmel’s Embedded Debugger, finally giving the smaller Arduino boards debugging support.

The chip powering the Zero features six communications modules, configurable as a UART, I2C, or SPI. USB device and host are also implemented on the chip, but there’s no word in the official word if USB host will be available. There are two USB connectors on the board, though.

The Arduino folk will be demoing the Zero at the Bay Area Maker Faire this weekend. Hackaday will have boots on the ground there, so we’ll try to get a more detailed report including pricing and availability then.

Learning To Reverse Engineer On A Broken Printer

Lexmark Hack

When a Lexmark inkjet printer stopped working, [Mojobobo] was able to claim it as his own. He quickly realized that the machine was flooded with ink and not worth repairing, but that didn’t mean he couldn’t still find a use for it. When he learned that the printer’s firmware was not only upgradable but also unprotected, he knew he should be able to get the printer to do his own bidding.

[Mojobobo] started his journey with the motherboard. The unit still powered up, but it was asking to insert a “duplex module” before it would boot any further. [Mojobobo] first tried to find a way to trick the duplex module sensor, but was unsuccessful. His next step was to search for some kind of serial communications port. He didn’t have an oscilloscope, so instead he used a speaker with a wire probe. In theory, if the wire was pressed against an active serial port, he would be able to hear varying tones through the speaker. Sure enough, he found some interesting tones after probing around some ports next to a “JTAG” label. He looked up some information about the nearby chip and found that it included an SPI bus.

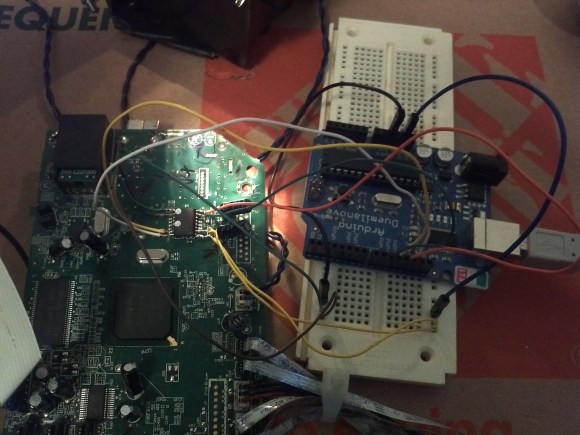
After some internet research, [Mojobobo] learned enough about SPI to have a rough idea of how to use it. Having limited tools available to him, he decided to use his Arduino to try to communicate with the motherboard. After wiring up a simple circuit, (and then re-wiring it) he was able to dump the first 4096 bytes of the motherboard’s boot loader to the Arduino via the SPI interface.

[Mojobobo’s] next steps will be to find a faster way to dump the boot loader. At 9600 baud, he grew tired of waiting after three hours. Once he has the full boot loader he intends to search for a way to bypass the duplex sensor and get the board to finish booting. Then he may just use the printer for its scanning functions, or he might find other interesting uses for it.
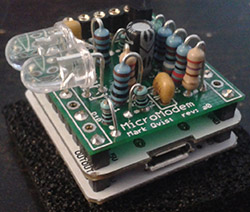