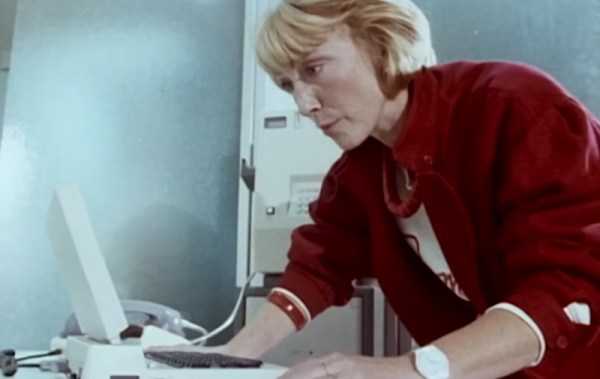
Reviving An 8-Inch Hard Drive From The 1980s

As part of the eternal quest within the realm of retrocomputing, storage devices can be one of the most challenging, especially when it comes to firmly obsolete hard drives, such as the CDC Finch drive. This compact 8″ HDD replaced the previous 14″ models with a form factor that was decidedly more portable. These Finch drives being 1980s technology that got run pretty hard before their retirement, it’s little wonder that they’d end up on the repair bench over at [Usagi Electric]

A CDC Finch hard disk drive, available in 8 to 32 MB for all your data storage needs. (Credit: Usage Electric)

Introduced in the early 1980s, the CDC Model 9410 Finch drive was unlike its 14″ predecessors in that it is a sealed unit, with maintenance-free air filtration. With the 14″ models you’d have both fixed and swappable platters, with far less consideration for dust exposure. This makes these Finch drives more touchy to work on, not unlike HDDs today, and adds to the excitement when repairing one of these old drives.

In this video, two differently broken Finch drives are discussed. Both appear to have an issue on the controller board, with one not responding to communications on the interface, while the other featuring a dead short on the interface pins. The first drive was brought back to life by replacing a dead SN75110 line driver IC, as well as a dead 7818 voltage regulator that was only outputting a sad 0.3 V.

Unfortunately, after half an hour of uptime and in the process of dumping data the drive errored out with a Not Ready, indicating that there are further issues on the controller board to fix. The good news here is that the platters appear to be pretty robust, but the controller boards on these old drives tend to develop issues over the years, something which will be further explored in upcoming videos.

Continue reading “Reviving An 8-Inch Hard Drive From The 1980s”

Building The Cheapest MIDI Home Studio From 1988

These days, there is a plethora of cheap hardware and software which you can use to make digital music. Back in the 1980s, though, this was still a nascent field, with new gear changing the game for musicians. In his latest video, [cTrix] puts together a guide to building a budget MIDI home studio like it’s 1988.

The original Atari ST is the star of the show, which sold for around £300 back then. Unlike most contemporary computers, it came with MIDI ports built-in, and it quickly became a popular platform for music sequencing and controlling external synth hardware. It was often spotted in posh studios being used by big-time musicians, but [cTrix] wanted to look at how it was used by more humble users.

While the Atari ST could output some passable chiptunes, it was most powerful when paired with off-board gear. Industry magazines would readily talk up “DIY” setups worth thousands, but [cTrix] aimed for a budget in the low hundreds. In 1988, that might get you something like the 16-channel Yamaha PSS-580, which rocked full MIDI support and a ton of sounds and drumkits built in. It ran an OPL soundchip, and could play multiple instruments at once under MIDI control from software like Dr. T’s MIDI Recording Studio.

Of course, if you’ve ever played a keyboard like the PSS-580, you’ll have noted that the sound output can be more than a little chintzy. A cheap way to level up was to get yourself something like the Roland MT-32, which rocked a far higher-quality sound module. Everything from slap bass to solid electric pianos could be blasted out from the Roland, which also included a decent reverb unit, too. [cTrix] also dives into other budget heroes, like the rich and expansive Kawai K1 and the Yamaha EMT-10.

If you want to make music like it’s 1988 and you’re hunting for your first gold record, you’ll learn a lot here. We can’t wait for Part 2, that explores the next level of sophistication in this era. His previous lessons on how to make 90s dance bangers on the Amiga are a treat, too.

Continue reading “Building The Cheapest MIDI Home Studio From 1988”

Faux-Retro “Tape” Player Runs On ESP32 And 80s Vibes

At first glance, this gorgeous retro-styled audio player built by [Max Kern] could absolutely pass for the genuine article. But then you take a closer look and realize that the “tape” it’s playing is actually an animation running on a 320 x 240 IPS display, and the Play and Rewind buttons on the front aren’t the chunky electromechanical affairs of yesteryear but actually cleverly repurposed MX keyboard switches.

By now you’re probably realizing that this player is quite a bit smaller than you first imagined, which in turn, means that it even its case is a modern fabrication. While it might perfectly encapsulate the look and feel of a piece of 1980s consumer electronics, it was squirted out on a thoroughly modern desktop 3D printer.

Even so, [Max] made sure to include draft angles in the CAD design and and a distinctive separation line so the case looked like it was injection molded. Following similar logic, he decided against using a modern rechargeable battery pack to power the electronics, opting instead for a more era-appropriate set of AA batteries.

In terms of hardware, the custom PCB is home to an ESP32 WROOM, a MAX98357A I2S audio amplifier, a FT231XS USB-to-serial chip, with enough passives and regulators to keep them all well fed and happy. The ESP32 has more than enough computational horsepower to chew through MP3 files, which are conveniently loaded via an SD slot built into the side of the player. As the player was actually intended for audio books, onboard playback is limited to a mono speaker; though there is a 3.5 mm audio jack to plug in a pair of headphones for when the built-in speaker isn’t up to the task.

Check out the video after the break to see how the player is assembled, as well as a demonstration of its simple three-button user interface. It looks like a joy to use, though the lack of fast forward and rewind sound effects took us a bit by surprise given the otherwise impeccable attention to detail. We’ll assume there’s some technical limitation that makes this particularly difficult to implement, and that their absence is currently keeping [Max] up at night.

As impressive as the final product is, we can’t say it’s a surprise. Frankly, we wouldn’t expect anything less from [Max] at this point. His adaptive OLED macro pad wowed us back in 2020, and his ZeroBot is still one of the slickest designs for a DIY two-wheeled robots we’ve ever seen.

Continue reading “Faux-Retro “Tape” Player Runs On ESP32 And 80s Vibes”

Verbot Goes To The Dark Side

What happens to old, neglected 1980s toy robots? According to the [Randi Rain], they turn to the dark side! Way back in the ’80s, Tomy had an entire line of robots — from keychain wind-up toys to rolling, talking machines almost 2 feet tall. Tucked into the middle of this line was Verbot. Verbot’s claim to fame is that it is a voice-controlled robot. More than that, it was speaker-dependent. Train the robot with commands like “go forward” and then watch as it responds to your every command.

As you might guess, the speech recognition wasn’t great by today’s standards. Recognition was handled by a Microcontroller — a Mitsubishi product that was possibly a mask programmed 8051 variant. Pretty novel for an 80s toy — in fact, there’s a patent for it.

Continue reading “Verbot Goes To The Dark Side”

Screenshot of a 1988 news report on the Morris Worm computer virus

Retrotechtacular: Cheesy 1980s News Report On Early Internet Virus

It was a cold autumn night in 1988. The people of Cambridge, Massachusetts lay asleep in their beds unaware of the future horror about to be unleashed from the labs of the nearby college. It was a virus, but not just any virus. This virus was a computer program whose only mission was to infect every machine it could come in contact with. Just a few deft keystrokes is all that separated law abiding citizens from the…over the top reporting in this throwback news reel posted by [Kahvowa].

Computer History Museum exhibit of the floppy disk used to distribute the Morris worm computer virus.
Computer History Museum exhibit featuring the original floppy disk used to distribute the Morris Worm computer virus.

To be fair, the concept of a computer virus certainly warranted a bit of explanation for folks in the era of Miami Vice. The only places where people would likely run into multiple computers all hooked together was a bank or a college campus. MIT was the campus in question for this news report as it served as ground zero for the Morris Worm virus.

Named after its creator, Robert Tappan Morris, the Morris Worm was one of the first programs to replicate itself via vulnerabilities in networked computer systems. Its author intended the program to be a benign method of pointing out holes, however, it ended up copying itself onto systems multiple times to the point of crashing. Removing the virus from an infected machine often took multiple days, and the total damage of the virus was estimated to be in the millions of dollars.

In an attempt to anonymize himself, Morris initially launched his worm program from a computer lab at MIT as he was studying at Cornell at the time. It didn’t work. Morris would go onto to be the first person to receive a felony conviction under the 1986 Computer Fraud and Abuse Act. After the appeals process, he received a sentence a community service and a fine. After college Morris co-founded the online web store software company Viaweb that Yahoo! would acquire in 1998 for 49 million dollars. Years later in an ironic twist, Morris would return to academia as a professor at MIT’s department of Electrical Engineering and Computer Science.

Interested in some info on viruses of a different nature? Check out this brief history on viruses from last year.
Continue reading “Retrotechtacular: Cheesy 1980s News Report On Early Internet Virus”

Milspec Teardown: ID-2124 Howitzer Data Display

It’s time once again for another installment in “Milspec Teardown”, where we get to see what Uncle Sam spends all those defense dollars on. Battle hardened pieces of kit are always a fascinating look at what can be accomplished if money is truly no object. When engineers are given a list of requirements and effectively a blank check, you know the results are going to be worth taking a closer look.

Today, we have quite a treat indeed. Not only is this ID-2124 Howitzer Deflection-Elevation Data Display unit relatively modern (this particular specimen appears to have been pulled from service in June of 1989), but unlike other military devices we’ve looked at in the past, there’s actually a fair bit of information about it available to us lowly civilians. In a first for this ongoing series of themed teardowns, we’ll be able to compare the genuine article with the extensive documentation afforded by the ever fastidious United States Armed Forces.

For example, rather than speculate wildly as to the purpose of said device, we can read the description directly from Field Manual 6-50 “TACTICS, TECHNIQUES, AND PROCEDURES FOR THE FIELD ARTILLERY CANNON BATTERY”:

The gun assembly provides instant identification of required deflection to the gunner or elevation to the assistant gunner. The display window shows quadrant elevation or deflection information. The tenths digit shows on the QE display only when the special instruction of GUNNER’S QUADRANT is received.

From this description we can surmise that the ID-2124 is used to display critical data to be used during the aiming and firing of the weapon. Further, the small size of the device and the use of binding posts seem to indicate that it would be used remotely or temporarily. Perhaps so the crew can put some distance between themselves and the artillery piece they’re controlling.

Now that we have an idea of what the ID-2124 is and how it would be used, let’s take a closer look at what’s going on inside that olive drab aluminum enclosure.

Continue reading “Milspec Teardown: ID-2124 Howitzer Data Display”

Repairing A Vintage Sharp MemoWriter

As you may know, we’re rather big fans of building things here at Hackaday. But we’re also quite partial to repairing things which might otherwise end up in a landfill. Especially when those things happen to be interesting pieces of vintage hardware. So the work [ekriirke] put in to get this early 1980’s era Sharp MemoWriter EL-7000 back up and running is definitely right up our alley.

There were a number of issues with the MemoWriter that needed addressing before all was said and done, but none more serious than the NiCd batteries popping inside the case. Battery leakage is a failure mode that most of us have probably seen more than a few times, but it never makes it any less painful to see that green corrosion spreading over the internals like a virus. When [ekriirke] cracked open this gadget he was greeted with a particularly bad case, with a large chunk of the PCB traces eaten away.

The corrosion was removed with oxalic acid, which dropped the nastiness factor considerably, but didn’t do much to get the calculator back in working order. For that, [ekriirke] reconnected each damaged trace using a piece of wire; he even followed the original traces as closely as possible so the final result looked a little neater. Once everything was electrically solid again, he covered the whole repair with a layer of nail polish to adhere the wires and add a protective coating. Nail polish might not have been our first choice for a sealer, and likely not that particular shade even if it was, but sometimes you’ve got to use what you have on hand.

After years of disuse the ribbon cartridge was predictably dry, so [ekriirke] rejuvenated it with the fluid from a permanent marker applied to the internal sponge. He also made some modifications to the battery compartment so he could insert rechargeable Ni-MH AA batteries rather than building a dedicated pack. There’s no battery door in the enclosure, so removing the batteries will require opening the calculator up, but at least he has the ability to remove the batteries before putting the device in storage. Should help avoid a repeat of what happened the first time.

If you’re a fan of a good restoration, we’ve got plenty to keep you entertained. From bringing a destroyed Atari back from the dead to giving some cherished children’s toys a new lease on life, fixing old stuff can be just as engrossing as building it from scratch.

Continue reading “Repairing A Vintage Sharp MemoWriter”