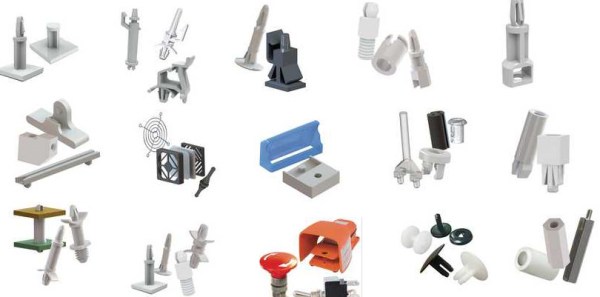
Parts You Should Know: A Universe Of Useful Injection Molded Standoffs

Your clever branding won't work on me! *types caption in on iPhone*
Your clever branding won’t work on me!
*types caption in on iPhone, sips Starbucks*

I remember the first time I built a computer. My sister and I had our last fight about who would get to use the family computer, it was time I had one of my own. I knew a little bit, and I knew I wasn’t going to be one of those plebs that overpaid for a Gateway in its cow box. So I outsourced. One of the computer literate parents in my Scout Troop very kindly agreed to put together a list of components for me. I spent my Christmas money, birthday money, and a small mountain of money I had saved up. I remember getting the parts in the mail. I was so excited that a week earlier I had even bought one of those super lame computer tool kits to put it together.

I still remember how enormously frustrating the stand-offs for the mother board were to install. I think computers were still figuring out that they didn’t need ALL of the features of a mainframe. Anyway there was a 3mm screw on each side of a cm tall brass standoff. It also wanted me to put these little isolating paper washers on the assembly for some reason. Even with my then presidentially sized hands it took a long time. My Mom later told me that it was around this time she was certain the whole endeavour was going to end in tears.

Six hours of careful work later I had the computer together and running when I realized I had forgotten to buy an OS for it. She was nearly right.

Regardless. My early experience with computer assembly left me with a love for standardized screws, a hate for excessive fasteners, and a deep loathing for improperly routed wires. I was a weird kid. Anyway, when it came time for me to start designing my own enclosures for circuit boards I had all the unique psychological damage and underpinnings I would need to waste a lot of time googling on the internet for an alternate, screwless, method of standing a board off from a surface.

Continue reading “Parts You Should Know: A Universe Of Useful Injection Molded Standoffs”

A Short Introduction To Staking And Potting

Staking and potting are not often used in the hobby electronics world, not really entering to the common vernacular. However, everyone who’s ever busted out a glue-gun to convince that dang wire that keeps coming loose to stay has done it.

However, as [Sean Thomas] touches on, staking is not necessarily as easy as a dob of hot glue. There is a method to the madness. [Sean] gives some examples in pictures, but also directs people to the excellent NASA standard methods for staking. It’s surprising how many unintuitive caveats there are to the proper technique.

Potting, or covering everything in epoxy forever, is a great way to get a waterproof, unserviceable, and practically mechanically invincible circuit. The big challenge in potting is picking the right material. A soft silicone, for example, might transfer an unexpected force to an unexpected section of the circuit and cause a mechanical failure. A nice hard epoxy may be too insulating and cause a thermal failure. The standard RTV from the big box store has acetic acid that will eat your components.

These two techniques that come in handy when you need them and worth the bit of reading it takes to get familiar. Have you used either in your own workshop? Let us know the application and the material/techniques you have tried in the comments below.

One Home Made NES To Rule Them All

The Nintendo Entertainment System, or Famicom depending on where in the world you live, is a console that occupies a special place in the hearts of people of a certain age. If you lived in a country that Nintendo didn’t ship its consoles to in the late ’80s and early ’90s though, you might think that it would be an experience that would have passed you by. Eastern Europeans for instance didn’t officially meet Mario for years.

A Pegasus NES clone. Ktoso the Ryba [Public domain], via Wikimedia Commons.
Fortunately for them there was an industry of Chinese and Taiwanese clone makers whose products were readily available in those markets. For the countries without official Nintendo products it is these consoles and their brand names that have achieved cult gaming status rather than the real thing.

In Poland, [phanick] wanted to recreate his youth by building his own clone console (Polish Language, English translation via Google Translate). His chosen target was the Pegasus, the Taiwanese NES clone that was the must-have console for early ’90s Poles.

But he wasn’t just satisfied with building a Pegasus clone. Along the way the project expanded to include support for 72-pin NES cartridges as well as the 60-pin Pegasus ones, and the ability to play both PAL and NTSC games. For this dual-system support he had to include both sets of processor and graphics chip variants, along with logic to switch between them. He goes into some detail on the tribulations of achieving this switch.

The result is a very impressive and well-executed piece of work. The PAL games have a letterbox effect with black bars at top and bottom of the screen, while the NTSC games have slightly washed-out colours. But if you were a gamer of the day you’ll see these as simply part of the genuine experience.

He’s posted a descriptive video which we’ve embedded below the break, but with non-English commentary. It is however still worth watching even without understanding the audio, for its view of the completed board and gameplay.

Continue reading “One Home Made NES To Rule Them All”