Many low-cost wireless temperature and humidity sensors use a 433 MHz transmitter to send data back to their base stations. This is a great choice for the manufacturer of said devices because it’s simple and the radios are cheap, but it does limit what we as the consumer can do with it a bit. Generally speaking, you won’t be reading data from these sensors on your computer unless you’ve got an SDR device and some experience with GNU Radio and reading the Nexus protocol.
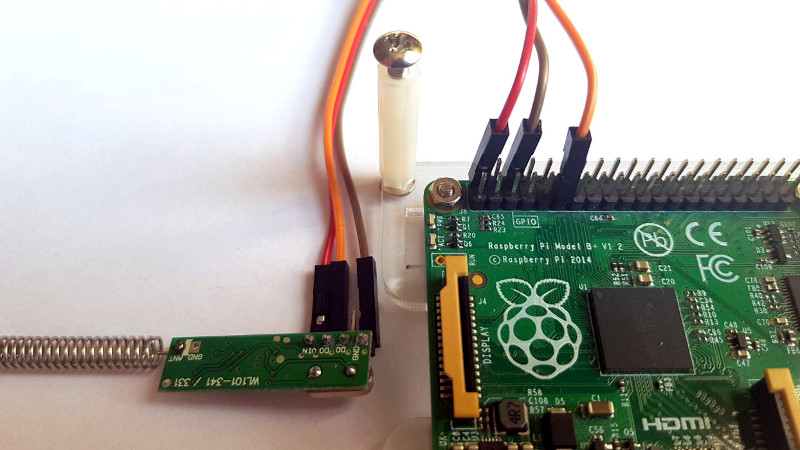
 But [Aquaticus] has developed a very comprehensive piece of software that should make integrating these type of sensors into your home automation system much easier, as long as you’ve got a spare Raspberry Pi lying around. Called nexus433, it uses a cheap 433 MHz receiver connected to the Pi’s GPIO pins to receive data from environmental sensors using the popular Nexus communication protocol. A few known compatible sensors are listed in the project documentation, one of which can be had for as little as $5 USD shipped.
In addition to publishing the temperature, humidity, and battery level values from the sensors to MQTT, it even tracks connection quality for each individual sensor and when they go on and offline. To be sure, this is no simple hack. In nexus433, [Aquaticus] has created a mature Linux service with enough flexibility that you shouldn’t have any problems working it into your automation setup, whether it’s Home Assistant or something you’ve put together yourself.
We’ve seen a number of home automation hacks using these ubiquitous 433 MHz radios, from controlling them with an ESP8266 to hacking a popular TP-LINK router into a low-cost home automation hub.


Don’t get me wrong, it’s a nice build. But.. Sonoff RF bridge for $10 does the exact same.
Have you looked into customer reviews of the RF bridge? Could be biased — people experiencing failure are more likely to post than people for whom it just works — but the vast majority of the reviews on Amazon read like “this thing didn’t work with my gear”.
Whereas if you DIY, it’s “this thing doesn’t work with my gear…yet.” Until someone writes up some code to get it done, that is.
And the bridge is $20, right?
Anyway, the Sonoff bridge is just an ESP8266 and a 433 MHz radio plus code, which suggests that the DIY alternative has some headroom for price reduction, if you’re so inclined.
I mentioned it in another comment, but there’s a pretty awesome esp + 433 project here https://github.com/1technophile/OpenMQTTGateway
That’s very interesting… I have some now unnecessary ESP32 modules lying around, I’ll test them with this. Thanks!
Holy cow. That’s fantastic.
Nice!
I use RFlink to integrate all my 433MHz with domoticz on the Pi. The RFlink is a cheap board for on the arduino mega which does all the protocol decoding and that connects through USB with the Raspberry Pi. The developer is amazing, dozens of 433MHz devices are supported, and if you have something it doesn’t know, you just have to send in the debug info and he adds it to the firmware.
http://www.rflink.nl/blog2/easyha
I’ve use RFLink and like it, but:
It’s now closed source.
In November I sent details of my device (a central heating thermostat).
If it was open source I could probably have figured out how to add it myself as it correctly detected the ‘turn boiler off’ packet but not ‘turn boiler on’.
The last release was October though last week they posted “there will be a new release soon!”. So fingers crossed.
A word of advice. Don’t buy the cheapest $0.99 receivers bundled with transmitters. The ones I got from different vendors barely received the outdoor thermometer 5 meters (it’s like 15 feet, right?) away from RPi. Instead spend $1.50 on a superheterodyne receiver like the one pictured in the article, the difference is noticeable. Of course it could have been noise from nearby equipment or that my thermometer had lousy transmitter, but $0.50 is not worth the trouble, IMO.
I’ve also had a lot of headache with these cheap units, but also with the more expensive variants also. Buying 433mhz transcievers seems to be somewhat of a crap shoot. I’d be happy to spend the extra 0.50 if i knew it’d be reliably consistent in ability.
additionally, an awesome related project that runs off of an esp8266 is the https://github.com/1technophile/OpenMQTTGateway
You could use a RTL-SDR (with a Pi at least) but its cost, while low, is substantially more than those cheap modules.
You could also use RTL-SDR to tune receiver or transmitter (whichever has a trimpot) so that their frequencies more or less match. Some of the modules I have in my junk drawer are waaay off 433.92 MHz.
i wasn’t aware you could transmit with an rtl-sdr.. I have a rad1o (based on hackrf) which i use to grab the exact frequencies and protocols of the 433 speaking devices
A better approach (but not popular and slightly more expensive) would be radios like the RFM110 and RFM210. They are much higher performance and configurable. The configuration can be stored in the EEPROM, so you can afterwards use them like the other ones, with just a single data wire.
of course, ideally you could get a bit more serious and use the RFM69.
$1.50?! Do I look like I’m made of money?! :P
Good observation ziew, reflects other experiences I’ve observed last decade or so…
This band used to be very near local area paging for async POCSAG protocols around Australia late 1990’s to around 2006 or so then sync protocols (national telcos mostly) arose whilst mb/cell phones overwhelmed with so many models displacing many comms market segments such as in medical including hospices where dirt cheap but, passably reliable paging receivers flooded that market segment early noughties (2000’s). The paging protocols (though minimal) pretty good for reliability and with a receiver set up for classic ack/nak especially for local area (non telcos) broadcasting offered greater confidence which touches on ziew’s observation.
These days though with so many cheapie devices around that band adding odd ball noise too, it would improve reliability to include extensions to basic protocols and offer more confidence in low level security aspects include some forms of Audit Trail built in at the lowest levels. Thanks for posting article, cheers.
Remind me if I mess with these to have my box run a text to speech util to read out “Initiating the Nexus protocol”
Thanks for the information.
rtl_433 has over 100 different devices and protocols already figured out for everything from temperature sensors, TPMS tire pressure monitoring, key fobs, door contacts etc.
https://github.com/merbanan/rtl_433
rtl_433 turns your Realtek RTL2832 based DVB dongle into a 433.92MHz generic data receiver
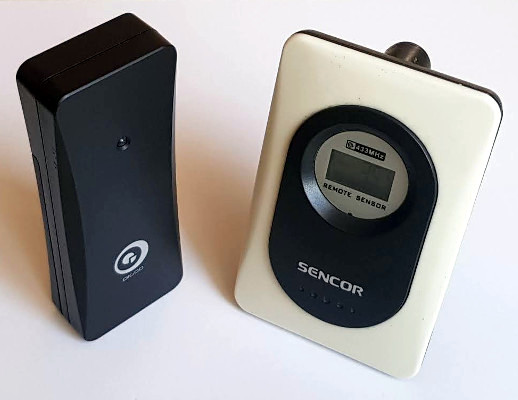
Tap data from wireless remote sensor Sencor SWS THS
https://github.com/erkobg/Sencor-SWS-THS