With the cost of 3D printers dropping rapidly, we’ve started to see a trend of hackers re-purposing them for various tasks. It makes perfect sense; with the hotend and extruder turned off (or removed entirely), you’ve got a machine that can move a tool around in two or three dimensions with exceptional accuracy. Printers modified to carry lasers, markers, and even the occasional rotary tool, are becoming a common sight in our tip line.
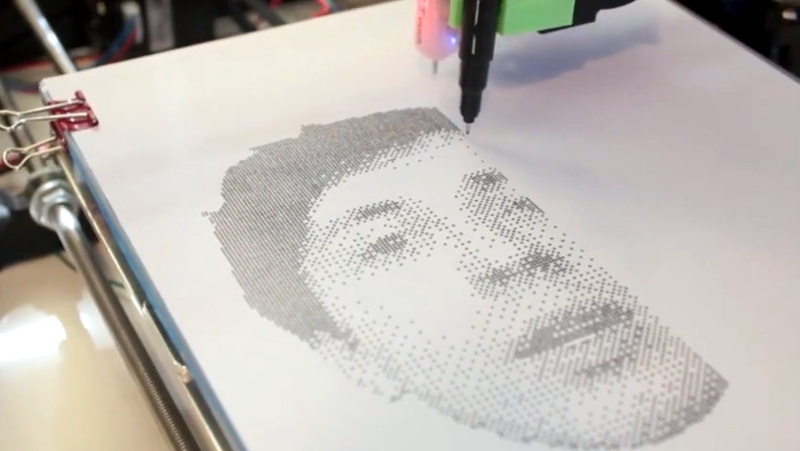
 Last year [Matthew Rayfield] attached a marker to his 3D printer and had it sketch out some pictures, but recently he decided to revisit the idea and try to put a unique spin on it. The end result is a throwback to the classic dot matrix printers of yore utilizing decidedly modern hardware and software. There’s something undeniably appealing about the low-fi nature of dot matrix printing, and when fed the appropriate images this setup is capable of producing something which we’ve got to admit is dangerously close to being art.
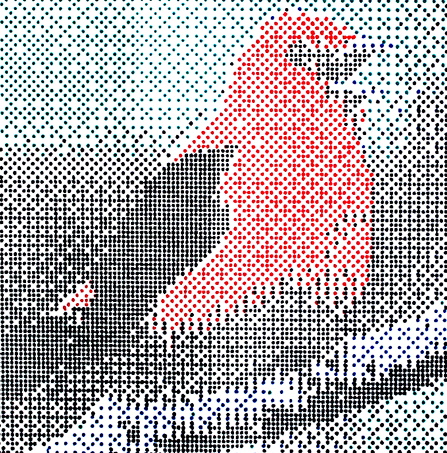
To create these images, [Matthew] has created “Pixels-to-Gcode”, an online service that anyone can use to turn an arbitrary image into GCode they can feed their 3D printer. There’s a number of options available for you to play with so you can dial in the specific effect you’re looking for. Pointillist images can be created using a tight spacing of dots, but widen them up, and your final image becomes increasingly abstract.
The hardware side of this project is left largely as an exercise for the reader. [Matthew] has attached a fine-point pen to his printer’s head using a rubber band, but admits that it’s far from ideal. A more robust approach would be some kind of 3D printed device that allows you to quickly attach your pen or marker so the printer can be easily switched between 2D and 3D modes. We’d also be interested in seeing what this would look like if you used a laser mounted on the printer to burn the dots.
Back in the ancient days of 2012, we saw somebody put together a very similar project using parts from floppy and optical drives. The differences between these two projects, not only in relative difficulty level but end result, is an excellent example of how the hacker community is benefiting from the widespread availability of cheap 3D motion platforms.


” A more robust approach would be some kind of 3D printed device that allows you to quickly attach your pen or marker so the printer can be easily switched between 2D and 3D modes.”
That’s a place where the Mendel90 rocks! Remove two wingnuts and a D-SUB connector and the extruder/hotend assembly pops right off. In it’s place the wingnuts will attach this https://www.thingiverse.com/thing:910550
I’ve played with using my 3d printer as a plotter a little. The conclusion I came to was that it is a fun thing to try but not the greatest idea to do often because there is so much up/down. Is the Z-axis really made for that?
I would like to see a “plotter mode” written into popular 3d printer firmware. It would add P/U, P/D commands. These would turn a servo between two positions. Then instead of designing/printing a simple clip to clip the pen to the carriage (or just taping it on) something more involved with a servo to move the pen up/down could be designed.
When plotting the printer would not move the Z-axis at all. It would rely entirely on the pu/pd servo.
As a bonus that would mean it would not be necessary to reset the z-offset if you want to plot on the surface of objects of varying height. Nor would you have to code the height into the g-code. Just send a p/d command. Then adjust the z-axis so the pen just touches. Send P/U and start plotting!
Many printers/slicers use a feature called “Z-hop”, which raises the Z axis a small amount during movement to prevent it from dragging over the areas it has already put plastic down, which is more or less the same idea here. But really, rapid repetitive motion is sort of the name of the game for 3D printing anyway.
Sure!
I’ve used that method before. Start with an SVG. Use an online tool to convert it to a STL with a height equal to the first layer height setting in the slicer. Turn on that feature where it raises whenever it is traveling (I can’t remember what it’s called in Slic3r but Z-hop does not sound familiar). And “print”.
Later I found an inkscape plugin that wrote g-code directly including pu/pd via z-axis raise, lower. Less software steps, same result. No more using a slicer that was meant for 3d objects.
The “problem” I was talking about was more of a hardware issue. The Z-axis is usually the slowest and loudest axis on a 3d printer. It’s optimized for torque because it has to handle the weight of the extruder and hotend but not so much for speed, sound or runhours because It is expected to move only once per layer of a 3d object. I have a hard time just staying in the room with my printer when it is making a 2d drawing.
Besides it being slow, and obnoxiously loud I would fear that if one was doing 2d drawing on a regular basis it might cause premature wear on the threads at the very bottom of their travel. A purpose-built pu/pd add-on shouldn’t be too hard to fabricate and would be quite an improvement.
Maybe some day I will get to this project.
A quick simple solution could be to use the extruder for the pen up and down motion. A direct drive extruder would work best . You would be essentially attaching the pen to the filament.
The inner tube holding the ink in a common pen is 2.95mm. With a direct driven extruder for 3mm hotend, just remove the nozzle and pop the tube in so extruder cog grabs the tube. Rewrite Marlin for it?
Any chance of the pen tube collapsing or distorting slightly after a few shifts?
That could sort of introduce an ugly drift in the true location of the pen point.
That is very clever. I like it!
I’m not convinced it would work though. The extruder carves notches into the filament as it travels through. It’s not so bad that the same filament can’t go through the extruder more than once but the pen tube would have to go through hundreds or thousands of times per image. I would expect it to carve away too much plastic and no longer be able to grip the pen tube. Also, what if all that kneading of the tube causes ink to travel up the tube. I can imagine the ink squirting out and fowling up the inside of the extruder. Finally pen inner tubes aren’t that hard to bend. It might be ok so long as it only just barely sticks out the bottom of the extruder. Can your Z carriage go that low? The farther it sticks out the more likely it is to bend.
Modern 3D-printers uses Z-hop all the time, so hopping 0.1mm or 1mm makes no difference – it just takes longer.
There are plenty of models for pen holders over on thingiverse and elsewhere. Some models for drag knives too so you can make stencils or cut vinyl.
I want a peristaltic pump used with this to print/pump maker goo (UV hardenable photopolymer used in SLA printing) for braille.
I think an inkjet like approach would be better suited to this. A piezo device like in Epson printers which activates rapidly and shoots out small droplets of the resin.
I have been interested in pen plotter for a while, but I have yet to get one.
I really like different generation algorithms like this!
I am starting a slack channel for people interested in pen plotters and the algorithms.
The slack channel is at penplotters.slack.com.
Here is an invite link for whoever wants to join.
https://join.slack.com/t/penplotters/shared_invite/enQtNTU4MDUxNzI1OTI1LTU4ZDY1ZTlmZTczMTM0ZGEzZjQwMmY4MjJlNmUyNGM0OWJiNmI4Nzc2NDMzMmI5MWJhY2I5NTIzZTdkOTE1N2Y
I also have access to a 3D printer that I want to also use as a pen plotter.
Thanks for the links to the pen mounts.
Topographical maps using a 3D printer?
It’s not “dangerously close to being art”. It can only be art, because art does not need a practical use and the practical use of this is really limited. :-) If you want a decent output on paper, there are other well known methods like inkjet or laser.
Is that the measure of art? It’s art if it isn’t useful? What about useful objects that are also designed to be pretty? How about a beautiful mansion with a fancy facade. It keeps someone warm and dry. It gives them a place to put their stuff. But isn’t it also art?
I once had the displeasure to be acquainted with a professor who taught painting. He used to go on and on about how computers were killing art and nothing produced on a computer was art. He had students that tried to submit photos that had been run through algorithms to make them look like paintings. I would have totally agreed with him that when the purpose of the class is to learn to paint doing such a thing is cheating and should be treated as such. By all means kick them out! That wasn’t his stance though, his stance was completely anti-technology. He thought that computers shouldn’t even exist.
He was old. I wonder how many of the drugs that kept him alive were designed using a computer. People only very rarely survived to his age before modern technology. I have very little patience for the anti-tech crowd.
Back when I still had my C=64, I wrote a program that would dump the image on the monitor to my VIC-1520 plotter printer.
One pixel at a time… Yes, it took forever.
I will be using this with a glass etching marker on glass fo sho.
[1] Use a spring loaded pen holder. The old HP pen plotters were done that way to avoid issues with insufficient pressure and unevenness.
[2] Or get a laser engraver attachment and use laser engraver software that allows different gradations of dithering. Side benefit, no messy ink and you can probably make indelible “art” on more types of objects.
I’d like to adapt this nifty applet for my PCB mill.