There is a treasure trove of history locked away in closets and attics, where old shoeboxes hold reels of movie film shot by amateur cinematographers. They captured children’s first steps, family vacations, and parties where [Uncle Bill] was getting up to his usual antics. Little of what was captured on thousands of miles of 8-mm and Super 8 film is consequential, but giving a family the means to see long lost loved ones again can be a powerful thing indeed.
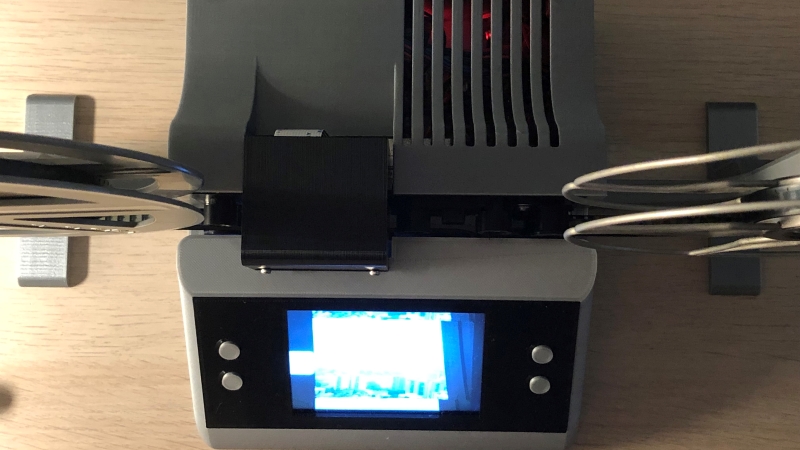
That was the goal of [Anton Gutscher]’s automated 8-mm film scanner. Yes, commercial services exist that will digitize movies, slides, and snapshots, but where’s the challenge in that? And a challenge is what it ended up being. Aside from designing and printing something like 27 custom parts, [Anton] also had a custom PCB fabricated for the control electronics. Film handling is done with a stepper motor that moves one frame into the scanner at a time for scanning and cropping. An LCD display allows the archivist to move the cropping window around manually, and individual images are strung together with ffmpeg running on the embedded Raspberry Pi. There’s a brief clip of film from a 1976 trip to Singapore in the video below; we find the quality of the digitized film remarkably good.
Hats off to [Anton] for stepping up as the family historian with this build. We’ve seen ad hoc 8-mm digitizers before, but few this polished looking. We’ve also featured other archival attempts before, like this high-speed slide scanner.


Nice! I’m looking forward to seeing the rest of the build instructions.
How do you diffuse the light source? I tried several variants of using a projector and photographing the image, but the light always tapered off in the corners, and was never white enough. Getting an even distribution of pure white light across a flat area is surprisingly hard.
I never could solve that issue, so I ended up buying a commercial film scanner (that was as slow as a dog.)
A mirror box and a lens will achieve a square of light with pretty even lighting across the projected square. The trick is to have the lens set to fucus on the end of the mirror box. There are instructions floating around the interwebs that will guide you through the process of making on what e correct size and shape.
If you can find a broken LCD monitor or TV somewhere, take it apart. Behind the LCD itself is several plastic diffuser sheets, and probably also a plastic plate of many tiny fresnel lenses for more diffusion. Cut that stuff down to the right size for your lamp and use it to get even lighting.
I’m doing my best to complete the building instructions as fast as possible.
To the diffuser: I’m simply using a 1mm white acrylic sheet. The light indeed tapers of towards the sides, but the area I’m actually using for the image is very even. I tried many different ways, but settled with this very simple one.
I appreciate the effort that went into this. I would not use the Pi camera, it’s rather poor. I would instead use a machine vision camera with something like an IMX249 sensor, which has a much higher dynamic range and much lower noise. These can usually be purchased with GPIO for triggering image capture so you can stick a hall sensor on the gate cam and rip frames to disk in real time over USB3. Take the projector lens off and point one of those ebay “microscope” lenses right at the film gate.
You can get a big improvement out of the Pi camera by removing the lens and projecting directly onto the image sensor. Then read RAW files rather than relying on the built in image processing pipeline. Its not as good as projecting into a hacked DSLR but its way easier.
thats something I need to try one day!
I’m sure there are better cameras / sensors out there. When I started the project, one of my thoughts was actually if the pi camera would be good enough and I presumed it is for my purpose.
However, I have posted the fusion 360 files, so anyone can modify for the use with different cameras or lenses. Would love to see that happen, since there are much more qualified people out there to do so :)
Cool project, very nicely executed, professional looking too!
Regarding: “Yes, commercial services exist that will digitize movies”
That’s very true, but becomes very expensive quickly depending on how many movies you need to convert. This combined with the initial thought of “how hard can it be” is enough to jump into such a project. Which in this case is nicely executed.
In my own situation I ended up with a videocamera pointing to a small screen. Sometimes that is really all you need. I was able this way to “convert” 8mm to DVD. My parent didn’t mind the slightly gentle flicker. They certainly do appreciate the fact that they can pop in a DVD whenever they want and relive those precious parts of their past (without the hassle of setting up the projector).
Hehehe… I mis-scanned the headline at first as claiming to bring family MEMBERS (rather than memories) back to life… Now _that_ would be one hell of a scanner (ala Merle Rideout & Roswell Bounce at least if not the full Victor Frankenstein).
Seriously, though, this looks like a neat idea and it could probably be adapted for different film formats and cameras (many standalone DSLRs for instance support locking the mirror and controlling the shutter, exposure, focus, etc. and downloading the resulting pictures over USB and have sufficient resolution that you could capture images from 16mm film too).
Not sure if that is a good idea, it is definitely an expensive one. With the 18fps frame rate of Super8, you will eat through even a Canon 1D MK4’s rated shutter life (300k exposures) in only 277 minutes of film.
No idea about 1d, but modern mirrorless cameras can use electronic shutter. So you can scan your entire film without any mechanical spending.
I had a slightly different idea. Film in 4k 60 fps and just pull the film slowly. The software tracks the frames, sprockets etc and saves corrected frames. It didn’t go very far unfortunately.
https://github.com/jphfilm/rpi-film-capture Just leaving that here, as that’s what I’m planning on building one day 🙂
Have a few more links since you mentioned rpi-film-capture :-)
Do keep an eye on the mailing list: https://groups.google.com/forum/#!forum/rpi-film-capture — lots of good posts regarding illumination, lenses and the types of projectors people have been hacking.
Dominique Galland is an active poster there, here is his implementation based on rpi-film-capture: https://github.com/dgalland/yart
On this page of his (in French) https://github.com/dgalland/yart/blob/master/yart.md he compares the RPi cameras (V1 vs V2), with and without colour calibration and also shows off his HDR results.