New Part Day: Sonoff USB Smart Adaptor Taps A New WiFi Chip

For decades, we dreamt of a future where all of our electronics used a standardized power connector. Most of us probably didn’t expect that USB would ultimately fill that role, but we’ll take what we can get if it means a future without getting a new wall wart for every piece of tech we buy. From soldering irons to laptops, the number of things you can power with a lowly USB cable these days is pretty incredible.

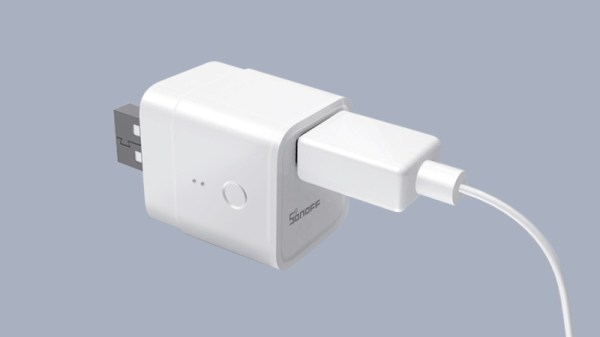
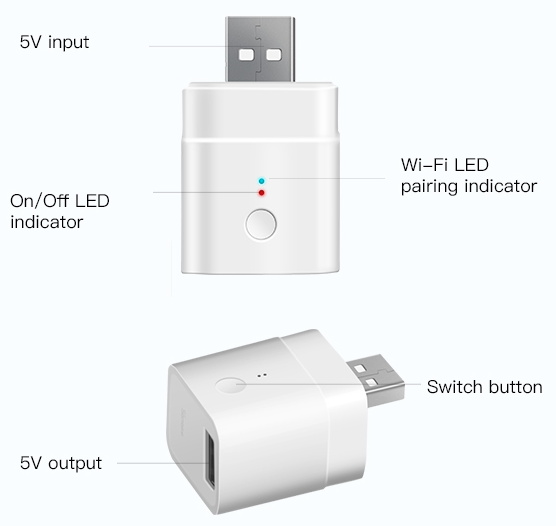
Which makes it all the more surprising it took so long for somebody to come up with a way to toggle USB devices off and on over the network. The Sonoff “USB Smart Adaptor”, which the company says will start shipping before the end of the year, is the logical evolution of their exceptionally popular mains voltage smart switches. The Smart Adapter is designed to go between the device and its existing power supply, allowing the user to drag any USB powered device kicking and screaming into their existing smart home setup. All for the princely sum of $6.50 USD.

In the video after the break, Sonoff gives a few potential uses of the Smart Adapter: from controlling a string of LEDs to limiting how long a smartphone is allowed to charge for. But really, there’s a nearly limitless number of devices which could be easily and cheaply integrated into your home automation routines thanks to this gadget.

On the other end of the spectrum, those who are looking to keep a tighter control on the ears and eyes that are active in their home could use the Smart Adapter to make sure their Google and Amazon listening devices assistants are only powered up during certain hours of the day.

Unfortunately, there’s a catch. Sonoff smart switches are best known, at least among the type of folks who read Hackaday, for the fact that they’re based on the eminently hackable ESP8266 microcontroller. Given the size of this product and its intended use, it would seem logical enough to assume this device also utilizes the insanely popular chip. But according to a Sonoff representative, the USB Smart Adapter won’t be using an ESP at all; leaving its hackability an open question until people can actually get their hands on them and start poking around.

Continue reading “New Part Day: Sonoff USB Smart Adaptor Taps A New WiFi Chip”

Custom Control Panels With Photogrammetry

One of the best applications for desktop 3D printing is the creation of one-off bespoke components. Most of the time a halfway decent pair of calipers and some patience is all it takes to model up whatever part you’re after, but occasionally things get complex enough that you might need a little help. If you ever find yourself in such a situation, salvation might be just a few marker scribbles away.

As [Mangy_Dog] explains in a recent video, he wanted to model a control panel for a laser cutter he’s been working on, but thought the shapes involved were a bit more than he wanted to figure out manually. So he decided to give photogrammetry a try. For the uninitiated, this process involves taking as many high-resolution images as possible of a given object from multiple angles, and letting the computer stitch that into a three dimensional model. He reasoned that if he had a 3D model of the laser’s existing front panel, it would be easy enough to 3D print some replacement parts for it.

That would be a neat enough trick on its own, but what we especially liked about this video was the tip that [Mangy_Dog] passed along about increasing visual complexity to improve the final results. Basically, the software is looking for identifiable surface details to piece together, so you can make things a bit easier for it by taking a few different colored markers and drawing all over the surface like a toddler. It might look crazy, but all those lines give the software some anchor points that help it sort out the nuances of the shape.

Unfortunately the markers ended up being a little more permanent than [Mangy_Dog] had hoped, and he eventually had to use acetone to get the stains off. Certainly something to keep in mind. But in the end, the 3D model generated was accurate enough that (after a bit of scaling) he was able to design a new panel that pops right on as if it was a factory component.

Hackaday readers may recall that when we last heard from [Mangy_Dog] he was putting the finishing touches on his incredible “Playdog Blackbone” handheld gaming system, which itself is a triumph of mating 3D printed components with existing hardware.

Continue reading “Custom Control Panels With Photogrammetry”

Adding USB-C To The TS100, But Not How You Think

USB-C has its special Power Delivery standard, and is capable of delivering plenty of juice to attached hardware. This has led many to modify their TS-100 soldering irons to accept the connector. [Jana Marie] is the latest, though she’s taken rather a different tack than you might expect.

[Jana] didn’t want to modify the original hardware or hack in an adapter. Instead, she struck out on her own, developing an entire replacement PCB for the TS-100 iron. The firmware is rough and ready, and minimal work has been done on the GUI and temperature regulation. However, reports are that functionality is good, and [Jana]’s demonstration shows it handling a proper desoldering task with ease.

Files are on Github for those that wish to spin their own. The PCB is designed to snap neatly inside the original case for a nice fit and finish. Power is plentiful too, as the hardware supports USB Power Delivery 2.0, which is capable of running at up to 100 W. On the other hand, the stock TS-80 iron, which natively supports USB-C, only works with Quick Charge 3.0, and thus is limited to a comparatively meager 36 W.

We’ve seen plenty of TS-100 hacks over 2019. Some have removed the standard barrel jack and replaced it with a USB-PD board. Meanwhile, others have created adapters that plug in to the back of the iron. However, [Jana] is dictating her own terms by recreating the entire PCB. Sometimes it pays to go your own way!

[Thanks to elad for the tip!]